In today’s digital landscape, maintaining reliable communication with website visitors is essential. Email plays a crucial role in fostering engagement and building trust, whether you’re sending transaction confirmations, contact form notifications, or newsletters. However, many WordPress site owners face the challenge of emails not being delivered properly or ending up in the dreaded spam folder. One effective solution to this problem is to create a SendGrid account, which can significantly improve email deliverability and ensure your messages reach the inbox every time.
If you’ve been struggling with poor email deliverability, you’re not alone. Fortunately, there’s a powerful solution—SendGrid. In this guide, we’ll walk you through how to create a SendGrid account, configure it with your WordPress site, and use the WP SMTP pluginA plugin is a software component that adds specific features and functionality to your WordPress website. Esse… More to enhance email deliverability. By the end of this tutorial, your WordPress emails will be sent reliably, ensuring they land in the inbox, not the spam folder.
What is SendGrid?
Before diving into the setup process, let’s quickly review what SendGrid is and why it’s a game-changer for WordPress users.
SendGrid is a cloud-based email delivery service designed to help businesses send large volumes of email without having to manage email servers themselves. It ensures high email deliverability, which means your emails are more likely to land in the inbox rather than get lost in spam folders. With features like email tracking, analytics, and email list management, SendGrid offers everything you need to ensure that your email campaigns and transactional emails are sent smoothly.

Why Use SendGrid for WordPress?
- High Deliverability: SendGrid is optimized for inbox delivery, so your emails don’t end up in spam.
- Scalability: Whether you’re a small blog or a growing eCommerce site, SendGrid can handle large volumes of email effortlessly.
- Ease of Integration: SendGrid seamlessly integrates with WordPress, making it simple for site owners to configure email functionality.
How to Create a SendGrid Account
Now that we understand the benefits of SendGrid, let’s get started by creating an account and configuring it to work with WordPress.
Step 1: Visit the SendGrid Website
To begin, navigate to SendGrid’s website. Once there, click on the Sign Up button located in the top-right corner.
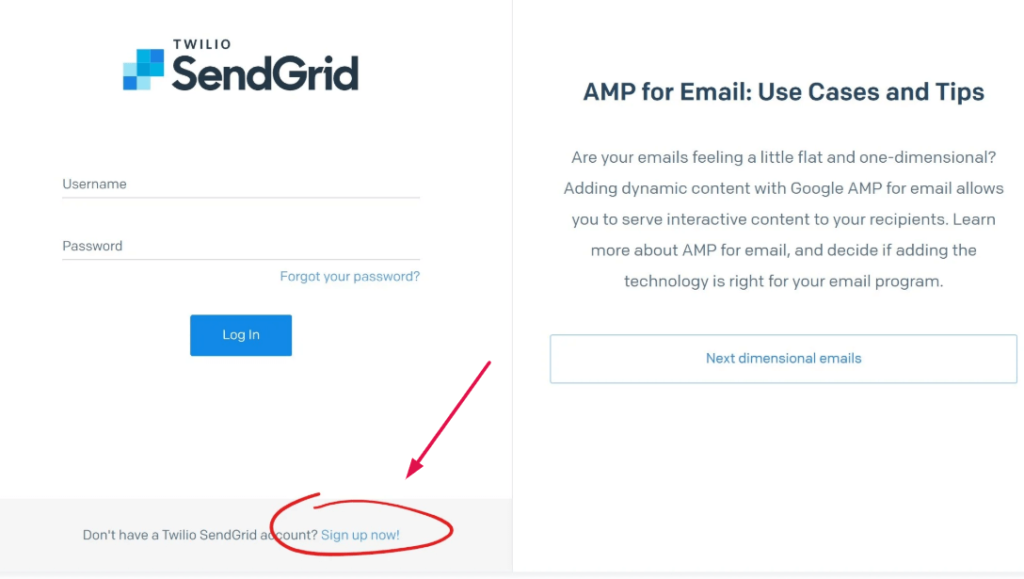
Step 2: Sign Up for a Free Account
SendGrid offers both free and paid plans. For most WordPress users, the Free Tier is sufficient to start. It allows you to send up to 100 emails per day, which is perfect for small to medium-sized sites. To sign up, you’ll need to enter your email address and create a password or sign up via your Google account.
Step 3: Verify Your Email Address
After signing up, you’ll need to verify your email address. Check your inbox for a verification email and click the link to complete your account activation.
Step 4: Set Up Your Sender Identity
Once your account is active, you’ll need to set up your sender identity. This step ensures that your emails are properly authenticated, making them more likely to be delivered to recipients’ inboxes.
- Add a sender email address that you’ll be using for sending emails (this could be an email like “support@yourdomain.com“).
- Verify your domain to prevent your emails from being flagged as spam. Follow the instructions in SendGrid to add the necessary DNS records for domain authentication (DKIM and SPF).
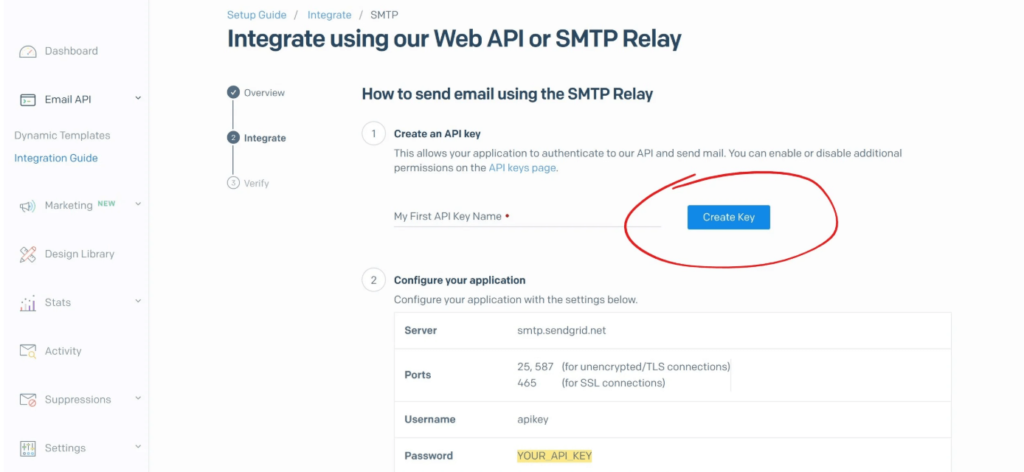
Step 5: Generate an API Key
The final step in the SendGrid setup process is generating an API key. This API key will allow you to connect your WordPress site with SendGrid.
- In the SendGrid dashboardIn WordPress, the Dashboard is a central hub for managing a website’s content and settings. It is the first sc… More, navigate to Settings > API Keys.
- Click Create API Key, give it a name (e.g., “WordPress Integration”), and select Full Access to allow it to send emails on your behalf.
- Copy the API key—it will be used in the next steps when setting up WP SMTP.
What is the WP SMTP Plugin?
Now that your SendGrid account is set up, let’s talk about the WP SMTP plugin.
The WP SMTP plugin is a simple yet powerful WordPress tool that allows you to send emails using an external SMTP server, like SendGrid. By configuring WP SMTP, you’ll bypass WordPress’s default email function, which often leads to deliverability issues. This plugin ensures that your emails are sent securely and reliably, improving your site’s overall email performance.
Why WP SMTP?
- Improved Deliverability: WP SMTP allows you to send emails through a trusted third-party service, like SendGrid, ensuring your messages make it to the inbox.
- Simple Integration: It’s user-friendly and integrates seamlessly with SendGrid, so you don’t need to be a developer to set it up.
Installing and Configuring the WP SMTP Plugin on WordPress
Let’s walk through the process of installing the WP SMTP plugin and connecting it to SendGrid.
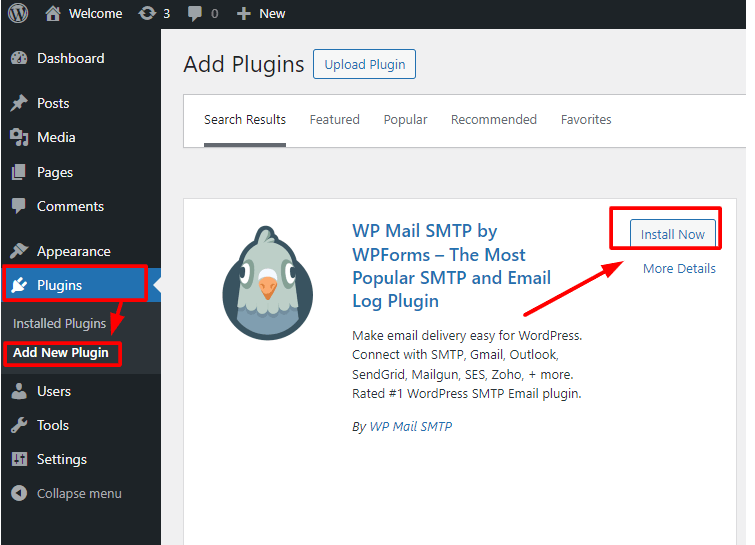
Step 1: Install the WP SMTP Plugin
- In your WordPress dashboardIn WordPress, the Dashboard is a central hub for managing a website’s content and settings. It is the first sc… More, go to Plugins > Add New.
- Search for “WP SMTP” in the search bar and click Install Now next to the plugin by WPForms.
- Once installed, click Activate.
Step 2: Access the WP SMTP Plugin Settings
- After activation, you’ll find the WP SMTP plugin under Settings > WP SMTP in your WordPress dashboard.
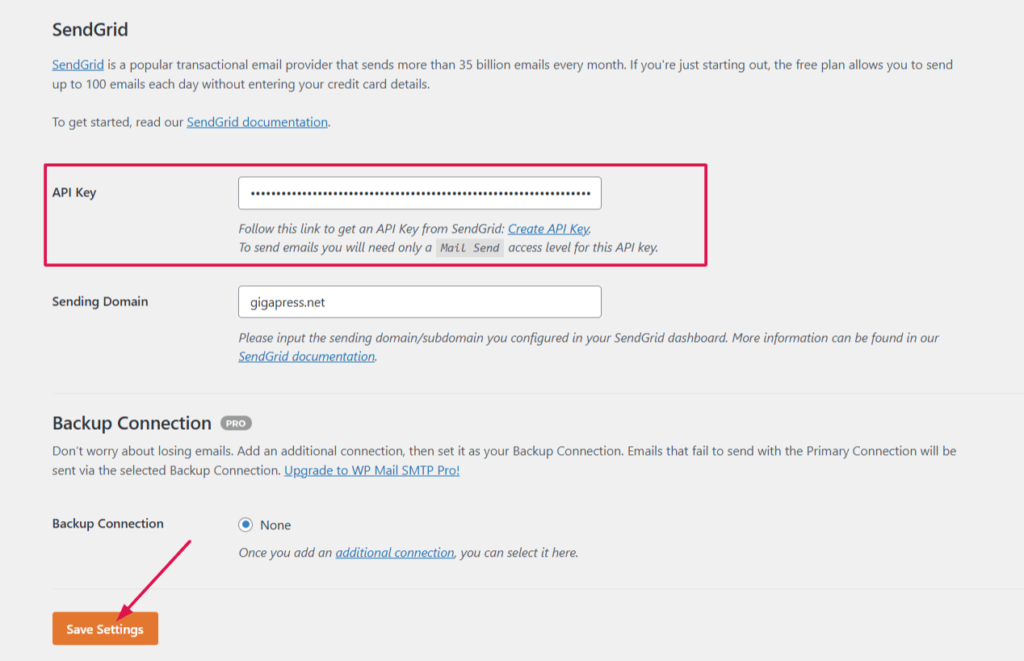
Step 3: Enter SendGrid API Key in WP SMTP Settings
- In the WP SMTP settings pageIn WordPress, a page is a content type that is used to create non-dynamic pages on a website. Pages are typica… More, you’ll need to input your SendGrid API key:
- From Email: Enter the email address you’ll be using for sending emails (the same one you verified in SendGrid).
- From Name: Enter the name that will appear in the sender field (e.g., “Your Site Name”).
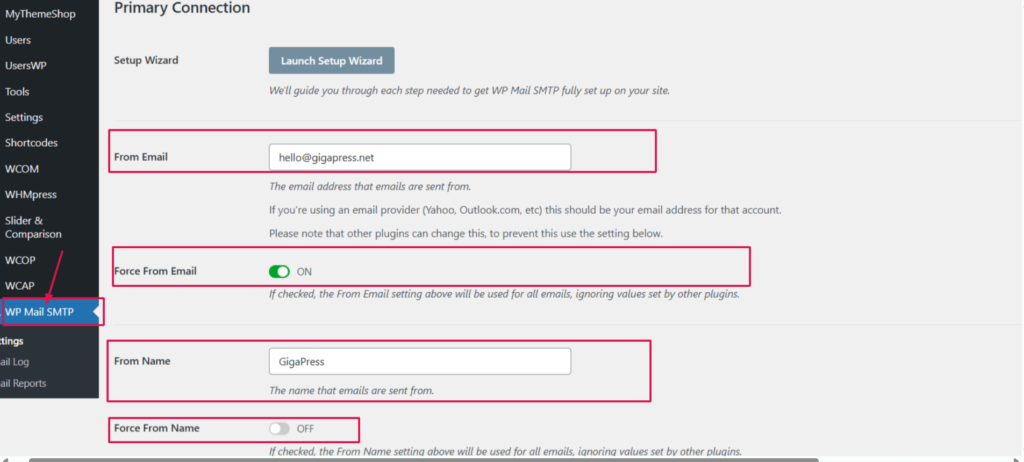
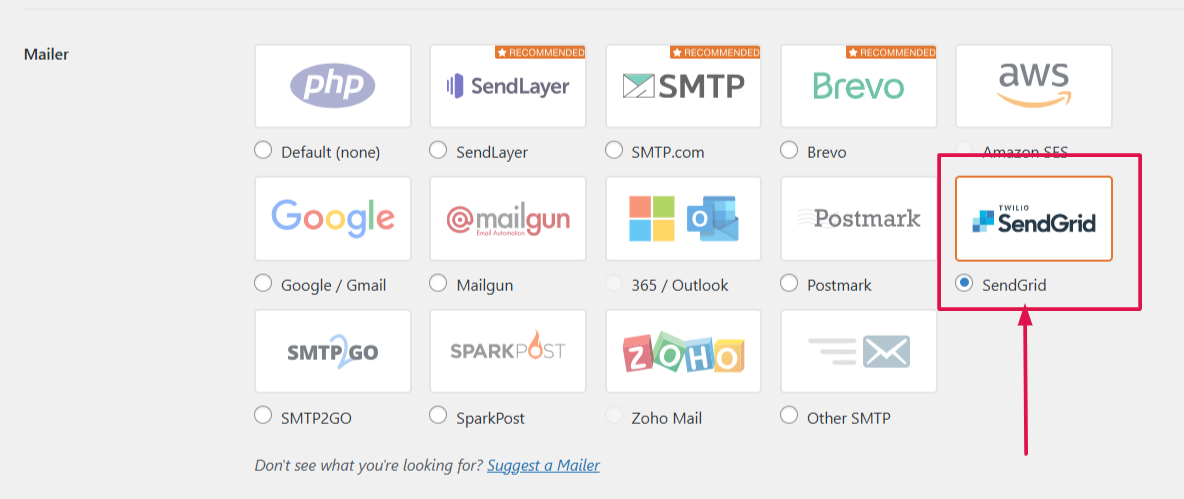
- Mailer: Select SendGrid from the dropdown menuIn WordPress, a menu is a collection of links that are displayed as a navigation menu on a website. Menus are … More.
Step 4: Test Your Email Configuration
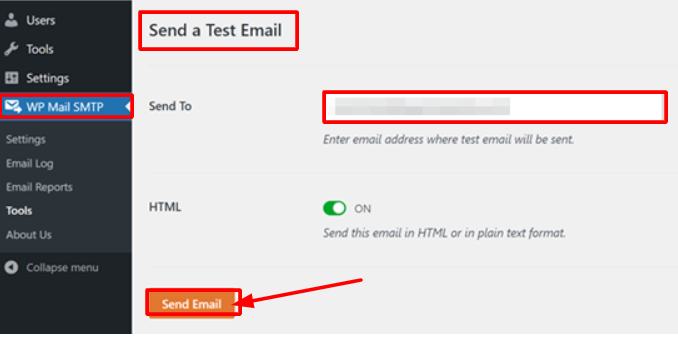
To ensure everything is set up correctly, use the Send Test Email function within WP SMTP. Enter an email address (preferably one that you control) and send a test email. Check your inbox to confirm that the email was delivered successfully.
Troubleshooting Common Issues
While SendGrid and WP SMTP are reliable tools, here are some common issues you may encounter and how to resolve them.
1. Emails Going to Spam
To avoid having your emails marked as spam:
- Authenticate your domain: Ensure you’ve set up DKIM and SPF records correctly in SendGrid.
- Use a consistent “From” name and email to build a trusted sender reputation.
2. Authentication Failures
If your emails aren’t being sent, double-check your API key and SMTP settings in WP SMTP. Ensure the SMTP Username is set to apikey, and the SMTP Password is your SendGrid API key.
3. Incorrect Plugin Configuration
If you notice issues with the plugin:
- Verify all the SMTP details.
- Ensure your SendGrid account is active and not exceeding its sending limits.
4. SendGrid Limits and Quotas
If you’re on the free plan and sending more than 100 emails per day, you’ll hit your SendGrid quota. Consider upgrading to a paid plan if your site needs to send more emails.
Best Practices for Using SendGrid and WP SMTP
To maximize your email deliverability and make the most of SendGrid’s features, follow these best practices:
- Monitor Deliverability: Keep an eye on your email statistics via SendGrid’s dashboard, which provides insights into open rates, bounce rates, and more.
- Security: Ensure your API keys are stored securely. Never share them publicly.
- Scaling: As your site grows, consider upgrading to a higher-tier SendGrid plan to accommodate more email sends and gain access to advanced features like email analytics.
- Test Regularly: Periodically test your email setup to ensure everything works smoothly, especially after plugin or WordPress updates.
How to Add the SPF, DKIM, and TXT records in DNS
To add SPF, DKIM, and TXT records to your DNS, follow these steps. These records are essential for email authentication and help improve your email deliverability and prevent your emails from being marked as spam.
Steps to add SPF, DKIM, and TXT records in DNS
Login to your DNS Hosting Provider:
- Go to your DNS hosting provider’s control panel.
- Log in to your account.
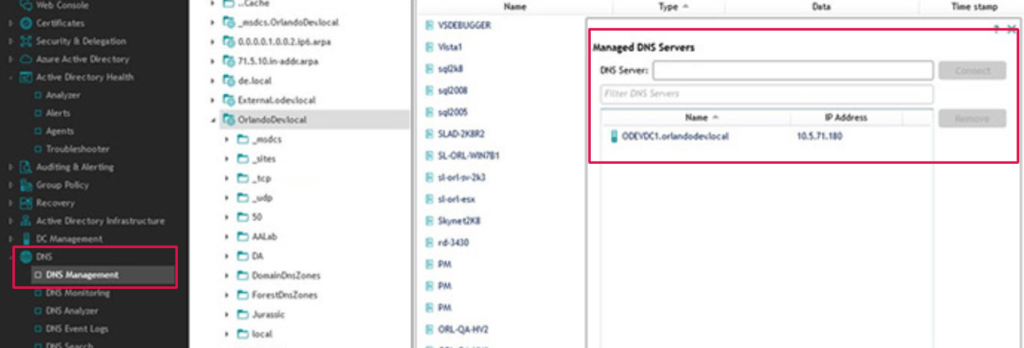
Navigate to DNS Management:
- Find the DNS settings section (it might be labeled “DNS Management”, “DNS Zone File”, or “Manage DNS”).
Add an SPF Record: The SPF (Sender Policy Framework) record is a TXT record that specifies which mail servers are allowed to send emails on behalf of your domain.
- Record Type: TXT
- Name/Host:
@(or leave it blank for the root domain) - Value: Your SPF record, for example:
v=spf1 include:_spf.google.com ~all- TTL: Leave the TTL (Time to Live) value as default or set it to 3600 seconds (1 hour).
- This SPF record means that Google’s mail servers are allowed to send emails on behalf of your domain.
- The
~allat the end indicates a soft fail for any server that isn’t listed, meaning emails sent from unauthorized servers may still be delivered but flagged as suspicious.
Add a DKIM Record: DKIM (DomainKeys Identified Mail) adds a digital signature to your emails, which allows the receiving server to verify that the email has not been tampered with and is from a trusted source.
- Record Type: TXT
- Name/Host:
selector._domainkey(replaceselectorwith the name you used for your DKIM key; it’s typically generated by your email provider, likegooglefor G Suite). - Value: The DKIM public key, which is provided by your email service provider (like Google or Office 365). It will look something like this:
v=DKIM1; k=rsa; p=MIIBIjANBgkqh... (long public key here)- The
p=part will contain the long public key that is used to verify the authenticity of your email. - TTL: Leave it as default or set it to 3600 seconds (1 hour).
Add a TXT Record (if needed for other purposes): Sometimes you might need to add additional TXT records for verification or other configurations like DMARC or custom settings. These are also added as TXT records.
- Record Type: TXT
- Name/Host:
@(or leave it blank for the root domain) - Value: The specific text that you need to verify or configure. For example, if you are setting up DMARC, you might add:
v=DMARC1; p=none; rua=mailto:dmarc-reports@yourdomain.com- TTL: Leave it as default or set it to 3600 seconds (1 hour).
Example of Records:
- SPF record:
Name: @
Type: TXT
Value: v=spf1 include:_spf.google.com ~all
TTL: 3600- DKIM record:
Name: google._domainkey
Type: TXT
Value: v=DKIM1; k=rsa; p=MIIBIjANBgkqh... (long public key here)
TTL: 3600- DMARC record (if applicable): yamlCopy code
Name: _dmarc Type: TXT Value: v=DMARC1; p=none; rua=mailto:dmarc-reports@yourdomain.com TTL: 3600
Save Changes: After adding the required records, click the save or update button to apply the changes.
Wait for DNS Propagation: DNS changes can take anywhere from a few minutes to 48 hours to propagate across the internet, but they usually take a few hours.
Verify the Records: Once the records are added and propagated, you can verify that the SPF, DKIM, and TXT records are set up correctly by using online tools such as:
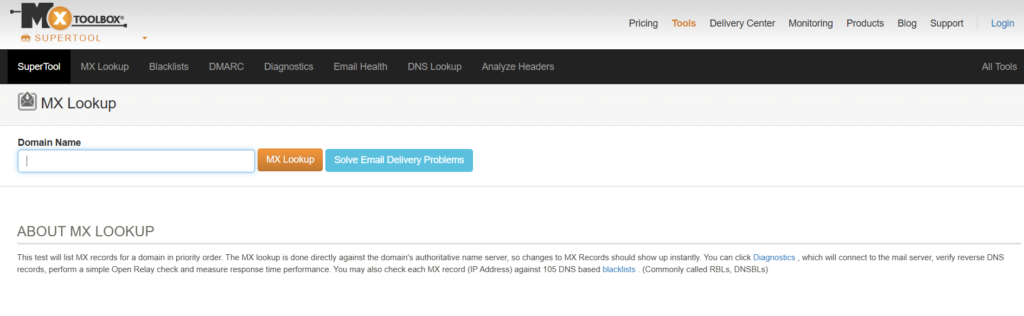
If you are using a third-party email service (like Gmail, Office 365, or Mailchimp), they will typically provide you with the exact values you need to add for SPF, DKIM, and other records, so make sure to follow their specific instructions.
Conclusion: Ready to Create a SendGrid Account?
In this tutorial, we’ve shown you how to create a SendGrid account, configure it with WordPress, and send emails reliably using the WP SMTP plugin. By following these steps, you’ll improve your email deliverability and enhance your site’s communication with users. Whether you’re running a small blog or an online store, SendGrid paired with WP SMTP ensures your emails are sent securely and reliably every time.
Start setting up SendGrid today, and enjoy improved email performance for your WordPress site. If you run into any issues or have questions, feel free to leave a comment below, and we’ll be happy to assist you.
Tired of email delivery issues? Get fast WordPress hosting, automatic updates, and learn how to create a SendGrid account to fix it. See our hosting packages by clicking the button below:
![How to Center Title in WordPress [A Beginner's Visual Guide]](https://codingheros.com/wp-content/webp-express/webp-images/uploads/2024/06/how-to-center-title-in-wordpress-a-beginners-visual-guide.png.webp)


