To use WordPress, log in to your dashboard at yoursite.com/wp-admin, set your site title, pick a theme, then create pages and posts in the block editor. You change the design in Appearance > Editor (block themes) or Appearance > Customize (classic themes), add features with plugins, and keep everything updated and backed up. That’s the whole loop, and this guide walks you through each part with real screenshots.
I tested every step on a fresh install of WordPress 7.1.4 with the default Twenty Twenty-Five theme (version 1.5), November 2026. If you’re using an older version, most screens look the same, but a few menu names may differ.
| What you want to do | Where to do it in WordPress |
|---|---|
| Log in | yoursite.com/wp-admin |
| Change the site name and tagline | Settings > General |
| Choose or change your theme | Appearance > Themes |
| Create a page (About, Contact) | Pages > Add Page |
| Write a blog post | Posts > Add Post |
| Edit the header, footer, colors and fonts | Appearance > Editor (block themes) or Appearance > Customize (classic themes) |
| Edit your menu | Appearance > Editor > Navigation (block themes) or Appearance > Menus (classic themes) |
| Add a feature, such as a contact form | Plugins > Add Plugin |
| Choose what your homepage shows | Settings > Reading |
| Set clean URLs | Settings > Permalinks |
Before You Start: Which WordPress Are You Using?
This guide is for self-hosted WordPress, the free software from WordPress.org that you install on your own hosting. WordPress.com is a hosted service built on the same software, so the editor looks similar, but its plans limit some things, like which plugins you can install.
If you don’t have a site yet, you have two easy options:
Step 1: Log In and Find Your Way Around the Dashboard
Go to yoursite.com/wp-admin (replace yoursite.com with your domain) and log in with the username and password you chose when WordPress was installed. If that address doesn’t work, my guide on logging in to WordPress covers the other login URLs and what to do when you’re locked out.
After you log in, you land on the Dashboard:
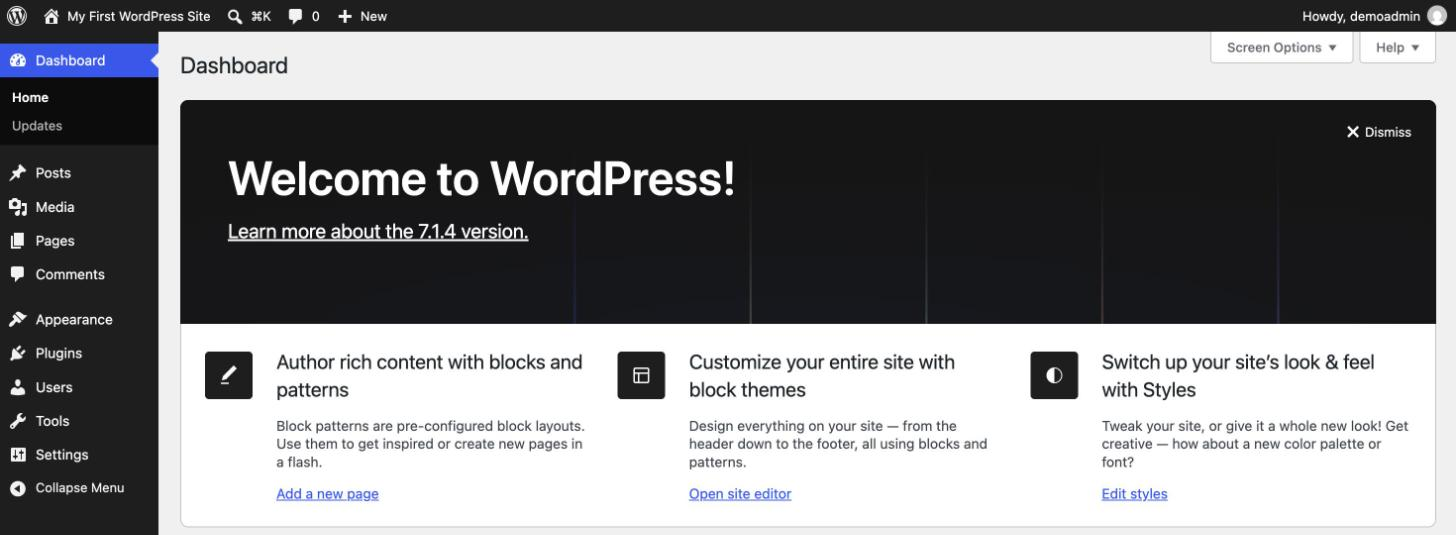
The menu on the left is the part to learn first. Here’s what each item does:
- Posts: blog articles, shown newest first.
- Media: every image, PDF and video you upload.
- Pages: standalone pages such as Home, About and Contact.
- Comments: approve, reply to or delete comments.
- Appearance: your theme and your site’s design.
- Plugins: add-ons that give your site new features.
- Users: your profile and anyone else who can log in.
- Tools and Settings: site-wide options, imports and exports.
The black bar across the top is the admin toolbar. Click your site name in it to view your site the way visitors see it, and use + New to start a post or page from anywhere.
Step 2: Set Your Site Title, Homepage and Links
Three settings are worth changing before you add any content, because changing them later is more work.
Site Title and Tagline
Go to Settings > General. Type your site’s name in Site Title and a short description in Tagline, then click Save Changes at the bottom. Many themes show both in the header and in browser tabs. If your site still says “Just another WordPress site”, see how to change the default tagline.
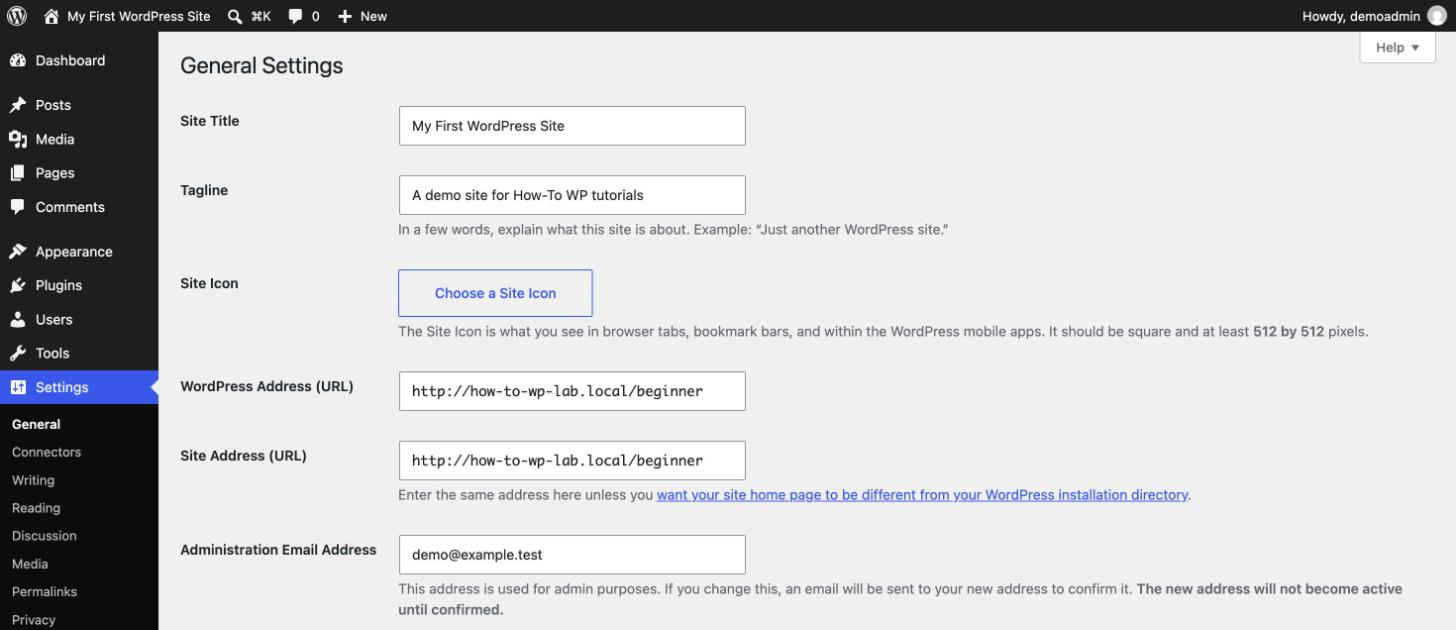
Leave WordPress Address and Site Address alone unless you know why you’re changing them. A typo there can lock you out of your own site.
What Your Homepage Shows
Go to Settings > Reading. By default, your homepage shows your latest posts, like a blog. If you want a fixed welcome page instead, create that page first (Step 4), then choose A static page and pick it as the Homepage.
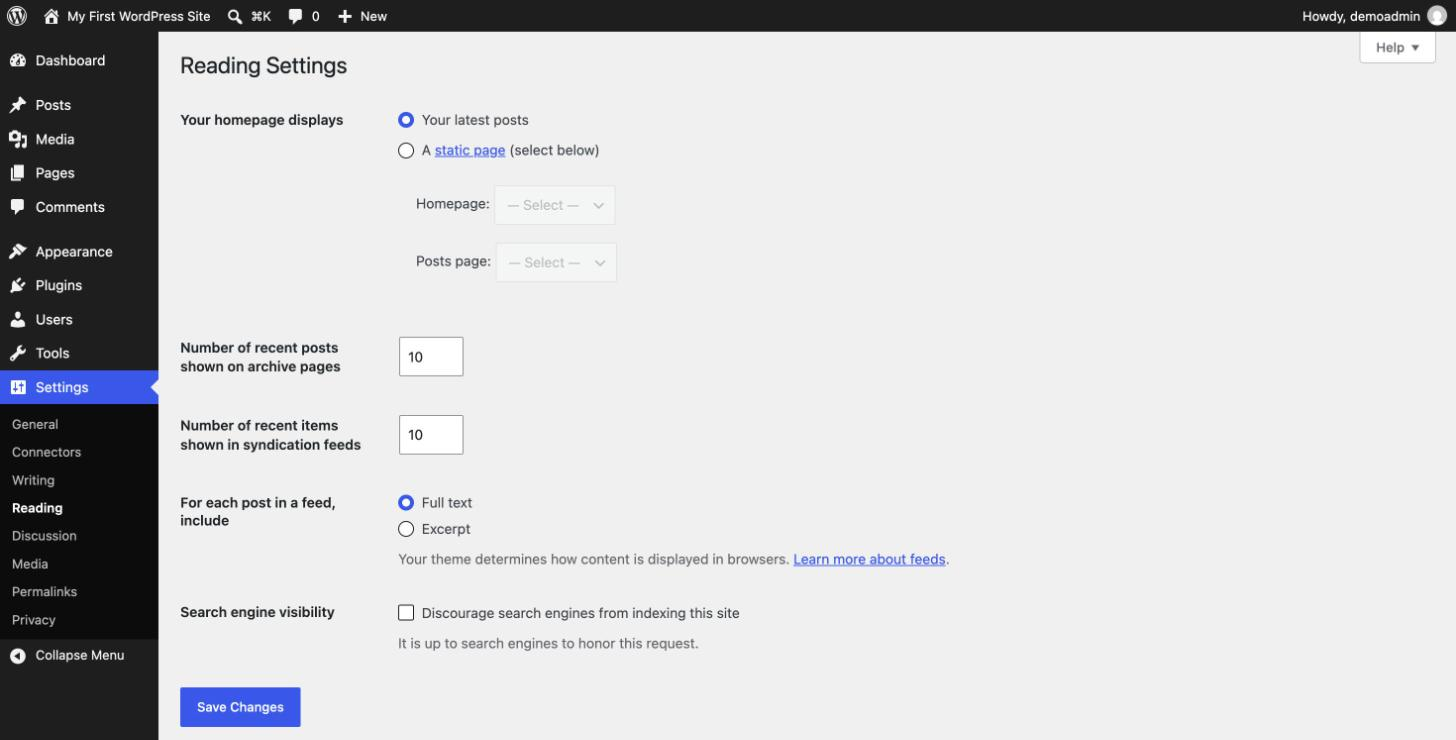
On the same screen, check that Discourage search engines from indexing this site is unticked once your site is live. If it’s ticked, Google is asked not to show your site.
Clean Links (Permalinks)
Go to Settings > Permalinks. On my fresh install, WordPress used Plain links such as ?p=123. Choose Post name so your links read like yoursite.com/about-me/, then click Save Changes. Some hosts set this for you, so it may already be selected.
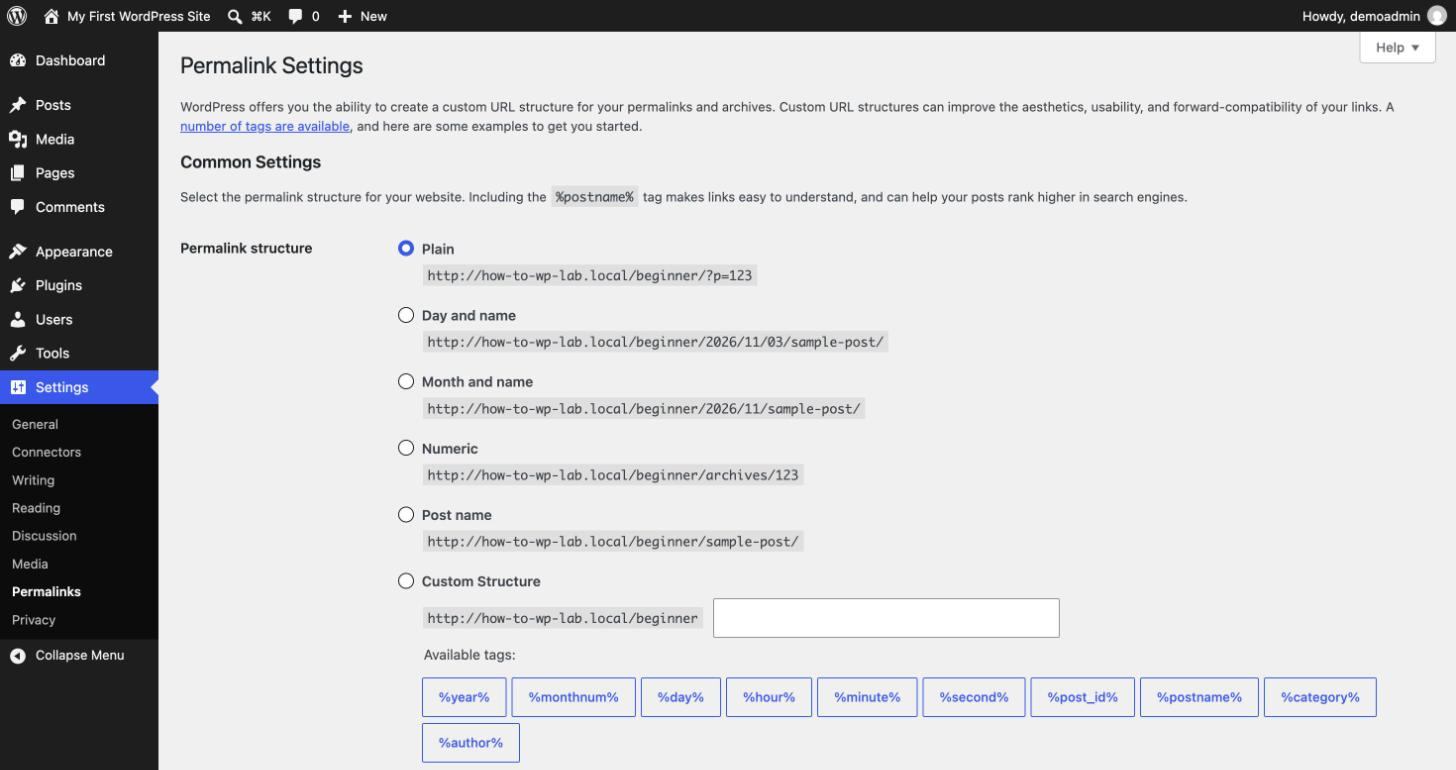
Do this on a new site. Changing the structure on an established site changes every URL, so old links need redirects. If links show “Page not found” after a change, see how to fix permalinks that stop working.
Step 3: Choose a Theme (and Check Which Kind It Is)
Your theme controls how your site looks. Go to Appearance > Themes to see the active theme, and click Add Theme to browse thousands of free ones. Hover over a theme and click Activate to switch.
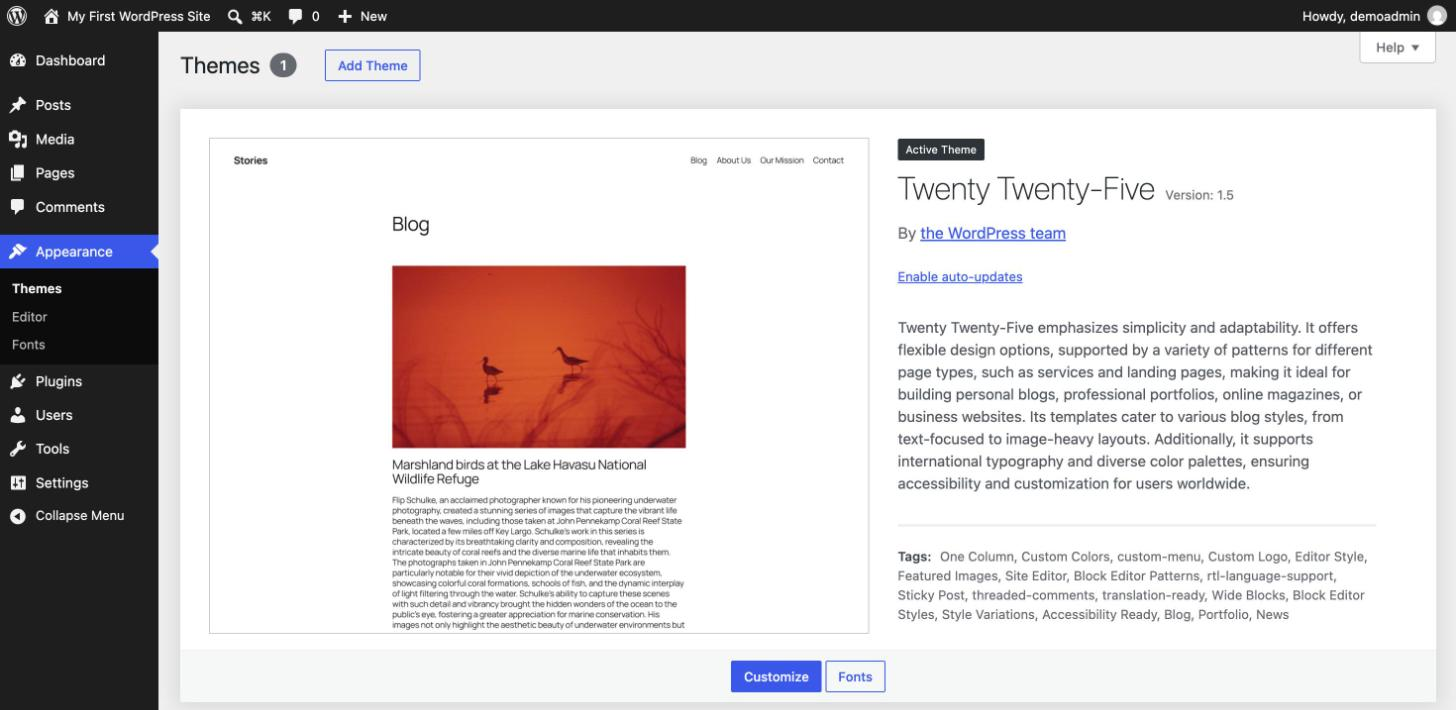
Before you go further, check which kind of theme you have, because it changes where almost every design setting lives:
| Block theme | Classic theme | |
|---|---|---|
| How to tell | Appearance shows Editor | Appearance shows Customize, and often Menus and Widgets |
| Header, footer, layout | Edited with blocks in the Site Editor | Theme options in the Customizer |
| Menus | Navigation block in the Site Editor | Appearance > Menus |
| Examples | Twenty Twenty-Five, Twenty Twenty-Four | Twenty Twenty-One, Astra, Kadence |
Both kinds are fine. Block themes let you edit everything with the same blocks you use for content. Classic themes are older, but many popular ones have years of polish and plenty of options. If you’re still deciding, read how to choose a WordPress theme, and if you already have content, check the things to do before changing your theme.
Step 4: Create Your First Page
Pages are for content that doesn’t change often, such as Home, About, Services and Contact. Posts are for dated articles. To create a page, go to Pages > Add Page.
Step 1: Pick a Pattern or Start Blank
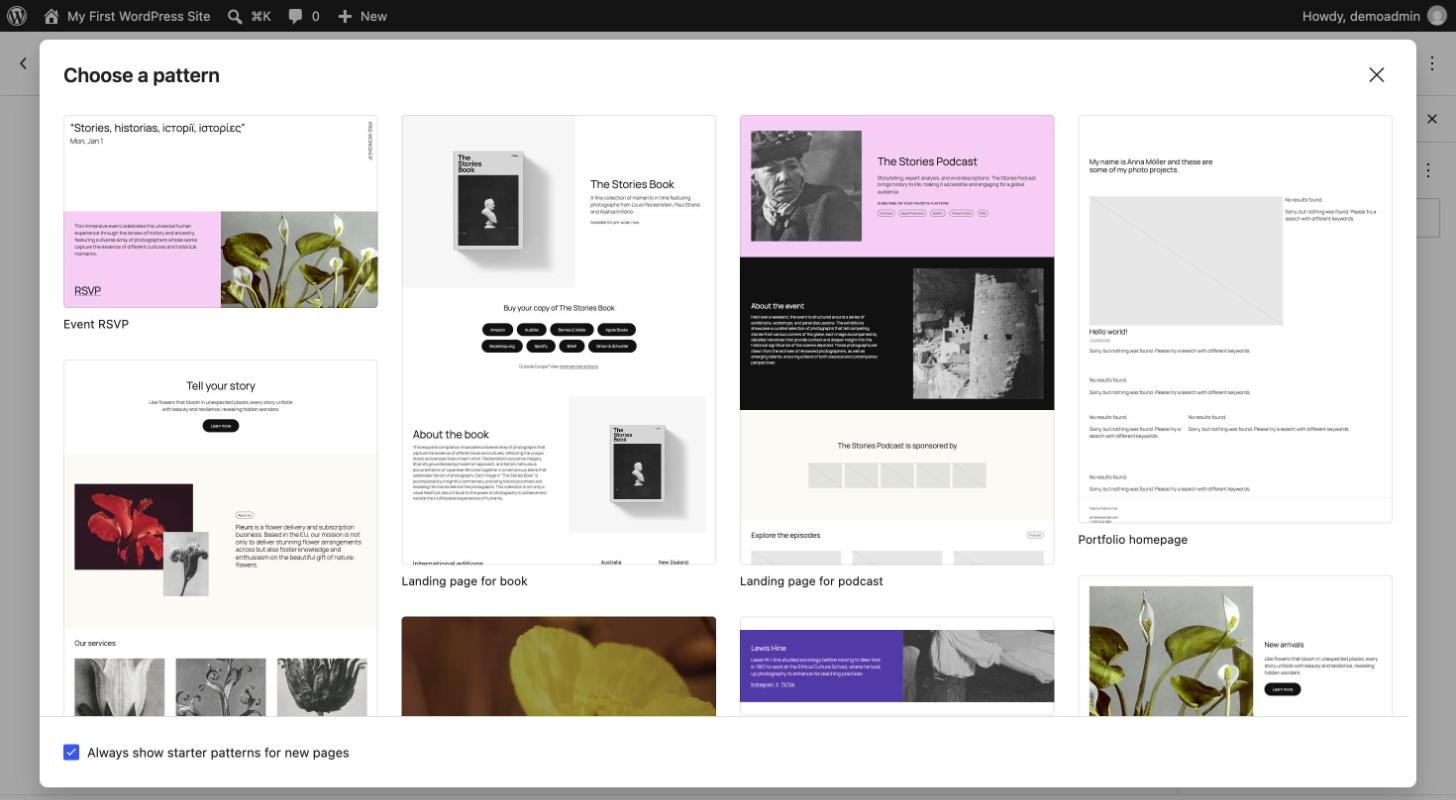
With a block theme, WordPress first shows a Choose a pattern window full of ready-made layouts. Click one to start from it, or close the window with the X to start with a blank page. Untick Always show starter patterns for new pages if you don’t want to see it every time.
Step 2: Add a Title and Blocks
Click Add title and type the page name, then press Enter and start typing. Everything on the page is a block: each paragraph, heading, image and button is its own block that you can move, style or delete.
To add a different block, click the blue + at the top left to open the block list, or type / on an empty line followed by the block name, such as /image or /heading.
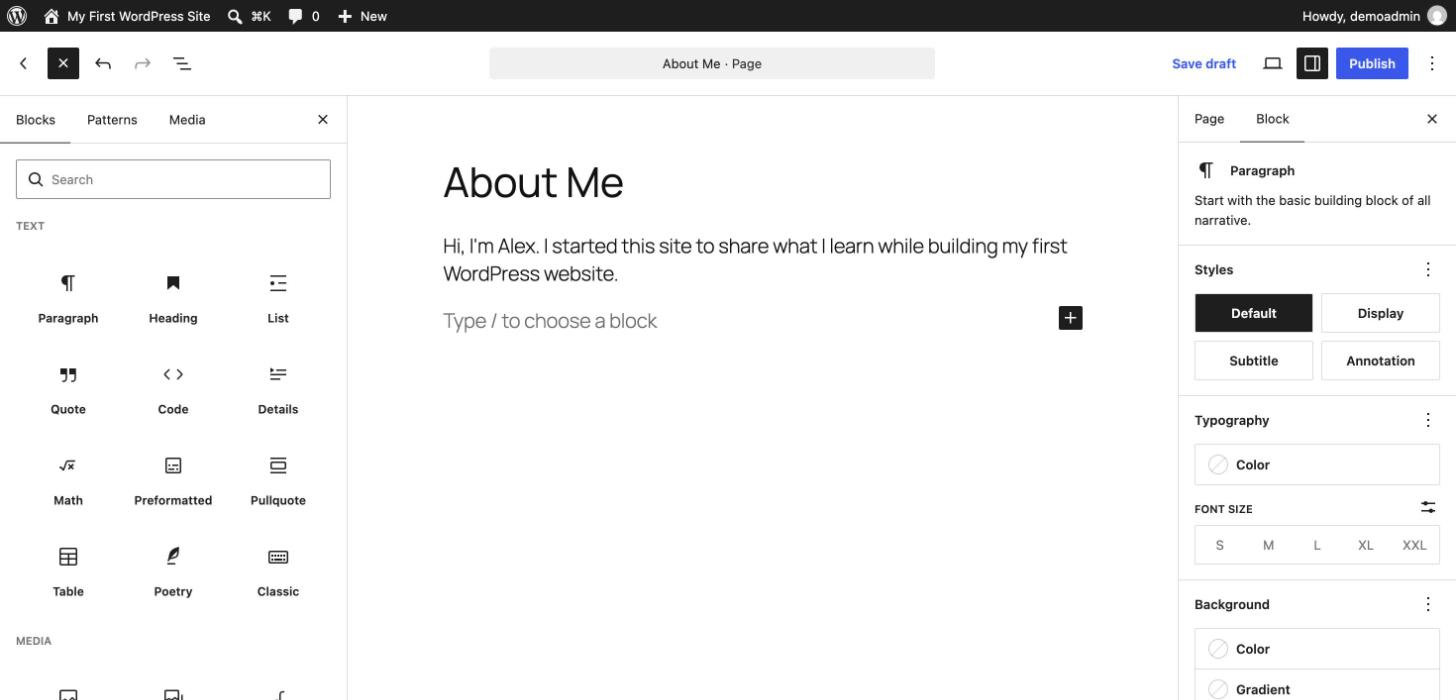
The panel on the right has two tabs. Page holds settings for the whole page, such as the URL slug and featured image. Block holds settings for whatever block you’ve selected, such as its color and font size.
Step 3: Save or Publish
Click Save draft to keep working later, or Publish when you’re ready. WordPress asks you to confirm first and shows who can see the page and when it goes live:
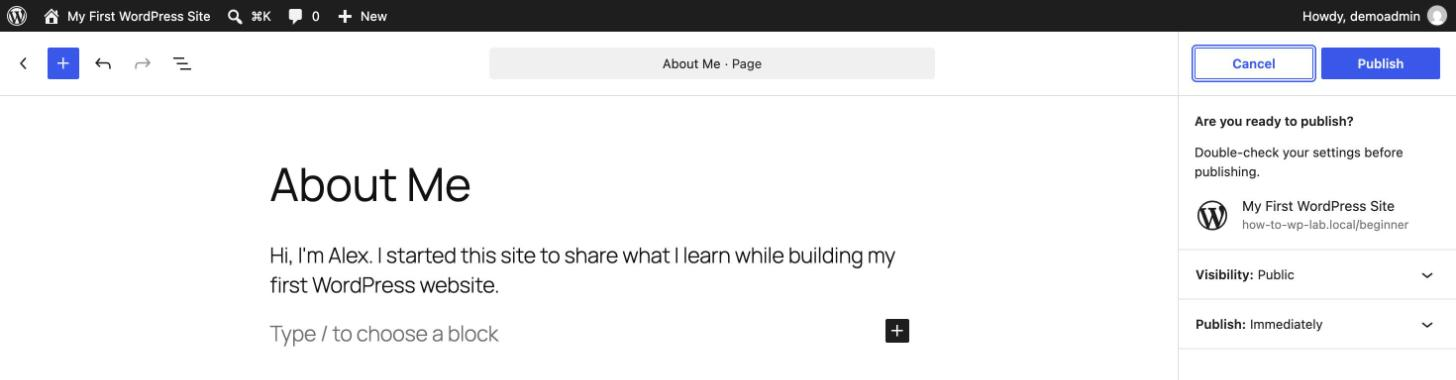
Click Publish again and the page is live. To make changes later, open it from Pages, edit it and click Save. You can also duplicate a page to reuse its layout, or unpublish a page you no longer want public.
Step 5: Write Your First Blog Post
Posts use the same editor as pages. Go to Posts > Add Post, add a title and your content, and publish it the same way. Two settings matter more for posts than for pages, and both are in the Post tab of the right panel:
- Categories: the main topics of your site, such as Recipes or Travel. Give each post one main category so readers and search engines can follow your structure.
- Tags: optional, more specific labels. They aren’t SEO keywords, so don’t add dozens.
Also set a featured image. Most themes show it on your blog page and when the post is shared on social media. WordPress deletes nothing when you change your mind: every save creates a revision you can restore from the right panel.
Step 6: Customize Your Design
Where you change the design depends on the theme type you checked in Step 3.
Block Themes: the Site Editor
Go to Appearance > Editor. The Site Editor opens with a menu on the left and a live preview of your site on the right:
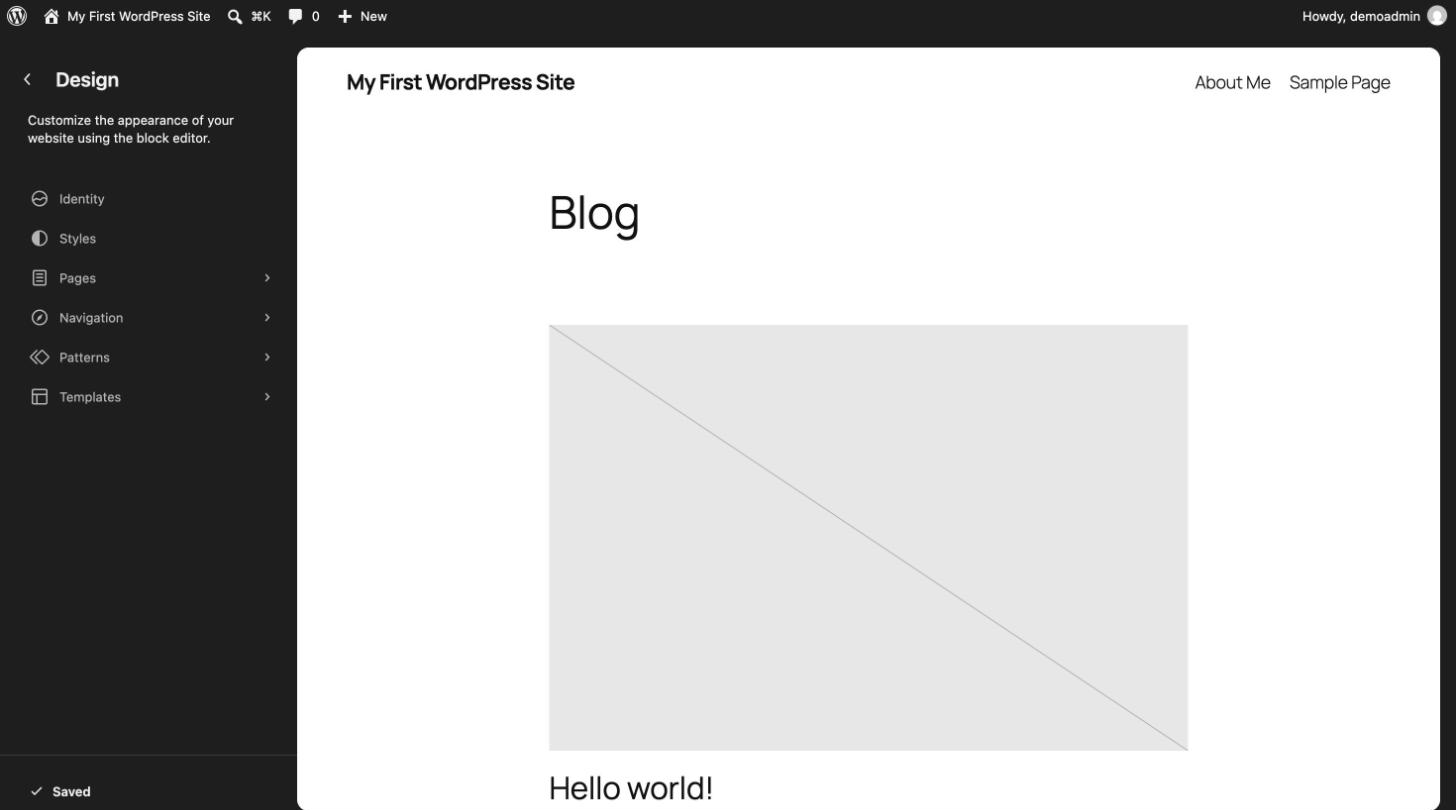
- Identity: site title, tagline and logo.
- Styles: fonts, colors and spacing for the whole site.
- Navigation: your menus.
- Patterns: reusable sections, including the header and footer.
- Templates: the layout used for each kind of page, such as single posts and the blog page.
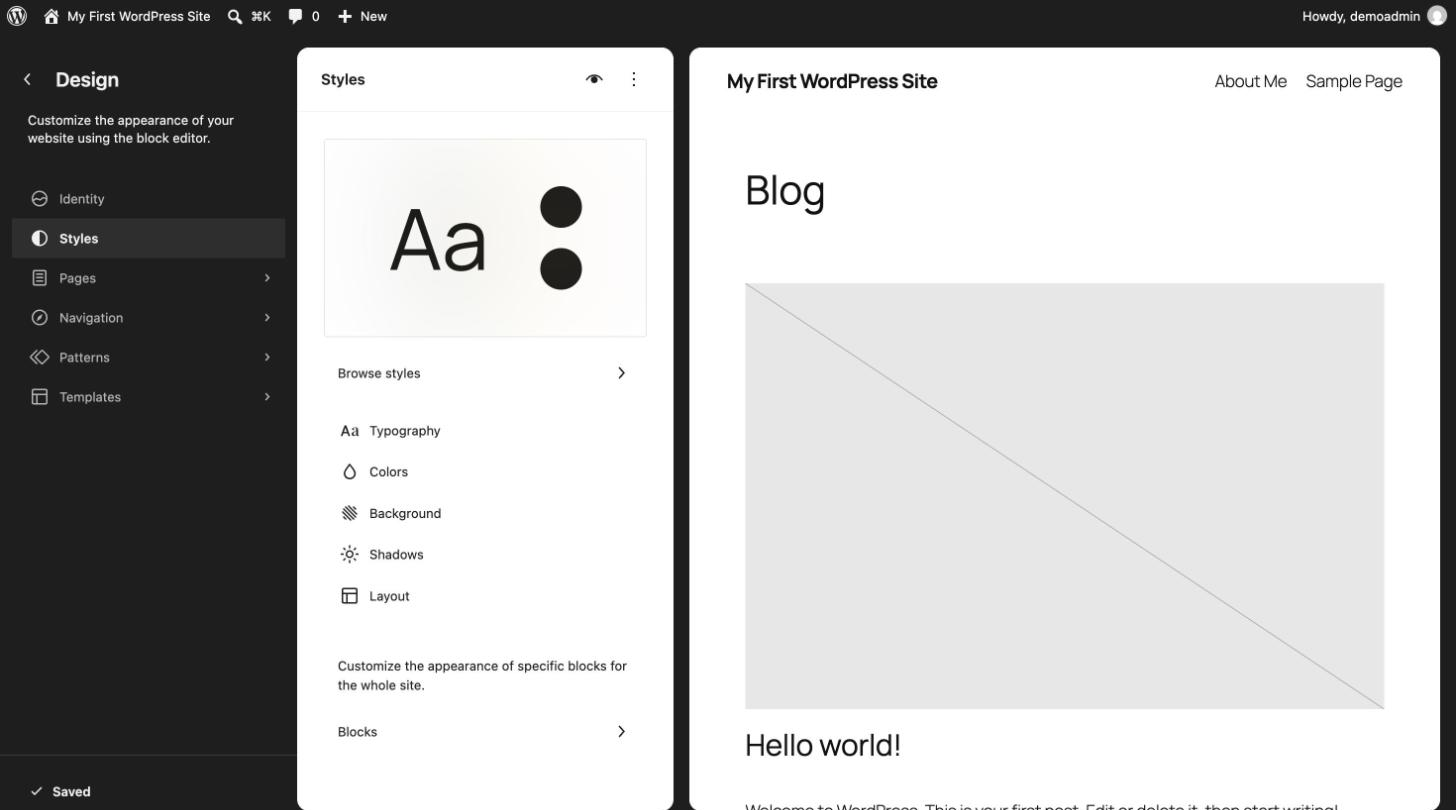
Open Styles to change the look of the whole site at once. Browse styles switches between the color and font combinations your theme includes, and Typography and Colors let you fine-tune them:
Open Navigation to manage your menu. On my test site, the About Me page I published in Step 4 appeared in the menu automatically, because the default menu lists your pages until you build your own:
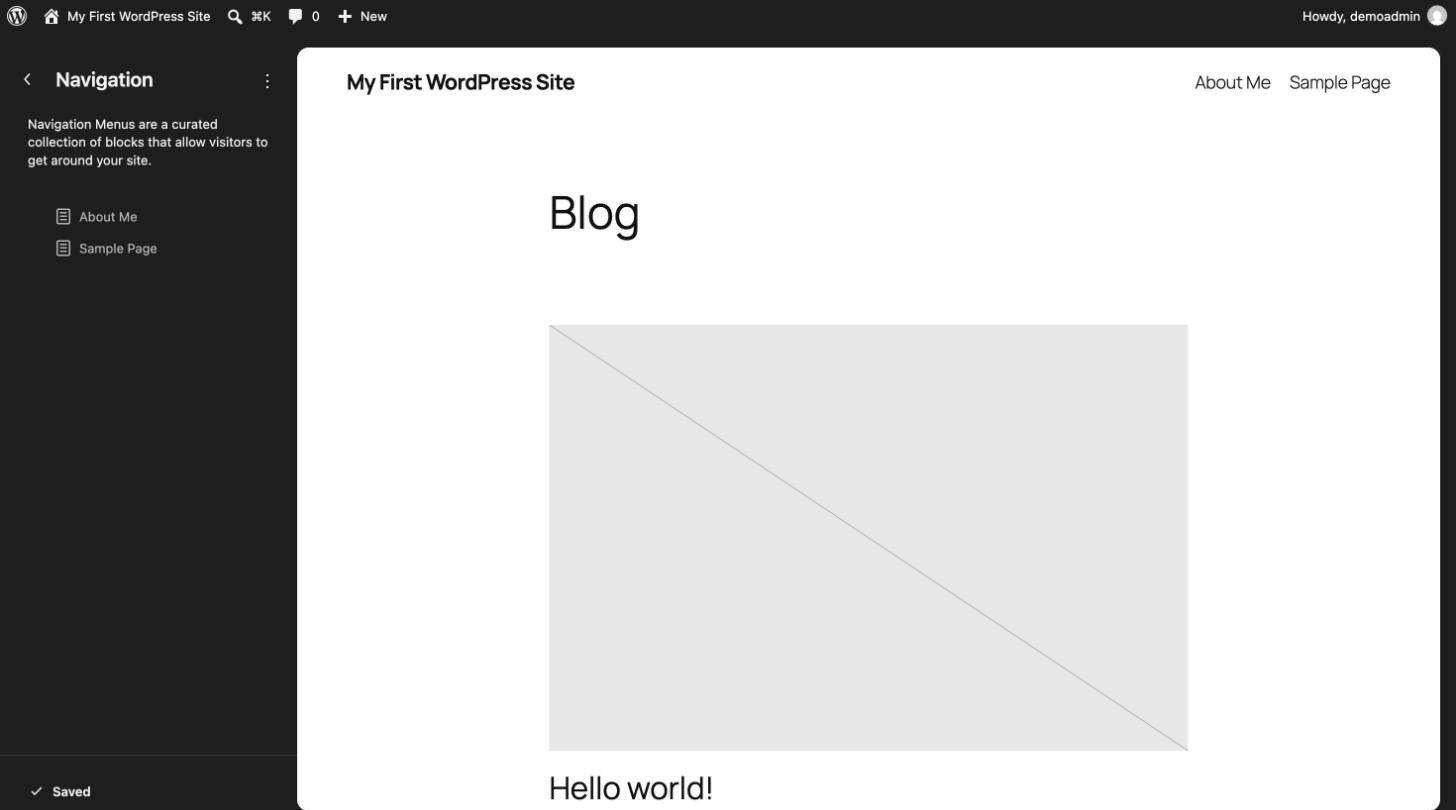
Your changes in the Site Editor apply site-wide when you click Save. For specific jobs, see how to edit the footer and how to change fonts and font sizes.
Go to Appearance > Customize. You’ll see your theme’s options on the left, such as Site Identity, Colors, Header and Footer, with a live preview on the right. Click Publish to save. Menus live in Appearance > Menus; my guide on creating a drop-down menu walks through it.
If you want more design control than your theme gives you, a page builder can help. Compare the options in how to choose a WordPress page builder before you commit, because switching builders later means rebuilding pages.
Step 7: Add Features With Plugins
Plugins add things WordPress doesn’t do on its own, such as contact forms, SEO settings, backups and online stores. Go to Plugins > Add Plugin, search for what you need, click Install Now, then Activate.
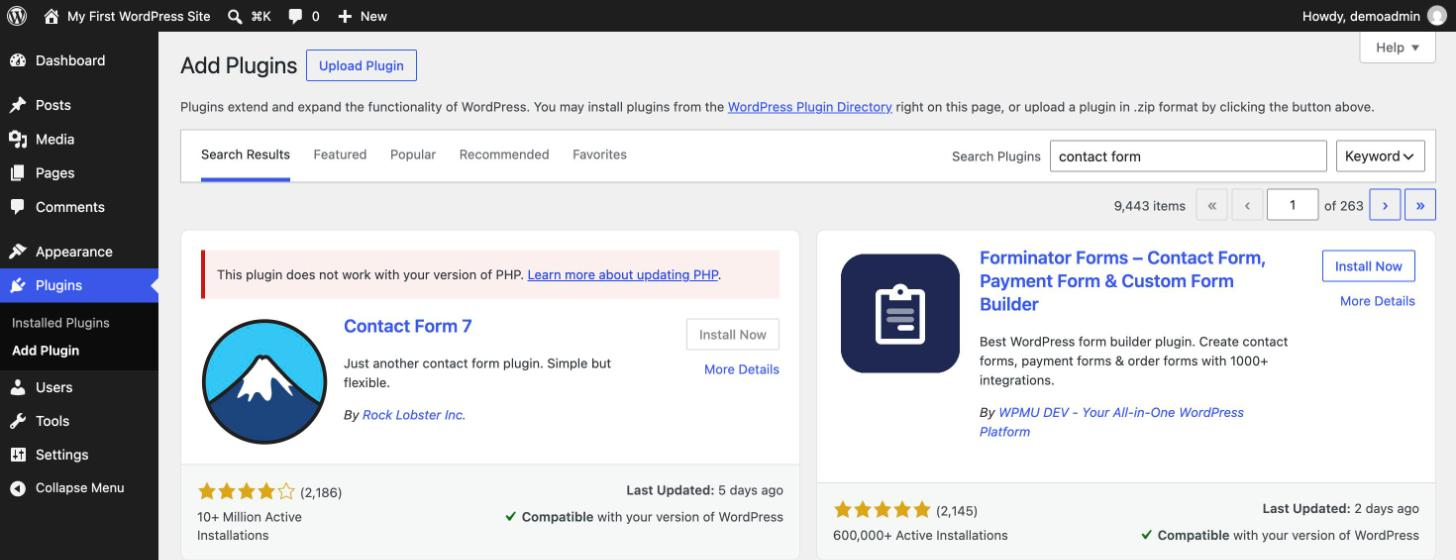
Before you install, read the plugin card. Check the rating, the number of active installations, when it was last updated and whether it says Compatible with your version of WordPress. On my test server, one popular form plugin showed “This plugin does not work with your version of PHP”, so its Install button was greyed out. That’s a sign your host’s PHP version is old; my guide on updating PHP in WordPress explains how to fix it.
A few habits keep plugins from causing trouble:
- Install only what you need, and delete plugins you stop using. The tests in do deactivated plugins slow down WordPress show that inactive plugins don’t slow your pages, but they still need updates and can still be a security risk.
- Don’t install two plugins that do the same job, such as two SEO or two caching plugins.
- Make a backup before installing a big plugin on a live site, or test it on a staging site first.
Step 8: Keep Your Site Updated, Backed Up and Fast
Running a WordPress site is mostly small, regular upkeep. Once a week or so:
- Back up first. Use your host’s backup tool or a backup plugin, and keep a copy somewhere other than your server.
- Update. Go to Dashboard > Updates and update WordPress, then plugins and themes. Updates fix security holes, so don’t leave them for months. You can check your WordPress version at any time.
- Check your site. Open your homepage and a couple of pages in a private browser window to make sure nothing broke.
Two more things are worth doing once: make sure your site loads over HTTPS (see how to get a free SSL certificate), and work through how to speed up WordPress when your site has some content. If you’d rather not handle upkeep yourself, my WordPress maintenance service covers updates, backups and monitoring.
When Something Goes Wrong
Most beginner problems have a known fix. These are the ones I see most often:
You’ll find more fixes in the troubleshooting tutorials. If your site is down and you need it back quickly, I can fix your WordPress site for you.
How to Learn WordPress Faster
You don’t need to learn everything at once. This order works well for most beginners:
- Practice on a test site where mistakes don’t matter.
- Build three pages (Home, About and Contact) and write two or three posts.
- Change the design until it looks the way you want, using the design and customization tutorials.
- Learn the basics of WordPress SEO so people can find your pages.
- Look up any unfamiliar word in the WordPress glossary.
For structured lessons, WordPress also has free official courses on Learn WordPress.
Frequently Asked Questions
Is WordPress easy to use?
Yes for everyday tasks. Writing posts, adding pages and uploading images work much like a word processor. The harder parts are design, plugins and fixing problems, because WordPress gives you more choices than hosted website builders do.
Why does WordPress feel hard at first?
Mostly because there are two ways of doing many things. Block themes and classic themes put design settings in different places, and older tutorials often show screens that no longer exist. Check your theme type (Step 3), and the menu names in this guide will match what you see.
How long does it take to learn WordPress?
You can publish your first page within an hour of logging in. Getting comfortable with themes, plugins and settings usually takes a few weeks of regular use. Learning to build custom themes or plugins is a developer skill that takes much longer.
Do I need to know how to code?
No. Everything in this guide works without code. Knowing a little HTML or CSS helps when you want to adjust something your theme doesn’t offer a setting for.
Is WordPress free?
The software is free and open source under the GPL license. You pay for hosting and a domain name, and optionally for premium themes, plugins or help.
Subscribe to our Monthly Newsletter
Get monthly updates of WordPress tips, tricks, and tutorials in your email.
Thanks. You have successfully subscribed.