Let’s be honest: when you’re running a blog, mistakes can happen. Maybe you lost a crucial paragraph during the editing process, or can’t remember where you put the new additions. Whatever the scenario, you might want a way to undo changes in WordPress – and fast.

Fortunately, there are built-in features for that. By understanding the main ways to undo changes to your postsA post is a type of content in WordPress, a popular open-source content management system used for creating an… More and pagesIn WordPress, a page is a content type that is used to create non-dynamic pages on a website. Pages are typica… More, you can recover previous versions and get your site back on track in no time.
In this article, we’ll go over how revisions and autosaves work in WordPress. Then, we’ll walk you through two different methods for using them to undo changes. Let’s dive right in!
How Revisions and Autosaves Work in WordPress
WordPress is a very user-friendly platform. However, that’s not just because it’s easy to use. It also comes packed with features to make your editing experience easier. Revisions and autosaves are two of them.
Revisions are copies of your posts and pages that WordPress creates every time you save your content. This applies to any manual updates or publishing actions, too. Each copy is stored in the WordPress database. There is no limit on these by default, meaning you’ll always have access to each revision.
Autosaves are a little different. These are temporary copies that WordPress automatically saves on a set schedule: every ten seconds for the Block Editor and every 60 seconds for the Classic Editor.
However, each new autosave replaces the previous one – you can only access one autosave at any given time. Thus, these tend to be more useful in the event of unfortunate browser crashes or other interruptions that can happen between saves.
As we have seen, revisions and autosaves work differently. However, both of them can be helpful if you want to undo changes in WordPress.
How to Undo Changes in WordPress (2 Methods)
Now that you understand the basics, here are two different ways to undo changes and recover your previous data.
Method 1: Choose a Previous Revision or Autosave
For the first method, we’ll focus on the main way to undo changes: returning to a previous version saved by a revision or autosave. We recommend you start with this one because it’s the most direct solution. It’s also the easiest in our opinion.
After you manually save a post or page, a new option will appear in the right-hand menuIn WordPress, a menu is a collection of links that are displayed as a navigation menu on a website. Menus are … More under Post, labeled Revisions:
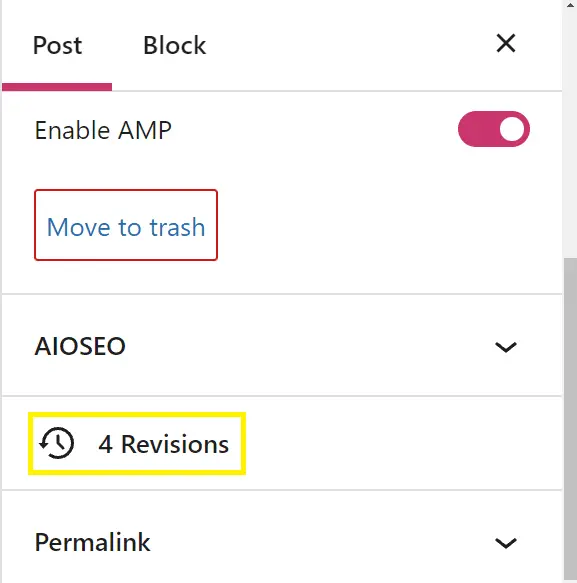
Go ahead and click on it. WordPress will then take you to the main revision interface:
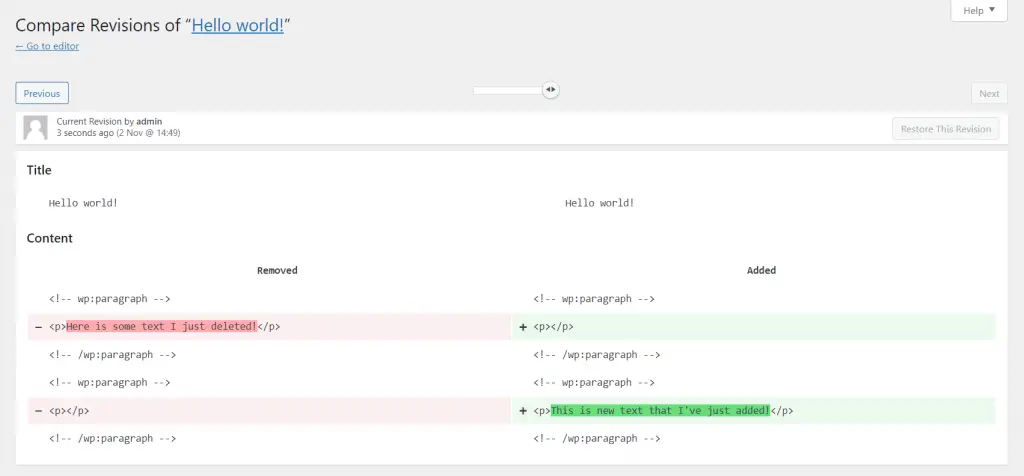
Let’s take a quick tour of your options. In the upper right corner, you should see an option to Compare any two revisions. By default, you’ll start with a view of the latest revision. However, you can check this box to pick any two.
To select the revisions you want to view, you can use the slider in the top middle of the screen. Once they’re side by side, there’s a color scheme to help you spot differences. Green highlights mean something has been added, while red means something has been deleted.
Once you find the revision you’re looking for, you can go back to it by clicking on Restore This Revision. This should undo any changes you’ve made. However, keep in mind that this is a full restoration – you can’t select individual pieces to save or replace.
However, you can always undo changes in small pieces manually. Simply copy the changes you’d like to apply from this screen, then paste them into the post or page’s code editor. This can also be a backup method to duplicate posts.
If you’re looking to restore an autosave, the process is pretty much the same. The only difference is that it will be labeled Autosave instead of Revision , and that you’ll only have access to that one copy.
Optional: Limit WordPress Revisions and Autosaves
Revisions and autosaves are helpful ways to undo changes in WordPress from time to time. However, revisions in particular also have a downside: with unlimited copies, it’s possible to clog up your site.
This can lead to slower load times and other issues like memory errors. Furthermore, if you have a lot of posts and pages, this problem can grow pretty quickly.
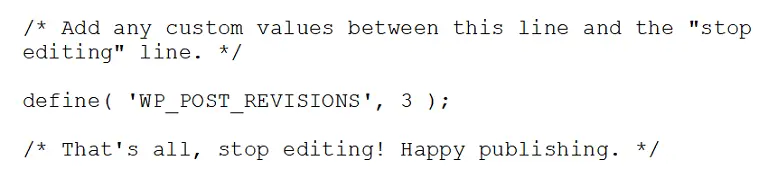
Fortunately, limiting revisions is easy. First, make sure you have File Transfer Protocol (FTP) set up for your site. Then, use it to access the wp-config.php file. Open it up and scroll down to the line reading That's all, stop editing! near the bottom.
Then, add the following code from the WordPress.org website just above that line:
define( 'WP_POST_REVISIONS', 3 );You can replace the 3 with the number of revisions you want to keep at a time, but we recommend staying below ten. Your file should now look something like this:
Save your work. Your revisions will now be limited to whatever number you chose. If you ever want to change that, you can come back to this file.
As for autosaves, these don’t take a toll on your site given that there’s only ever one. However, you might want to change how frequently they occur. To do that, you just have to add another piece of code to that same wp-config.php file:
define( 'AUTOSAVE_INTERVAL', 160 );
The number at the end is how many seconds will pass between each autosave. We went with 160, but you’re free to change it to fit your needs.
Method 2: Restore a Backup
Revisions and autosaves are the easiest way to undo changes, but they’re not your only option. If these two fail, you can always bring back previous work by restoring a backup of your entire site.
We want to emphasize that this is more of a last resort. Restoring a backup won’t just affect a post or page: it’ll revert your entire website. As such, you probably want to avoid it if any significant changes have happened between now and the time period you’re trying to return to.
Nevertheless, it will get the job done. Thus, if you make backups frequently and are willing to deal with their impact on the rest of your site, this is also a valid way to undo changes.
It’s possible to complete this process manually using FTP. However, if you’re already using a backup pluginA plugin is a software component that adds specific features and functionality to your WordPress website. Esse… More, we highly recommend you use its built-in recovery feature. For example, let’s look at UpdraftPlus. If you’ve already created the backup, you should see these options in the plugin’s settings:
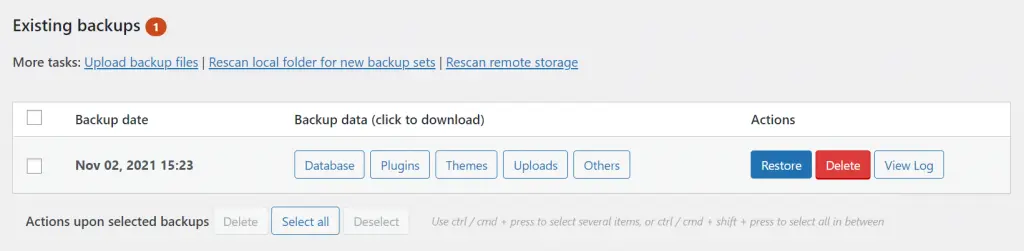
From here, all you have to do is click on Restore. This will start the process to revert your website to that copy, and as a result, undo any changes you made after it was created.
Conclusion
Eventually, everyone is bound to make changes in WordPress that they’d like to undo. Fortunately, the process is simple. By understanding how you can return to previous versions of your pages and posts, you can rest assured that you’ll always have a way to recover that data.
In this article, we showed you two methods for undoing changes in WordPress:
- Choose a previous revision or autosave.
- Restore a backup of your entire site.
Do you have any questions about how to undo changes in WordPress? Let us know in the commentsComments are a feature of WordPress that allow users to engage in discussions about the content of a website. … More section below!


