Unpublish a WordPress site or specific content can be essential for various reasons. Like performing significant updates, rebranding, or temporarily taking content offline. This guide will walk you through multiple methods to take down a WordPress site. Even it is your entire site, individual pagesIn WordPress, a page is a content type that is used to create non-dynamic pages on a website. Pages are typica… More, or postsA post is a type of content in WordPress, a popular open-source content management system used for creating an… More. We’ll explore steps to deactivate, hide, or remove content while ensuring you maintain SEO integrity and a positive user experience. Whether you need a temporary solution or a permanent one, this comprehensive guide covers all aspects of unpublishing a WordPress site effectively.
Why Unpublish a WordPress Site?
Before diving into the technical steps, it’s important to understand why you might want to unpublish your site. Here are some common reasons:
- Major Updates: You’re planning significant changes that require the site to be offline.
- Maintenance: Routine maintenance or troubleshooting technical issues.
- Rebranding: You’re overhauling your site’s design and content.
- Temporary Pause: You need to take a break or halt operations temporarily.
- Legal Reasons: Compliance with legal requirements or taking down sensitive content.
Preparing To Retire A WordPress Site
1. Backup Your Site
Before making any changes, always backup your site. This ensures that you can restore your site if anything goes wrong. Use plugins like UpdraftPlus or your hosting provider’s backup service to create a comprehensive backup of your site’s files and databaseA database is an organized collection of data stored and accessed electronically. It is a crucial component of… More.
2. Inform Your Audience
If possible, inform your audience about the upcoming changes. Use your social media channels, email newsletters, or a banner on your site to let visitors know that the site will be temporarily unavailable.

Methods to Unpublish a WordPress Site
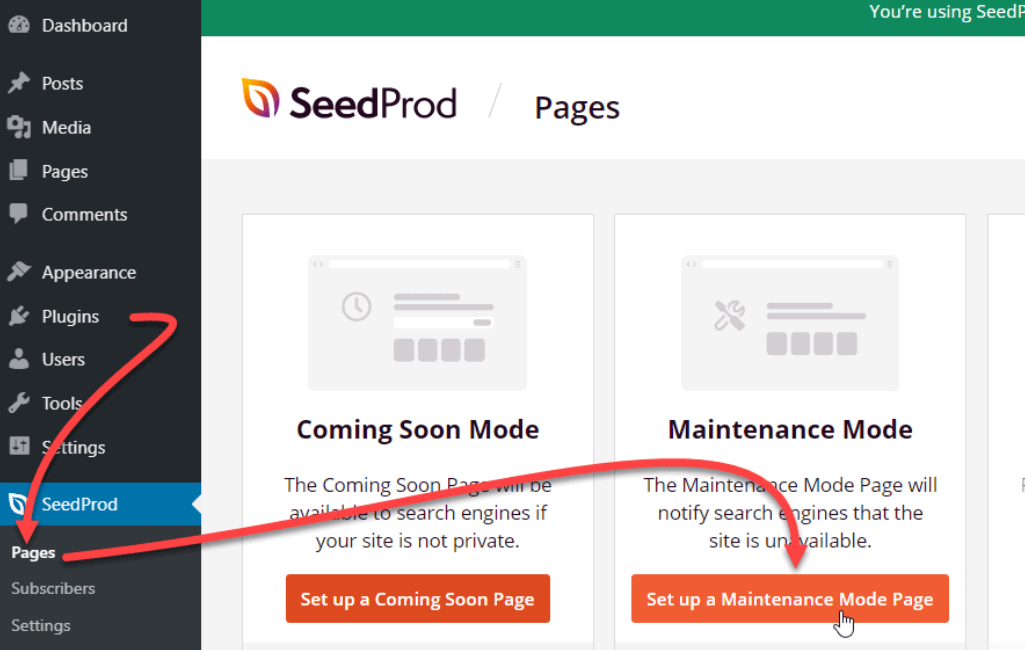
Method 1: Maintenance Mode
Putting your site into maintenance mode is an excellent way to temporarily unpublish it while indicating to visitors that the site will be back soon. Here’s how to do it:
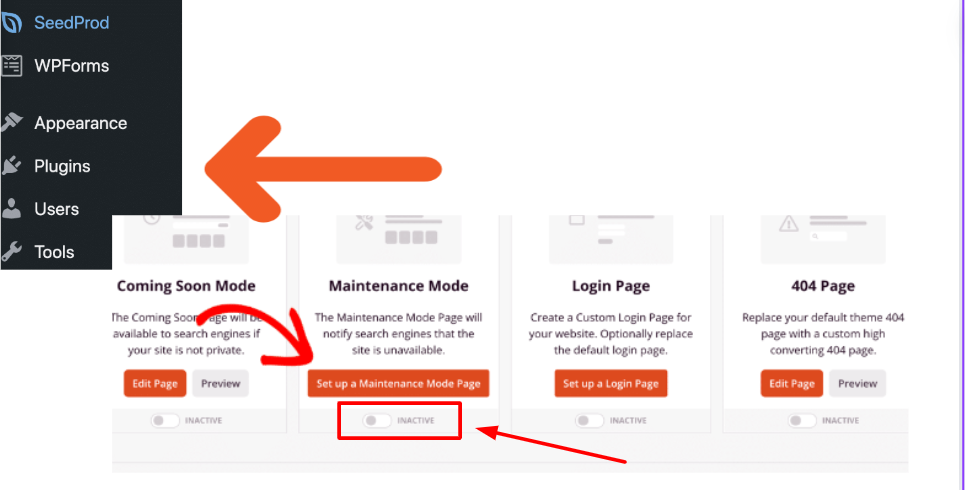
- Install a Maintenance Mode PluginA plugin is a software component that adds specific features and functionality to your WordPress website. Esse… More: Plugins like SeedProd, WP Maintenance Mode, or Coming Soon Page & Maintenance Mode by SeedProd are popular choices.
- Activate the Plugin: Once installed, activate the plugin from your WordPress dashboardIn WordPress, the Dashboard is a central hub for managing a website’s content and settings. It is the first sc… More.
- Configure Settings: Customize the maintenance mode message, design, and other settings to suit your needs.
- Enable Maintenance Mode: Turn on maintenance mode, which will display a maintenance page to visitors while you work on your site.
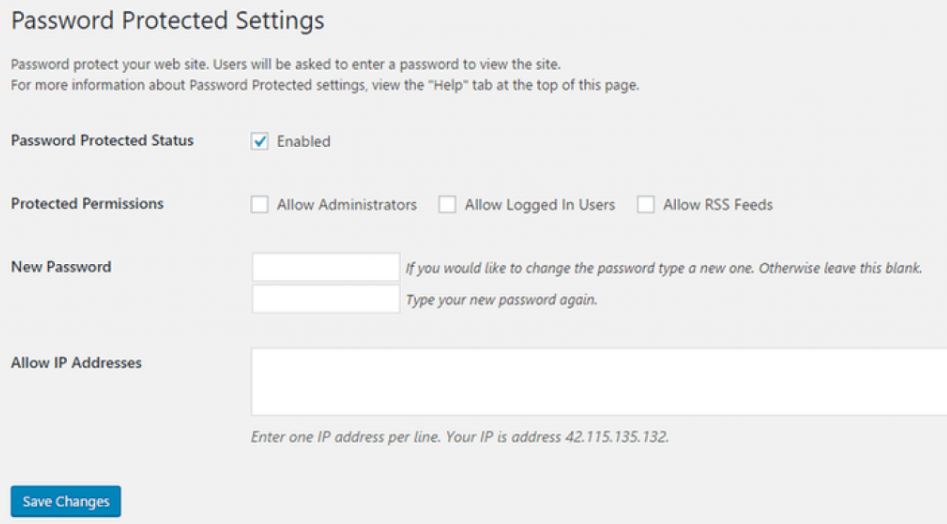
Method 2: Password Protection
Another way to restrict access is by using password protection. This method is useful if you need to restrict access to certain pages or posts without taking the entire site offline.
- Edit the Post/Page: Go to the post or page you want to protect.
- Set Visibility: In the WordPress editor, look for the ‘Visibility’ option in the publish box.
- Choose Password Protected: Select ‘Password Protected’ and enter a password.
- Update the Page/Post: Save your changes. Visitors will need to enter the password to view the content.
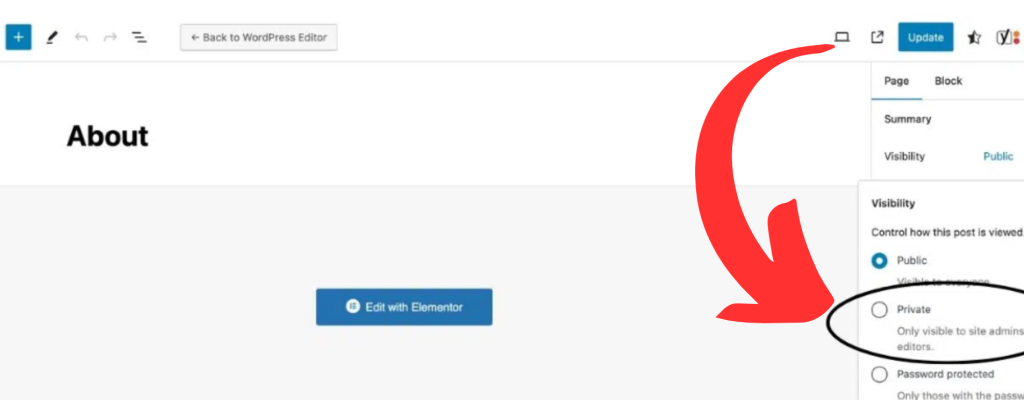
Method 3: Private Mode
Setting your content to private ensures that only logged-in administrators and editors can view it. This is a quick way to unpublish content without deleting it.
- Edit the Post/Page: Navigate to the post or page you want to make private.
- Set Visibility: In the publish box, set the visibility to ‘Private.’
- Update the Page/Post: Save your changes. The content will now be hidden from the public.
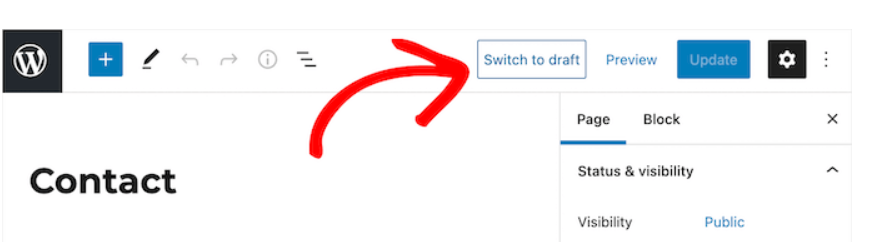
Method 4: Switching to Draft
Reverting a page or post to draft status is another straightforward method to unpublish content.
- Edit the Post/Page: Go to the post or page you want to unpublish.
- Change Status: In the publish box, change the status from ‘Published’ to ‘Draft.’
- Update the Page/Post: Save your changes. The content will no longer be visible to the public.
Method 5: Deleting Content
If you’re sure you no longer need certain content, you can delete it. However, remember that deletion is permanent unless you have a backup.
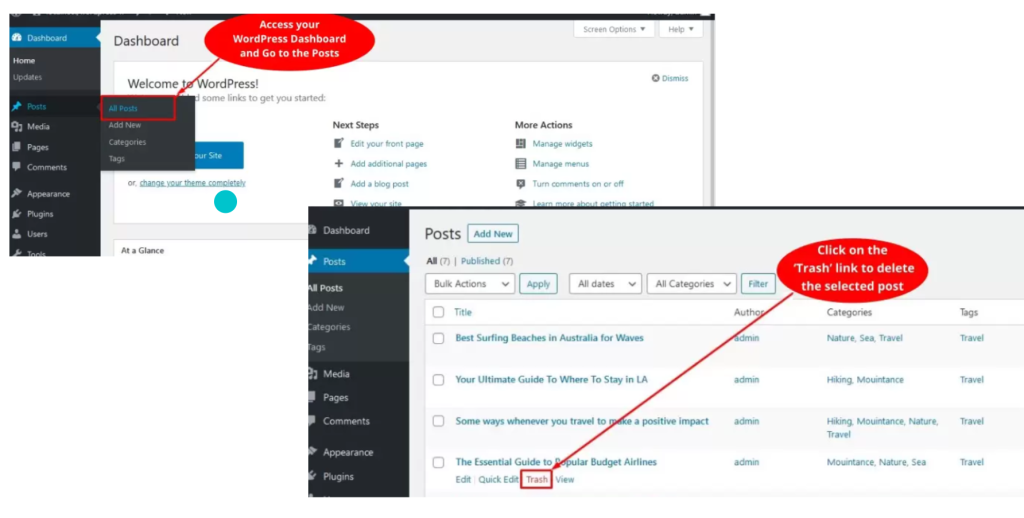
- Navigate to Posts/Pages: Go to the Posts or Pages section in your WordPress dashboard.
- Select the Content: Choose the content you want to delete.
- Move to Trash: Click ‘Move to Trash.’ The content will be moved to the trash bin.
- Empty Trash: To permanently delete, go to the trash bin and click ‘Empty Trash.’
Disable a WordPress Site
If you need to take down the entire site or turn off a WordPress site, you have several options:
Using a Plugin
- Install a Maintenance Plugin: Plugins like SeedProd or WP Maintenance Mode allow you to put the entire site in maintenance mode.
- Activate the Plugin: Once installed, activate the plugin.
- Enable Maintenance Mode: Configure the settings and enable maintenance mode. Visitors will see a maintenance message instead of your site content.
Using cPanel or Hosting Dashboard
One effective method to unpublish a WordPress site is through your hosting account, using cPanel or a similar hosting dashboard.
- Log in to Your Hosting Account – Access your hosting account dashboard by logging in with your credentials. This is typically done through your hosting provider’s website.
- Navigate to File Manager – Once logged in, find the File Manager or a similar tool. This allows you to manage your website files directly.
- Rename the Site Directory – Temporarily rename the site’s directory to prevent access. For example, you can change the directory name from “public_html” to “public_html_old.” This makes the site inaccessible to visitors.
- Disable Access – Alternatively, you can create an index.html file with a maintenance message in the site’s root directory. This file will override the WordPress site temporarily, displaying a custom message to visitors instead of your usual site content.

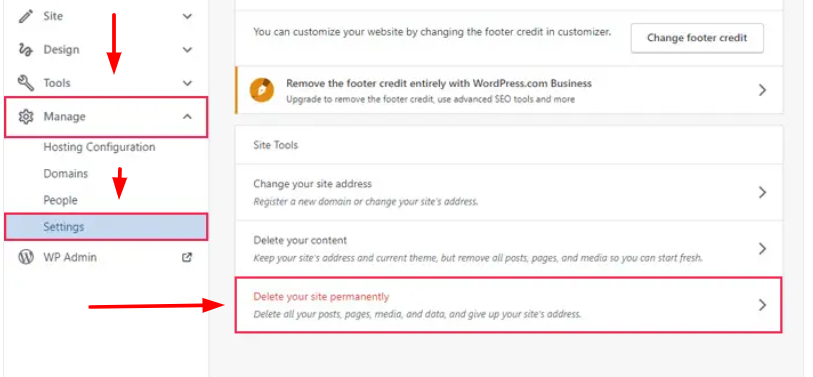
Deleting the Site
For a more permanent solution, you can Take down a WordPress site through your hosting provider. If you need to unpublish a WordPress site permanently, follow these steps:
- Backup Your Site: Before taking any drastic measures, ensure you create a full backup of your site. This includes all files, themesA WordPress theme is a set of files that determine the design and layout of a website. It controls everything … More, plugins, and the database. You can use plugins like UpdraftPlus or manually back up through your hosting control panel.
- Access Your Hosting Dashboard: Log in to your hosting account. Navigate to the control panel (cPanel, Plesk, or your hosting’s custom dashboard).
- Delete Your Site: Find the section for managing your websites. Locate your WordPress site and select the option to delete it. Confirm the deletion.
SEO Considerations
Unpublishing content can impact your SEO rankings, so it’s crucial to handle this process carefully. Here are some tips to minimize SEO damage:
1. Use 301 Redirects
If you’re permanently removing a page or post, use 301 redirects to point the URL to a relevant, existing page. This helps preserve your search rankings and provides a better user experience.
2. Update Your Sitemap
Ensure that your XML sitemap reflects the changes. Remove any unpublished or deleted URLs to prevent search engines from crawling them.
3. Inform Search Engines
If you’re unpublishing significant content or the entire site, consider using Google Search Console to remove URLs and update the index accordingly.
4. Monitor Your Traffic
Keep an eye on your website traffic and rankings to identify any negative impacts from unpublishing. Tools like Google Analytics and SEMrush can help you track these metrics.
Archiving Your WordPress Site Content
Archiving content is an excellent strategy for managing outdated or irrelevant posts without deleting them. This approach preserves the content for future reference and maintains SEO integrity.
Why Archive Content?
- Preserve Historical Data: Archiving keeps a record of old posts, which might be useful for historical context or reference.
- SEO Benefits: Archived content is not deleted, so it maintains any backlinks and SEO value it has accumulated over time.
- Declutter Your Site: It helps in keeping your site clean and focused on current, relevant content without losing valuable old posts.
How to Archive Content
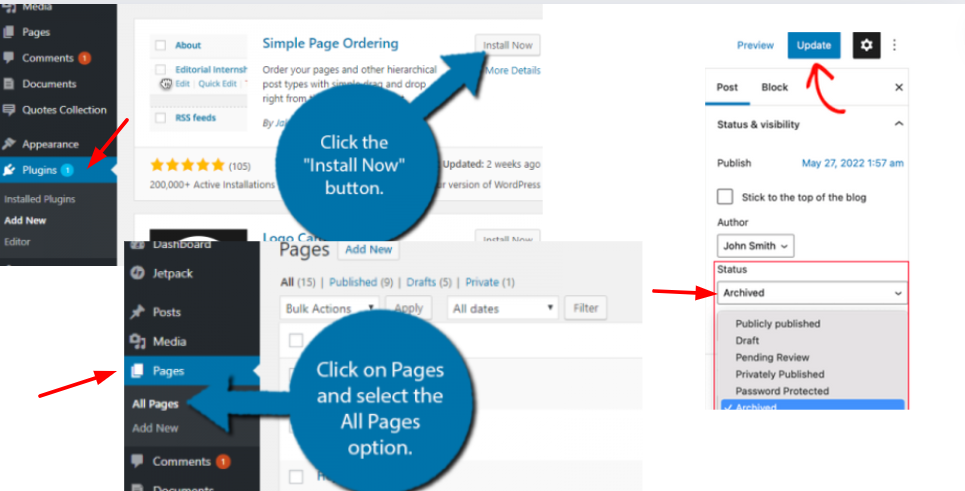
- Install an Archiving Plugin: Plugins like ‘Simple Page Ordering‘ or ‘WP Archive Post’ can help manage archived content efficiently. Install and activate your chosen plugin.
- Configure Archiving Settings: Navigate to the plugin settings in your WordPress dashboard. Customize the settings according to your needs, such as setting categoriesIn WordPress, categories are a fundamental taxonomy used to group and organize posts based on their topics or … More for archived content or determining which posts to archive.
- Archive the Content:
- Manual Archiving: Edit the desired post or page, and use the plugin’s features to archive it.
- Automatic Archiving: Some plugins allow for automatic archiving based on criteria like post age or category. Configure these settings if available.
- Accessing Archived Content: Ensure that archived content is easily accessible for administrators. This can typically be done through a separate section in your WordPress dashboard created by the plugin.
Repurposing Content
Repurposing outdated content is a great way to maintain its value without unpublishing it. Update old posts with new information, improve SEO elements, and re-promote them to your audience.
Steps to Repurpose Content:
- Identify Outdated Posts: Use Google Analytics to find posts with declining traffic.
- Update Content: Add new information, improve readability, and optimize for current SEO trends.
- Refresh Publish Date: Update the publish date to make the post appear fresh.
- Promote: Share the updated content on social media and through newsletters.
Scheduling Take down a WordPress Site
Using scheduling plugins like PublishPress Future can help you automate the unpublishing process. This is particularly useful for time-sensitive content.
How to Schedule Unpublishing:
- Install PublishPress Future: Activate the plugin from your WordPress dashboard.
- Set Expiry Date: When editing a post, set the expiry date and choose the action (switch to draft, delete).
- Save Changes: The post will automatically unpublish or switch to draft on the specified date.
Conclusion
Unpublish a WordPress site or specific content can be a strategic move for site maintenance, updates, or other reasons. By following the steps outlined in this guide, you can ensure a smooth and effective unpublishing process while minimizing disruptions to your visitors and maintaining SEO integrity. Always remember to backup your site before making significant changes and consider the impact on your audience and search rankings.
By following these comprehensive instructions, you can confidently unpublish a WordPress site or content, maintaining control over your online presence and ensuring your site meets your evolving needs.
![How to Unpublish a WordPress Page [4 Visual Methods]](https://codingheros.com/wp-content/webp-express/webp-images/uploads/2024/07/how-to-unpublish-a-wordpress-page-4-visual-methods.png.webp)


