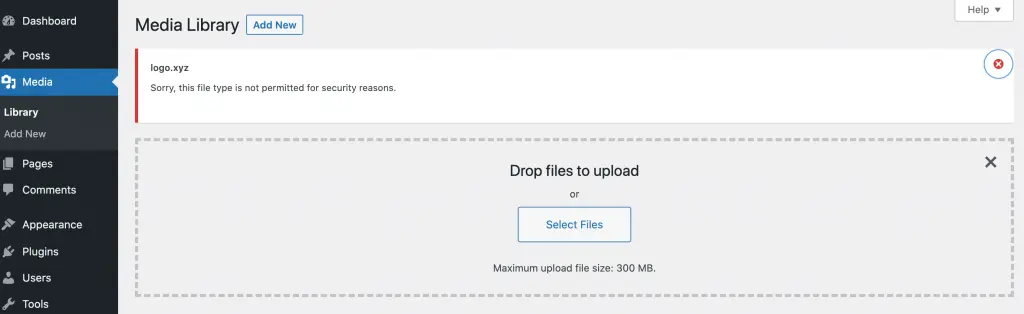
By default, WordPress supports all of the most common file types. However, you may occasionally encounter a ‘”Sorry, This File Type Is Not Permitted For Security Reasons” error.

Fortunately, there are multiple ways to upload unsupported files to WordPress. You can create exactly the site you want by bypassing this security feature – even if WordPress doesn’t permit your content out of the box.
In this postA post is a type of content in WordPress, a popular open-source content management system used for creating an… More, we’ll explore what this common error is and why you might encounter it. We’ll then share four ways to resolve it. Let’s get started!
An Introduction to the “File Type Is Not Permitted” Error
You can upload most common file types to WordPress without issues. However, for security reasons, the Content Management System (CMS) restricts the formats that you can upload through its dashboardIn WordPress, the Dashboard is a central hub for managing a website’s content and settings. It is the first sc… More.
If you attempt to upload a file outside of WordPress’ whitelisted file extensions, you may encounter the following error: “Sorry, This File Type Is Not Permitted For Security Reasons.” Some hosting providers also limit the content that you can add to their servers, even if WordPress itself supports these formats:
If you encounter this error, it’s wise to check that there isn’t an issue with the file extension. A simple typo or spelling mistake may be enough for WordPress to flag a legitimate file as dangerous.
If the extension is incorrect, resolving this error may be as simple as fixing the typo or spelling mistake. After making this simple change, you should be able to upload the file to WordPress without issue.
If there isn’t an obvious mistake with the file extension, WordPress may be blocking this file format. There are several ways to bypass this security feature, including relaxing its rules or even disabling the restrictions entirely.
Just be aware that file restriction is an important security feature. If you choose to permit additional file formats, your site may be more vulnerable to attacks.
For this reason, we recommend making sure that you’re following all of the latest security best practices. These include installing a Secure Sockets Layer (SSL) certificate and using a pluginA plugin is a software component that adds specific features and functionality to your WordPress website. Esse… More to limit login attempts.
Furthermore, plugins are integral parts of the WordPress experience. However, they can also introduce vulnerabilities and bugs that make your website more susceptible to hackers. To protect your site, it’s essential to ensure that you’re using WordPress plugins safely.
How to Fix the “File Type Is Not Permitted” Error in WordPress (4 Methods)
If you’ve verified that the file extension is correct, there are several ways to bypass the WordPress security restrictions. Here are four different ways to solve the “File Type Is Not Permitted” error and upload forbidden files!
1. Use the File Upload Types Plugin
WordPress has an internal whitelist that permits most of the common file formats. However, it is far from an exhaustive list. If you’re attempting to upload an unusual or potentially dangerous file, you may trigger the “Sorry, This File Type Is Not Permitted For Security Reasons” error.
Fortunately, it is possible to edit this whitelist. You can use the File Upload Types plugin to add support for any extension or Multipurpose Internet Mail Extensions (MIME) type. The add-on also woks with custom file types:
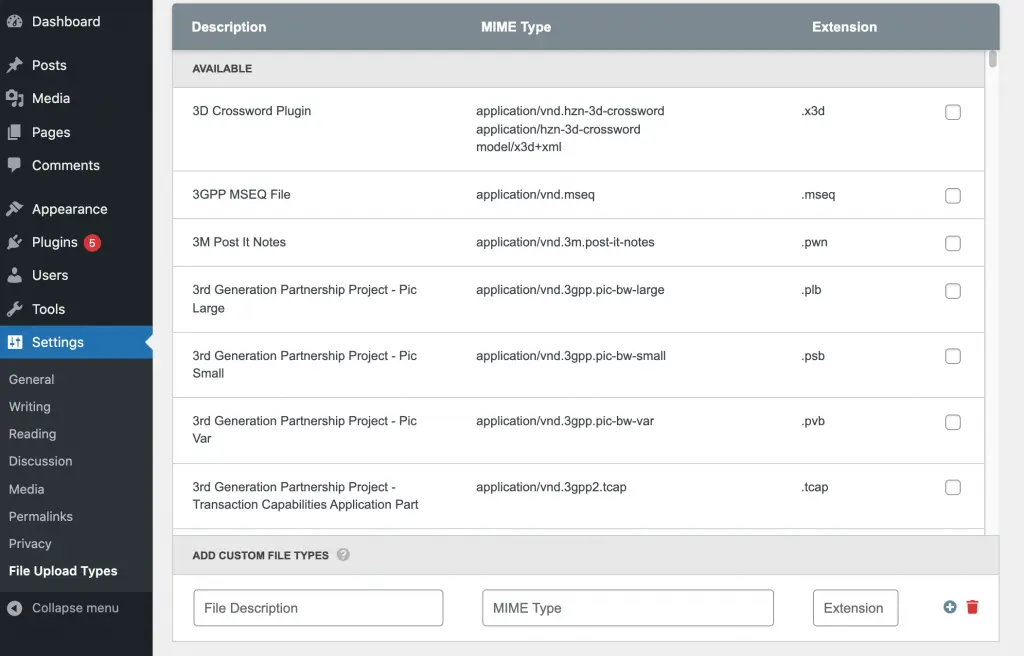
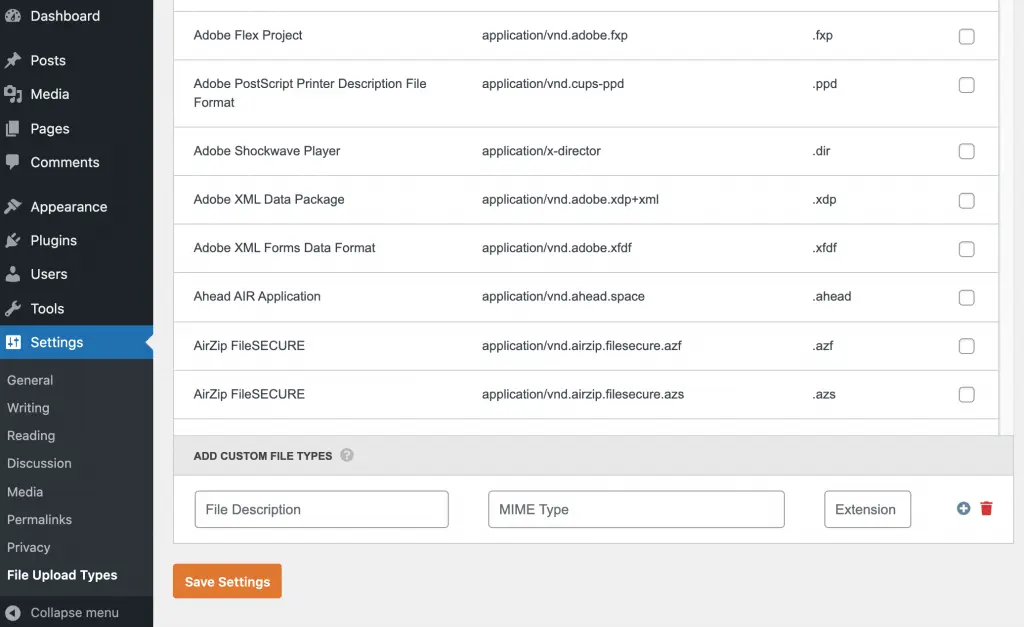
After installing and activating this plugin, navigate to Settings > File Upload Types. This plugin will now display all the file formats that WordPress supports by default.
You can add and remove support for any of these files by selecting and deselecting their accompanying checkboxes:
If you spot the desired file extension in this list, then click on its checkbox. You can then select Save Settings.
If the file format doesn’t appear in this list, you can scroll down to ADD CUSTOM FILE TYPES:
In this section, enter a description for the file format, followed by the extension and the MIME type. If you’re unsure about the MIME type, you can take a closer look at the file by opening a Terminal or Command Prompt window and then running the following command:
file filepath/filenameAfter entering all of this information, save your changes. You should now have no problems uploading files in this format.
2. Edit Your Theme’s functions.php File
You can change your site’s permitted MIME types manually by editing your website’s functions.php file. However, modifying your site at the code level always carries a degree of risk. For this reason, it’s wise to create a backup before proceeding, using a plugin such as UpdraftPlus:

To make this change, you’ll need to connect to your server using a File Transfer Protocol (FTP) client such as FileZilla. Inside the FileZilla application, navigate to File > Site Manager.
If this is your first time connecting via FTP, select File > Site Manager > New Site:
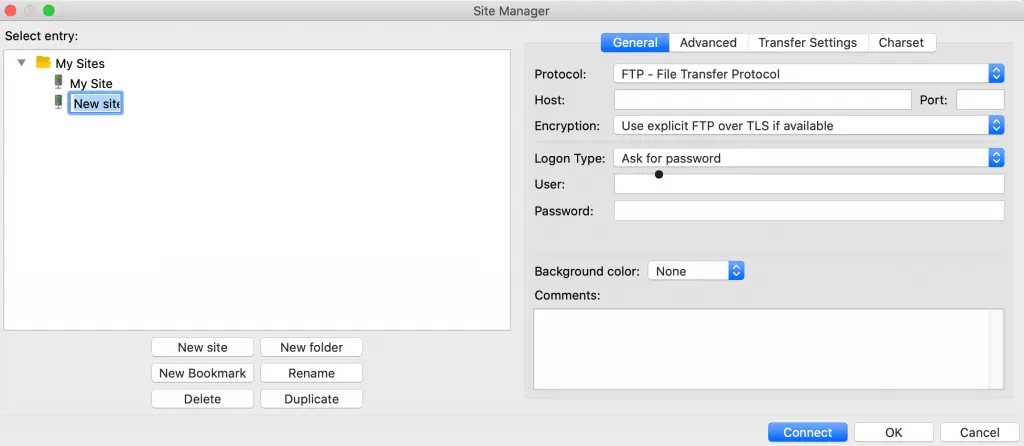
To start, assign this connection a descriptive name. In the Host field, enter your website’s FTP URL. For example, if your site’s address is “http://www.example.com”, its FTP address will either be “ftp://ftp.example.com” or “ftp://example.com”.
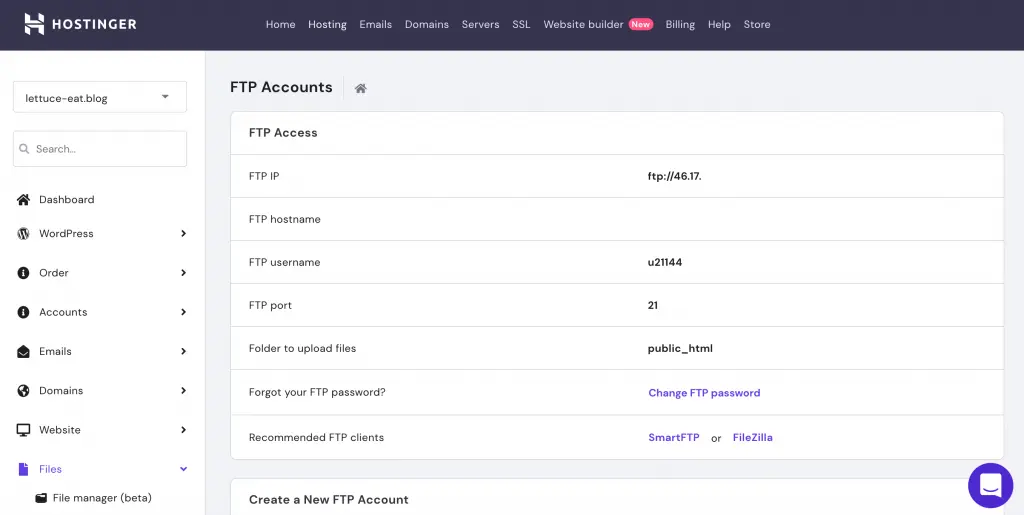
In Port value, type “21”. You can now enter your FTP username and password and click on Connect. If you don’t know your FTP credentials, you’ll typically find this information in the website administration tool provided by your web host:
FileZilla will now connect to your WordPress website. After a few moments, all of the files that make up your site will appear in the FTP window. You can now navigate to wp-content/themes, and open the directory for your current themeA WordPress theme is a set of files that determine the design and layout of a website. It controls everything … More.
Then, right-click on functions.php and select View/Edit. Doing this opens the file in your computer’s default text editor.
Inside functions.php, add the following text, being sure to update the code to include all of your desired file types:
function my_custom_mime_types( $mimes ) {

// Examples of new allowed mime types.
$mimes['svgz'] = 'image/svg+xml';
$mimes['svg'] = 'image/svg+xml';


return $mimes;
}
add_filter( 'upload_mimes', 'my_custom_mime_types' );
Save your changes. Now, you should have no problems uploading these files to your site.
3. Disable WordPress’ Whitelist
WordPress’ permitted file whitelist is designed to help keep your website safe. However, if you’re encountering the “Sorry, This File Type…” error regularly, you may decide to disable this security feature.
Be aware that allowing all formats makes it easier for third parties to upload malicious files to your site. You might even accidentally upload harmful content to your own website.
With this in mind, disabling the WordPress whitelist isn’t a decision you should take lightly. It also isn’t a recommended course of action for most users.
However, if the error frequently prevents you from uploading files, it may make sense to permit all formats. To disable this security feature, you’ll once again need to connect to your server through FTP.
After connecting using a client such as FileZilla, your next task is editing the wp-config.php file. This file contains information about your site’s databaseA database is an organized collection of data stored and accessed electronically. It is a crucial component of… More and is located in your website’s root directory.
Right-click on this file and then select View/Edit to open wp-config.php in your default text editor. You can then find the following line:
“/* That’s all, stop editing. Happy blogging. */”. Immediately above this line, copy and paste the following code:
define('ALLOW_UNFILTERED_UPLOADS', true);You can now save your changes. At this point, you’re free to upload any type of file to WordPress.
If you no longer require unfiltered uploads at any point, we highly recommend navigating back to wp-config.php and deleting the ALLOW_UNFILTERED_UPLOAD code. Doing this will restore WordPress’ whitelist and improve your site’s security.
4. Change Your WordPress Multisite Settings
WordPress Multisite enables you to create a network of websites with a single WordPress installation. These sites all share a file system and a database. They also typically reside on variations of the same domain name. This setup makes Multisite popular with agencies and organizations that manage multiple sites from a single dashboard.
If you’re using WordPress MultisiteMultisite is a feature of WordPress that allows a user to create and manage multiple websites from a single Wo… More, it’s possible to upload files that WordPress usually wouldn’t permit. In your dashboard, navigate to Settings > Network Settings.
Now, scroll to the Upload Settings section. Here, you’ll find an Upload file types field to add all of the files you want to support.
Then, simply save your changes, and that’s it! Your Multisite setup will now permit file types that it would previously block.
If at any point you change your mind, simply navigate back to this screen and delete all of the file extensions that you previously added. WordPress will now resume its default behavior and prevent anyone from uploading files with unsupported extensions.
Conclusion
WordPress is a flexible platform that supports a wide range of different file types. However, occasionally you may encounter the “This File Type Is Not Permitted” security error during the upload process.
Let’s quickly recap four ways to fix this common WordPress error:
- Use the File Upload Types plugin.
- Edit your theme’s
functions.phpfile. - Disable WordPress’ whitelist.
- Change your WordPress Multisite settings.
Do you have any questions about troubleshooting this WordPress error? Let us know in the commentsComments are a feature of WordPress that allow users to engage in discussions about the content of a website. … More section below!

![How to Unpublish a WordPress Page [4 Visual Methods]](https://codingheros.com/wp-content/webp-express/webp-images/uploads/2024/07/how-to-unpublish-a-wordpress-page-4-visual-methods.png.webp)