If other people have access to the back end of your WordPress website, you’ll want to keep an eye on what they’re doing. That means you need to know who’s publishing new content, making changes to settings, and so on.
An activity tracking pluginA plugin is a software component that adds specific features and functionality to your WordPress website. Esse… More makes that kind of oversight simple. This type of plugin gives you a breakdown of everything that happens on your website. You can use that information to troubleshoot errors, or to trace breaches if you encounter security issues.
In this article, we’ll dig deeper into why it makes sense to track user activity in WordPress. We’ll also show you how to get started. Let’s jump right in!
Why It’s Smart To Track User Activity in WordPress
There are a lot of tools you can use in WordPress to log specific types of events, such as changes to files, plugin updates and installs, and new commentsComments are a feature of WordPress that allow users to engage in discussions about the content of a website. … More or postsA post is a type of content in WordPress, a popular open-source content management system used for creating an… More. That is a lot more information than WordPress gives you access to out of the box.
User activity trackers or logs enable you to monitor everything that’s happening on your website. You can use that information to make informed decisions about new features or changes, and protect against simple human error.
For example, if an unexpected change occurs on your site, you can use its activity log to find out who made that edit and when. Then, you can reach out to the user in question to inquire about the change or ask them to reverse it.
Activity logs are also invaluable when troubleshooting errors or investigating potential security breaches. If your activity log shows a user trying to log in many times and failing, for instance, someone may be trying to gain access to your site for nefarious purposes. In that scenario, you can take steps to secure the site further, such as enabling Two-Factor Authentication (2FA).
How to Track User Activity in WordPress (In 3 Steps)
Since WordPress doesn’t offer default features that enable you to track activity on your website, you’ll need to use a plugin. That means the first step of the journey is selecting the right tool.
Step 1: Choose an Activity Log Plugin
Activity log plugins enable you to track events that happen on your website. How much information they show you and what events they track will depend on the plugin you choose.
Two of the most popular options are WP Activity Log and Jetpack. You may already be familiar with the latter. Jetpack is one of the plugins that comes by default with a lot of installations, and it offers features ranging from spam protection to 2FA and activity tracking.
The downside to using Jetpack is it requires a WordPress.com account. You’ll also need to pay for the Jetpack Protect bundle to get access to the activity log functionality.
WP Activity Log, on the other hand, focuses solely on activity tracking. The plugin can log dozens of events, and you can decide which types you want to prioritize.

This plugin is also free, which makes it perfect for smaller websites and anyone on a budget. The rest of this tutorial will show you how to use WP Activity Log. If you want to follow along, first install and activate the plugin.
Step 2: Configure WP Activity Log
Once you activate WP Activity Log, you can configure how the activity tracker works. To do this, go to WP Activity Log > Enable/Disable Events. This screen contains the full list of events the plugin can keep tabs on.
All events are enabled by default. You can check the corresponding boxes for events that don’t interest you, in order to make the activity log easier to navigate:
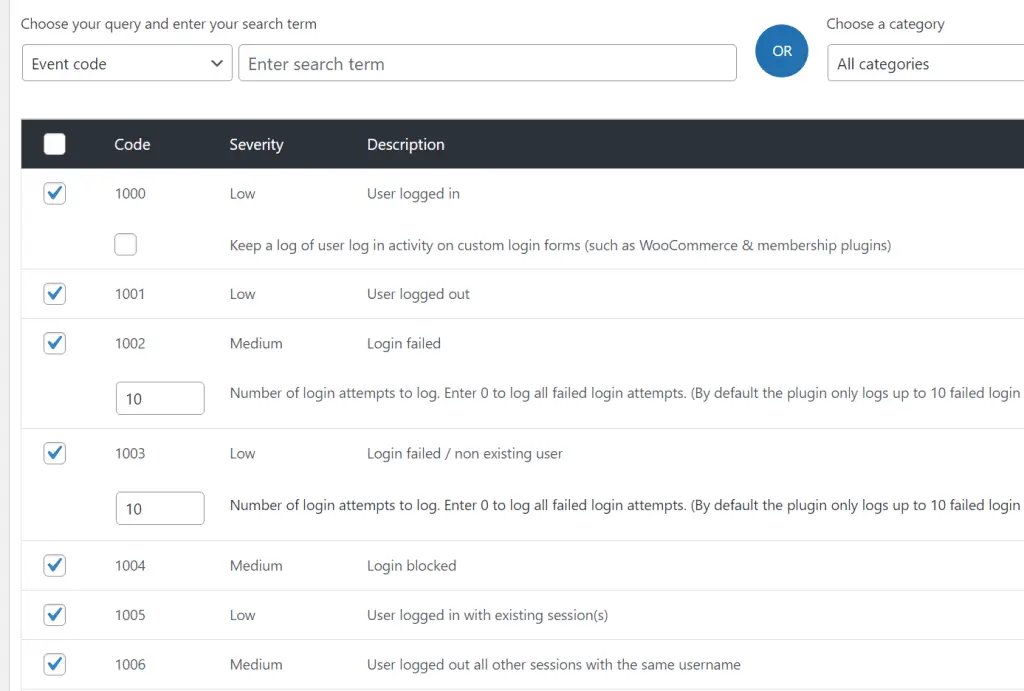
It’s usually best to prioritize events related to monitoring access to your website and notable changes. Having a record of those events will be critical if you need to troubleshoot problems on your site.
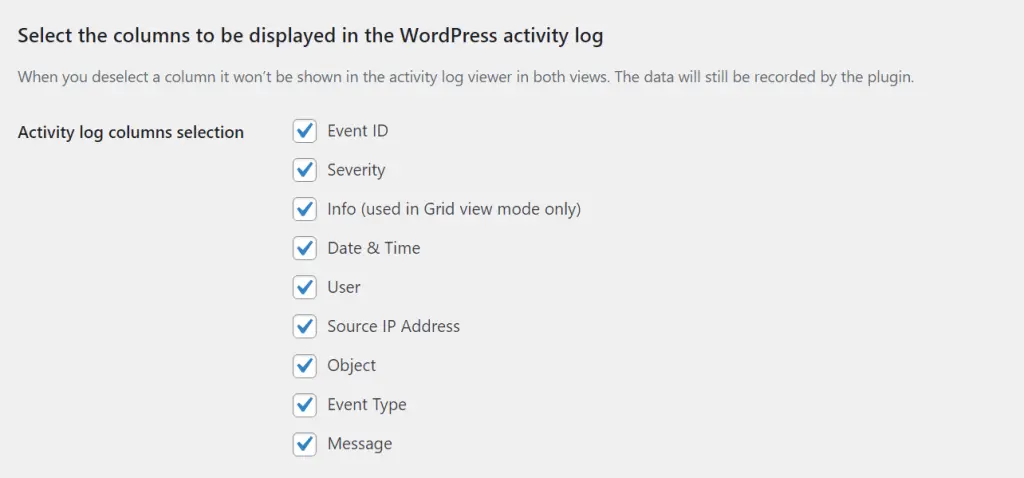
After deciding what activity to monitor, go to WP Activity Log > Settings > Activity log viewer. Scroll down to the section that reads Activity log columns selection. There, you can choose what information will appear for each event in the activity tracker:
Save the changes to the plugin configuration, and that’s it! Now let’s see what the activity tracker looks like in action.
Step 3: Monitor User Activity in WordPress
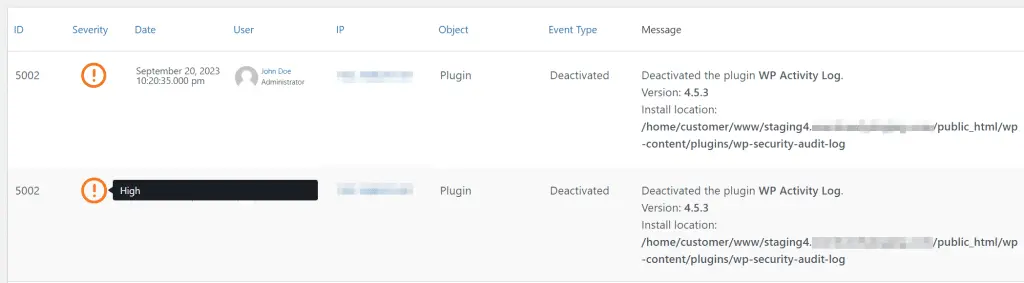
To access the activity tracker, go to WP Activity Log > Low Viewer. This pageIn WordPress, a page is a content type that is used to create non-dynamic pages on a website. Pages are typica… More will display a table that includes a breakdown of all recent user activity on the website.
In other words, this table shows you who did what and when. The plugin also uses a Severity system to point out more important events, such as changes to core files or plugin installations:
The free version of the plugin sends email notifications to the admin address for specific events. However, you’ll still need to monitor the activity tracker manually if you want to stay abreast of everything happening on your site.
If you use the plugin’s default options, the activity tracker will show a lot of details. That includes comments, logins, new posts, edits, and more. That level of information can be a bit overwhelming at first.
After using the activity tracker plugin for a while, we recommend revisiting its configuration to customize what events you want to monitor moving forwards. That way, it will be easier to find important events in the tracker.
Conclusion
The more your WordPress website grows, the more intricate it will become. You might have multiple people helping you run the site and publish content, alongside hundreds or thousands of users. With that level of activity, keeping an eye on what’s happening day to day becomes vital.
Activity tracking plugins enable you to monitor what users are doing, with very little effort on your end. Here’s how that process works:
- Choose an activity log plugin (we recommend WP Activity Log).
- Decide what type of events you want to track.
- Monitor user activity and further refine your settings.
Do you have any questions about how to track user activity in WordPress? Let’s talk about them in the comments section below!


![How to Delete a Theme in WordPress [3 Effective Ways]](https://codingheros.com/wp-content/webp-express/webp-images/uploads/2024/06/how-to-delete-a-theme-in-wordpress-3-effective-ways.png.webp)