Are you looking for a detailed guide on how to start a WordPress blog?
It might seem daunting to create a blog of your own, especially if you’re not a coder. However, starting a blog is super easy with WordPress, regardless of your coding knowledge and expertise.
In this article, I will guide you through the detailed steps to begin a WordPress blog, which will include:
- Choose a Web Hosting Provider (We Recommend Bluehost)
- Register a Custom Domain Name (Free)
- Install the Free WordPress Software
- Login to Your WordPress Blog/Website
- Activate a Free WordPress Theme and Change Your Blog Design
- Install and Activate WordPress Plugin
- Write Your First WordPress Blog Post
Ready? Let’s get started.
Table of Contents
Step 1: Purchase Your Hosting and Register the Domain Name
Once you’ve decided on your website niche, you’ll require hosting and a domain name to make your site accessible to search engines and users.
Hosting: You might be asking yourself, “What is web hosting?” Well, hosting is the place where your website resides. A web host acts as a middleman between you and the internet. They provide space on their servers to store your files and connect them so that your site can be accessed by people anywhere around the world.
Domain Name: A domain name is the address of your website, and it’s what people type into their browsers to reach your blog. A domain name can be a single word, like “blog,” or it can include letters and numbers, like “howtowp.”
You can purchase the domain name and website hosting separately per your preferences.
Here we recommend Bluehost for beginners because:
- It’s affordable
- Fast and reliable
- Easy to set up
- No hidden charges are included in the pricing plans
- Offers a free custom domain name that generally costs you more than 10$ if purchased separately.
If you’re planning to get another hosting, first go through our article on how to choose the best WordPress hosting.
Now let’s go ahead and purchase your hosting.
Sign Up for WordPress Hosting at Bluehost
To get started, visit the Bluehost website and click on the Get Started button.
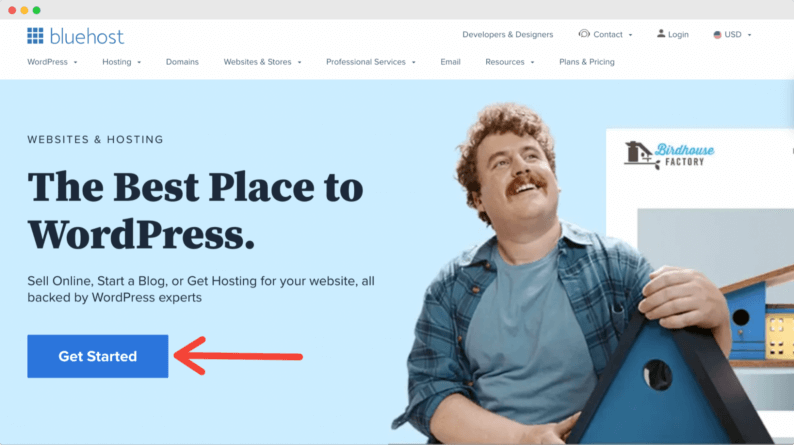
This will take you to the pricing section of Bluehost.
Choose Your Bluehost Hosting Pricing Plan
On this next screen, you’ll see several options for hosting plans.
The Basic plan is the best option for bloggers who are just getting started since it offers all the necessary features & functionalities.
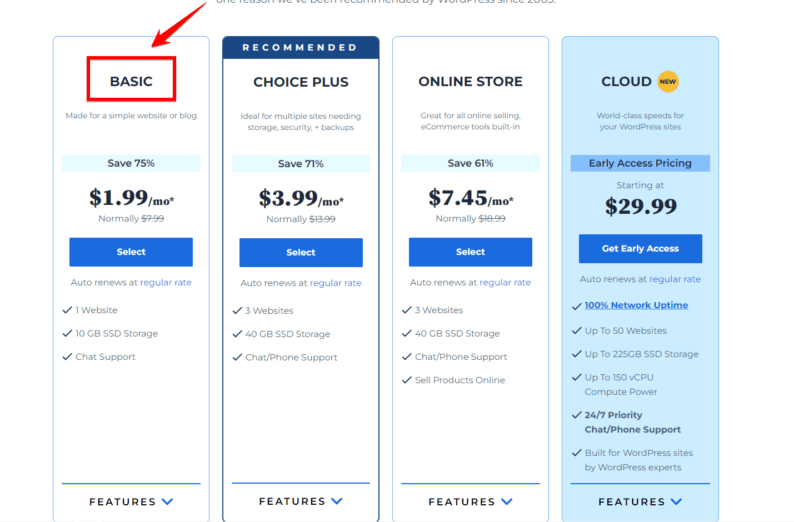
Choose your plan, and click on the Select button.
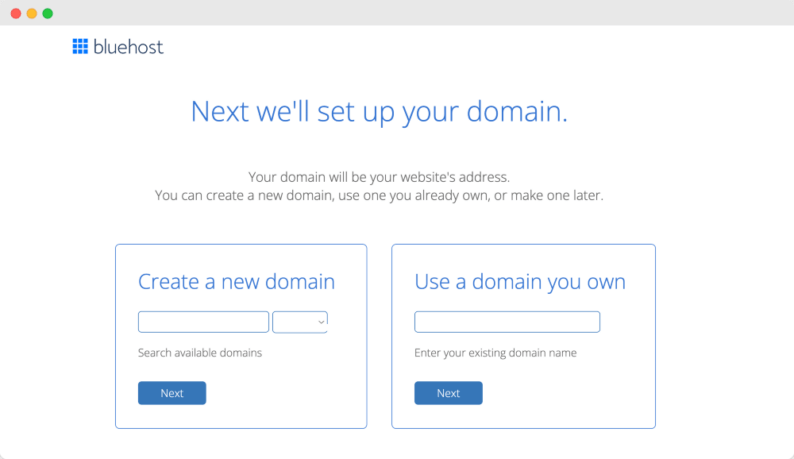
Set Up Your Domain Name
On the next screen, enter the domain name you want to use for your blog and click Next.
Create Your Account
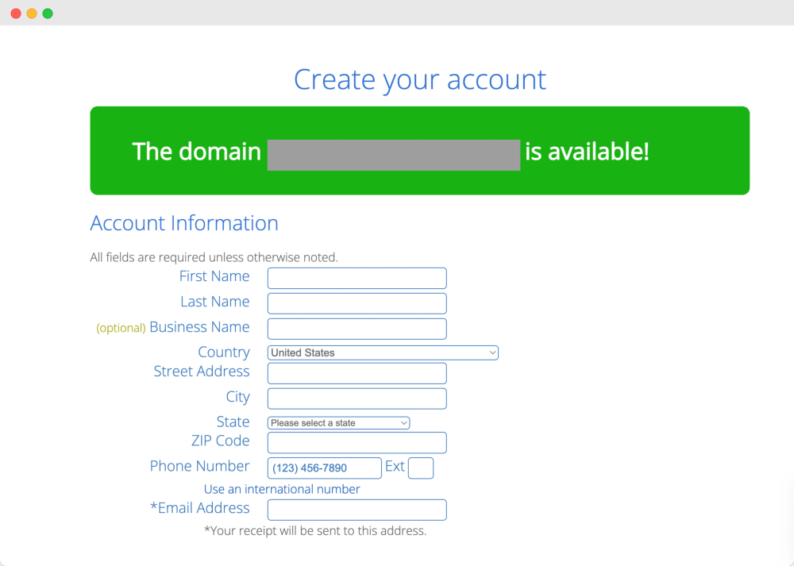
If your domain name is available, you’ll be redirected to a new page, where you need to create an account by adding general details like your name, address, etc.
At the bottom of the page, you will see a section with Package Information. In this section, you can choose the number of years of hosting service and any addon package you’d like.
By default, Bluehost will check some of these addon packages; you can check and deselect them.
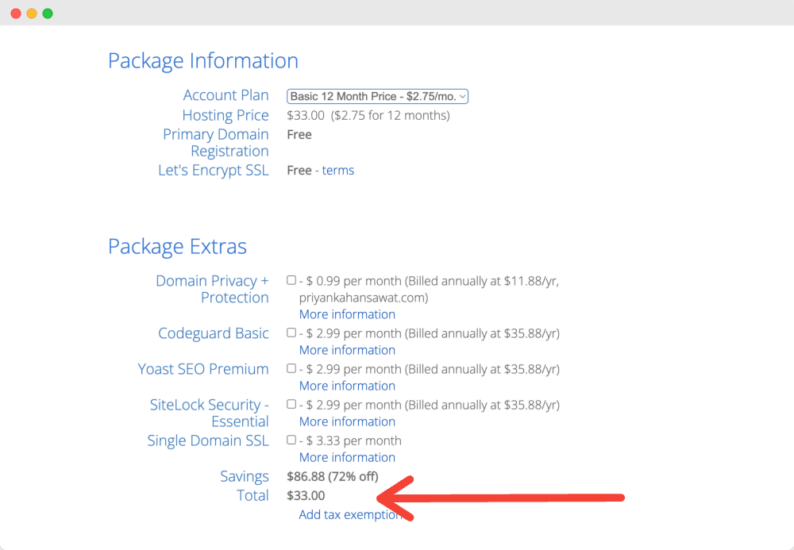
To complete your purchase, click SUBMIT at the bottom.
Once you complete your sign-up process, you’ll receive an email with your hosting login details.
Step 2: Login and Install WordPress
Now that we have purchased the hosting and registered the domain name, it’s time to install the free WordPress software on Bluehost.
Don’t worry! The installation process is relatively easy and beginner friendly.
Log in to Bluehost
Start by logging into your Bluehost account.
The first time you log in to your Bluehost account, a simple wizard will guide you through the process of installing WordPress.
No technical knowledge is required for installation.
Note: If you were able to successfully install WordPress using Bluehost simple wizard then move to the ''Log in to WordPress'' section.

But, incase you missed the initial site creation wizard process, then you can install WordPress by following the below steps.
Once you have signed in to your Bluehost dashboard, click on the “My Sites” tab.
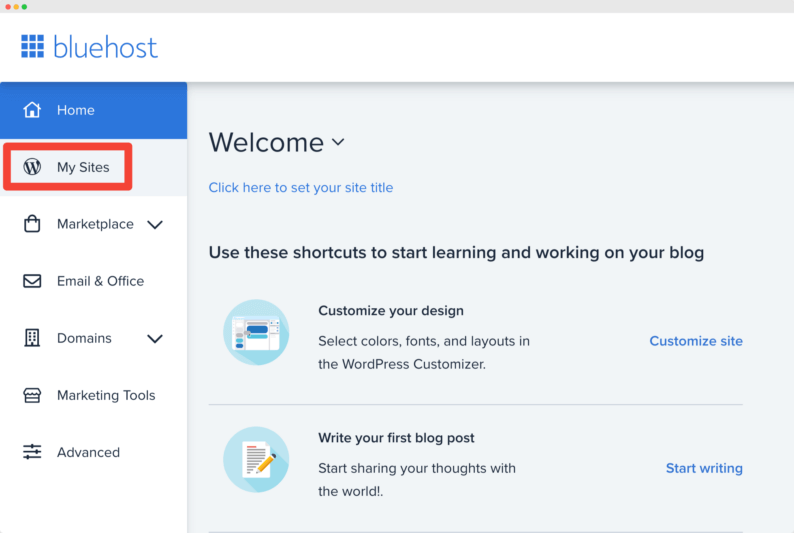
On the next screen, click “Create Site” in the upper right corner.
Enter Your Site Details
After choosing an option, you’ll be taken to a new page, where you need to enter your Site Name and Site Tagline.
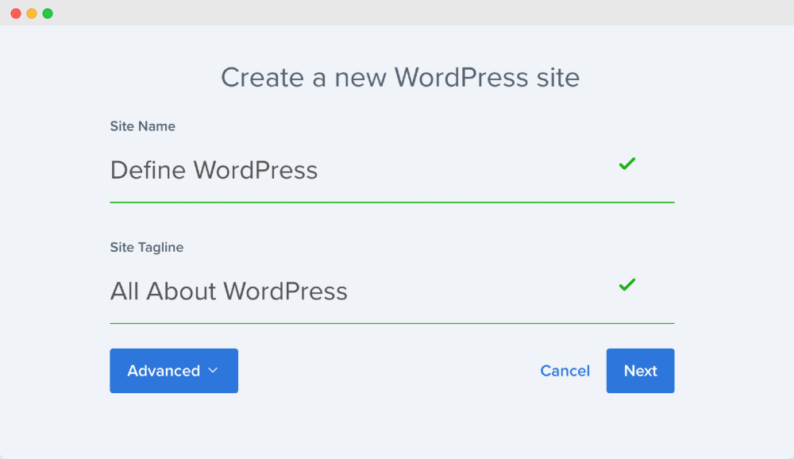
Once that is done, click on the Advanced button and enter the username and password you wish to use for your WordPress account.
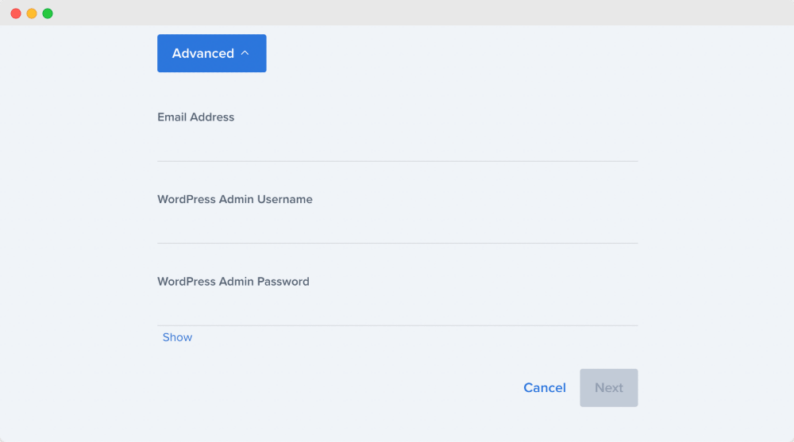
On the next screen, Bluehost will suggest free WordPress plugins you can install. Once you have completed the process, click “Next” at the bottom of the page.
Great! Your WordPress installation with Bluehost is successful.
Log in to WordPress
You can log in to your WordPress site directly from the Bluehost dashboard or by entering the URL in the format yourdomain.com/wp-admin.
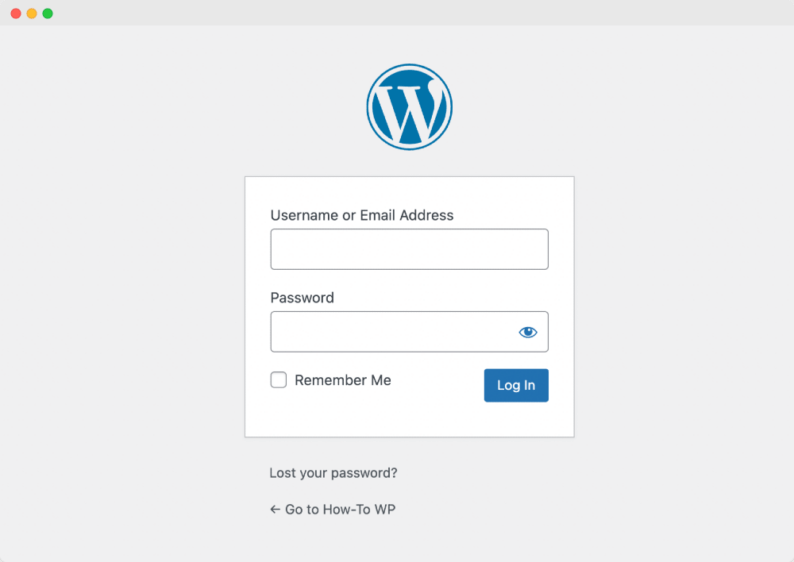
Now that your WordPress site is ready let’s customize it further to make it fully functional and user-friendly.
Step 3: How to Install, Activate & Customize a WordPress Theme
Having said that, first, we’ll see how you can install and activate a theme directly through the WordPress dashboard.
You might be wondering what a WordPress theme is and why we are changing it.
Simply put, your site’s appearance is dependent on its theme.
You can control how your WordPress site looks on the front end by customizing its theme settings.
Also, if you’re questioning, can a WordPress site be built and work without a theme? Simple answer, NO!
Now let’s activate a free theme on our WordPress site.
We recommend you install and activate the Kadence WP theme, because it offers both free and premium versions and includes plenty of built-in features, such as:
- It is fast, intuitive, and SEO friendly.
- Offers layout customization options.
- Compatible with modern page builder editor (aka Gutenberg) as well as Elementor page builder.
- Works flawlessly with WooCommerce
- Free header/footer builder
- Mobile friendly
Are you still unsure of how to choose the best WordPress theme? Here are the things to consider before choosing a WordPress theme for your website, as described in our post on how to select a WordPress theme.
Install a Free WordPress Theme
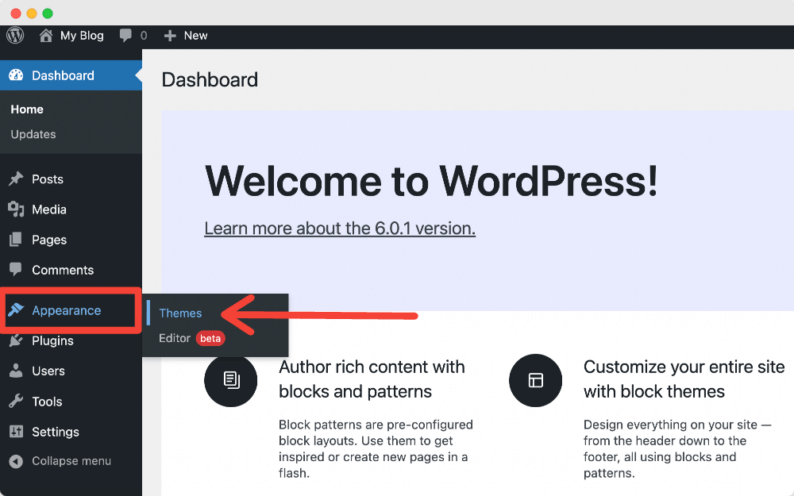
To start the process, go to your WordPress menu and click Appearance » Themes.
Click Add new on the next page.
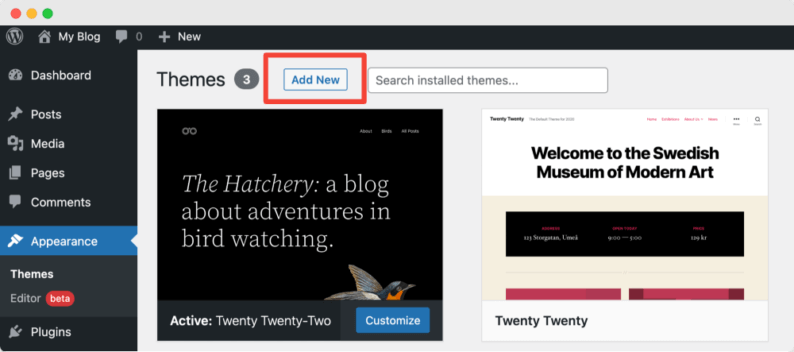
In the search, type “kadence.”
Live Preview and Activate the Theme
You will see many free theme options. Choose the first option and click the Install button. It’s also possible to view details and get a preview of how your theme will look live.
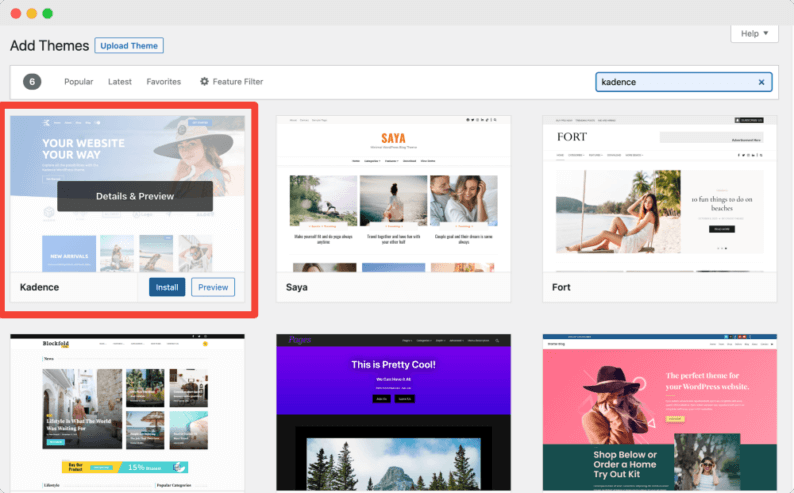
Once the theme installation completes, don’t forget to click the Activate button to activate the theme on your WordPress website.
Install Starter Templates
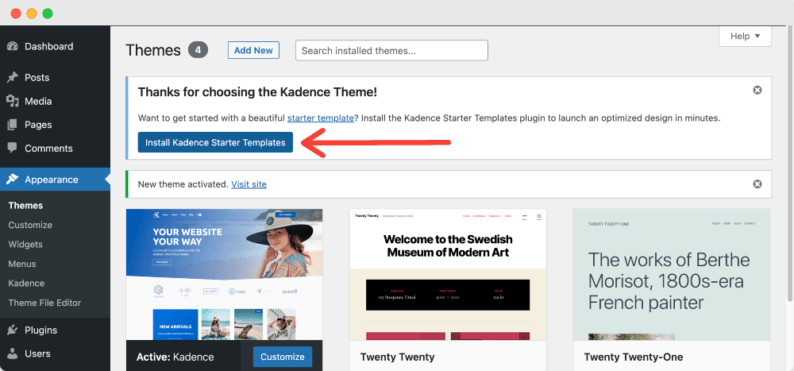
Once your theme is activated, you’ll get a notice to activate all the Kadence Starter Templates.
Click on the Install Kadence Starter Templates button to get started with the pre-built templates.
Customize the Kadence Template
Kadence WP’s premade page templates are customizable, so you can change their style according to your preferences.
Once you click the button, you’ll be displayed with the number of template options.
Because we’re using the Lite version of the Kadence WP theme, we can only use the templates packed in the free version.
You can choose whichever free template you prefer. For our example, we are using the Greenthumb Starter Template.
Click on the template to activate it on your site.
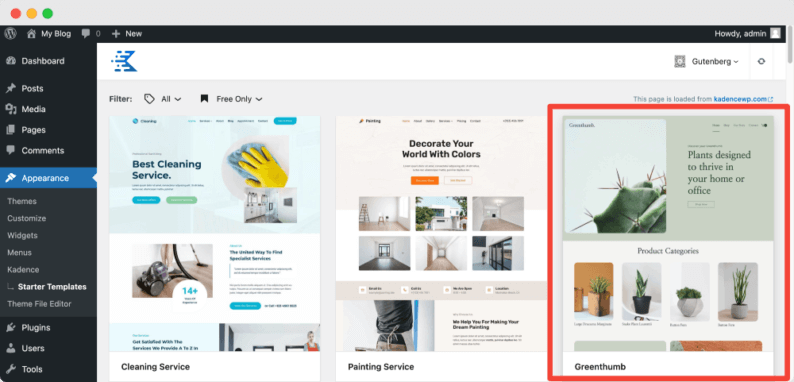
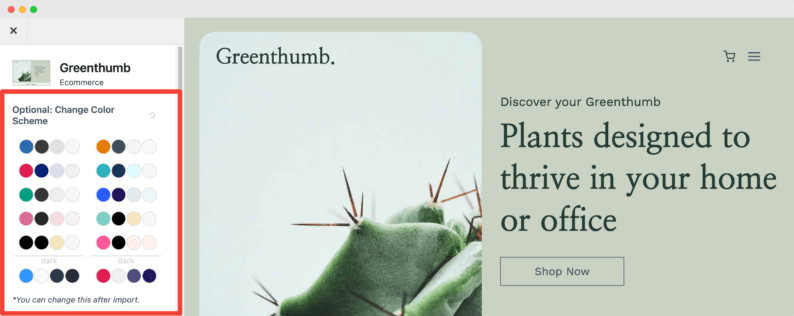
As soon as you click on the template, you’ll be taken to the theme editor, where you get customization options to change the look and feel of your template.
From the screen options, you can:
- Choose the Color Scheme: Choose the color scheme you want for your starter template.
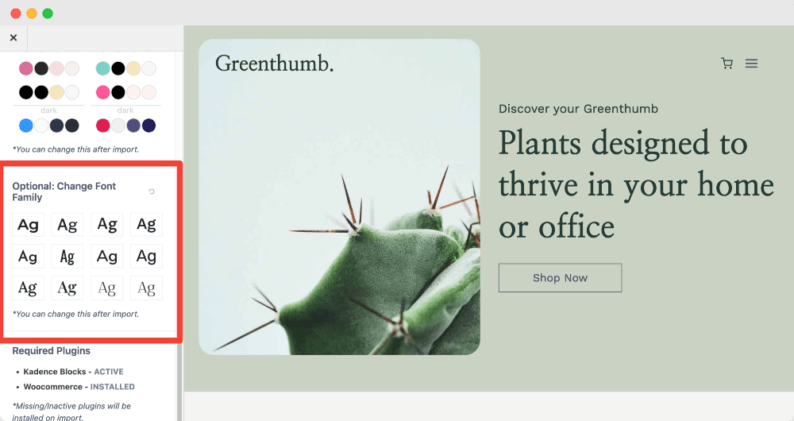
- Alter the Fonts: The starter template lets you choose the font you want to use.
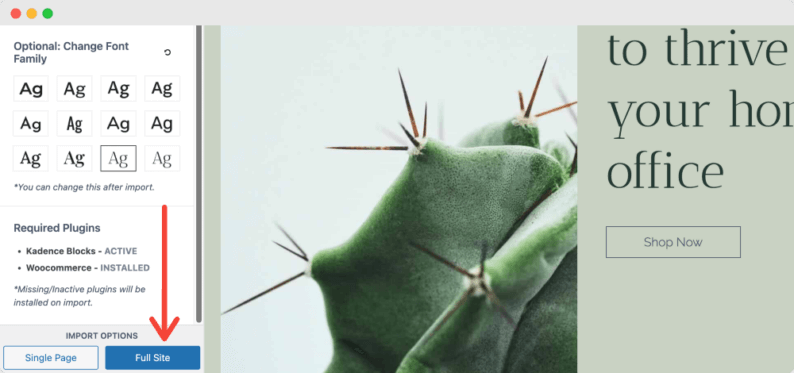
- Import the Site: After you’ve selected all your customizations, it’s time to build your site. You don’t have to worry; Kadence Starter Templates will handle everything.
Under the import options, click on the Full Site button to import all plugins, content, and images. It may take a while for the importing process to complete.
- Check the Imported Site: On the right side of the screen, you’ll see a message indicating the import has been completed.
Click on the Finished! View your site button.
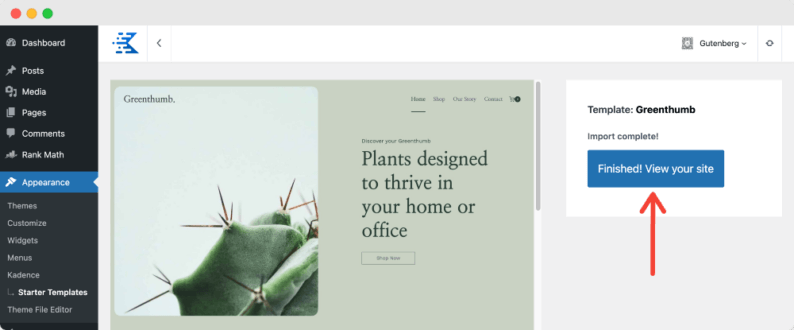
And that’s it! This is how easy it is to install the WordPress theme.
Now we’ll see the process of installing and activating the free WordPress plugin.
Step 4: How to Install and Activate a WordPress Plugin
In the same way, the appearance of a WordPress site depends on its theme, other essential tasks such as content optimization, adding contact forms, tracking analytics, and many more are performed by various WordPress plugins.
There are thousands of plugins available in the WordPress repository, so knowing where to start cannot be easy. It’s important to take a step back and think about what you want to accomplish with your blog before installing any plugins—do you want it to be more organized? Do you want better search functionality? Do you want to rank high in the SERPs?
We’ll start by installing Rank Math – a search engine optimization plugin for WordPress
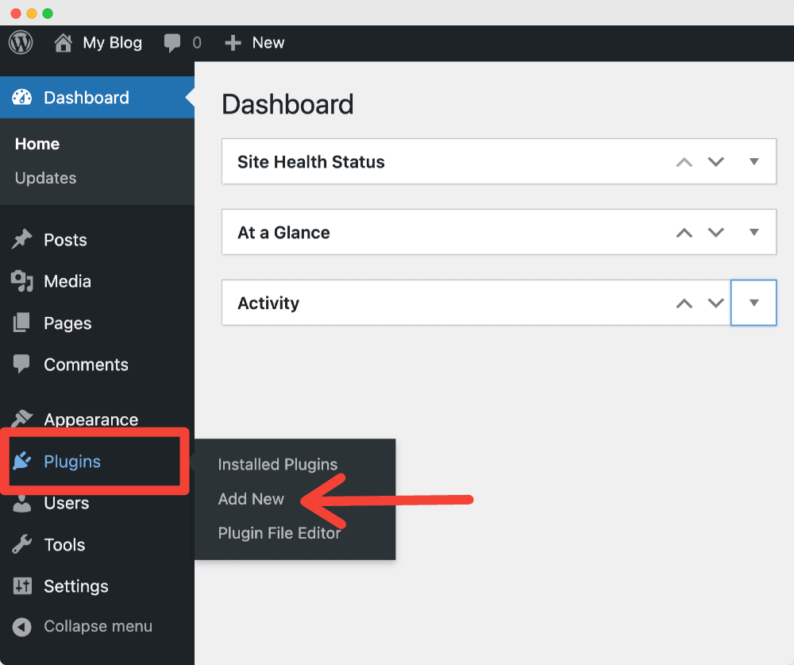
- Go to your WordPress dashboard, and click Plugins >> Add new.
- On the next screen, type “rank math” in the search bar at the top right corner
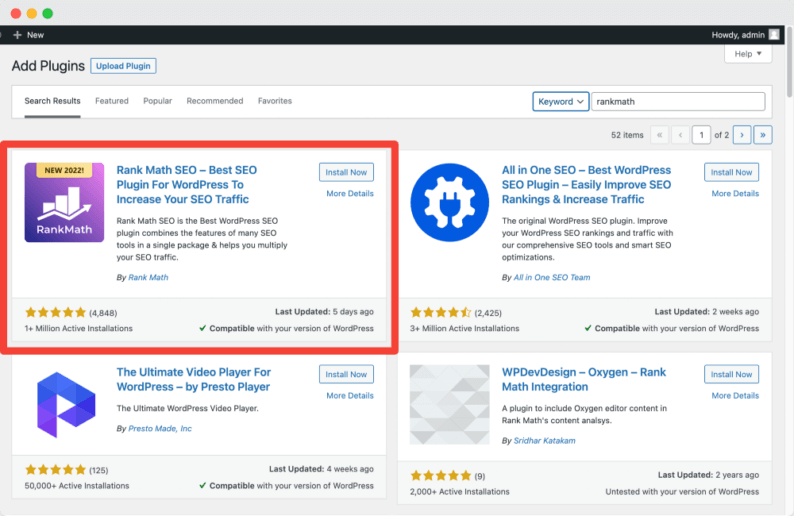
- Many plugin options will appear. Head over to the very first option and click Install Now.
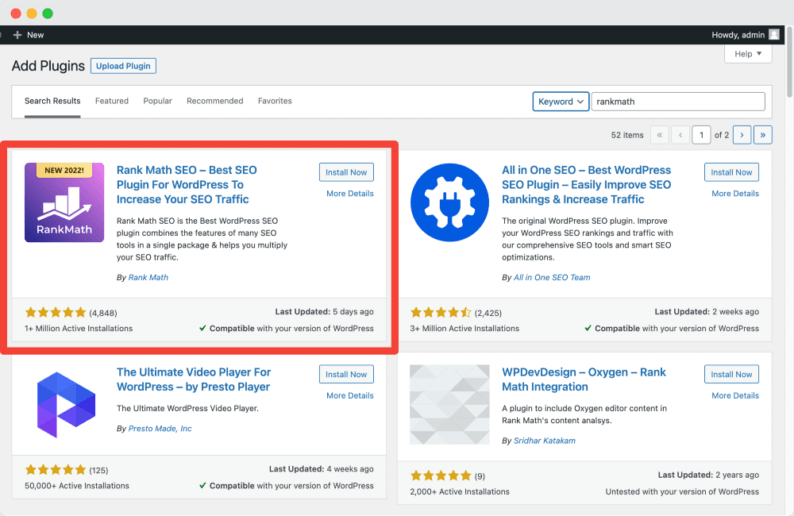
- Once the plugin installation is completed, click Activate.
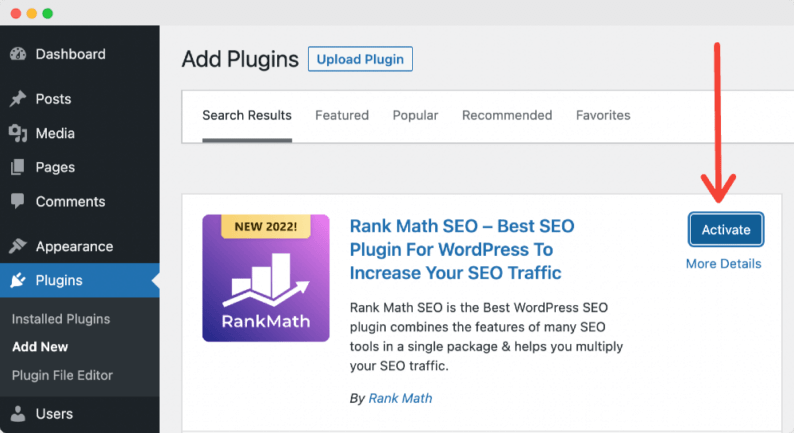
As soon as you activate the Rank Math plugin, a simple wizard will appear so you can set up SEO for your website. After completing the wizard, you’ll be required to add keywords and meta descriptions for each blog post.
To guide more about the process, we’ve added a detailed guide on how to Add Keywords and meta descriptions in WordPress.
There are more than 50,000 free WordPress plugins available. You can install and activate any free WordPress plugin by following the same process.
Here’s a list of some of the plugins that you can use to add more advanced functionality to your site:
- WPForms – To add contact forms to your site.
- MonsterInsights – Helps you integrate your website with Google Analytics.
- Elementor – For responsive design and landing pages. It has 100+ Basic & Pro Widgets.
- Monarch – Allows your visitors to share your posts to social media channels like Facebook and Twitter.
- Bloom – To add email opt-in forms to your blog to grow your subscribers.
- ShortPixel – To optimize your blog images.
- WP Rocket – To improve site loading speed and make it for the Core Web Vitals.
Step 5: How to Write Your First Blog Post in WordPress
Now that you’ve learned how to install a WordPress theme and plugin, it’s time to write your first blog post.
To write a blog, go to your WordPress dashboard and click, Posts >> Add New.
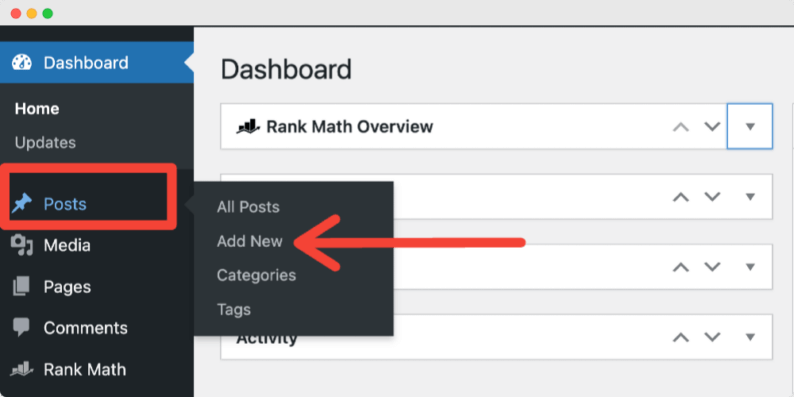
This will redirect you to the WordPress Editor, where you can start writing your blog post.
Simply click and start adding your text. Additionally, you can add blocks for images, galleries, videos, and headings.
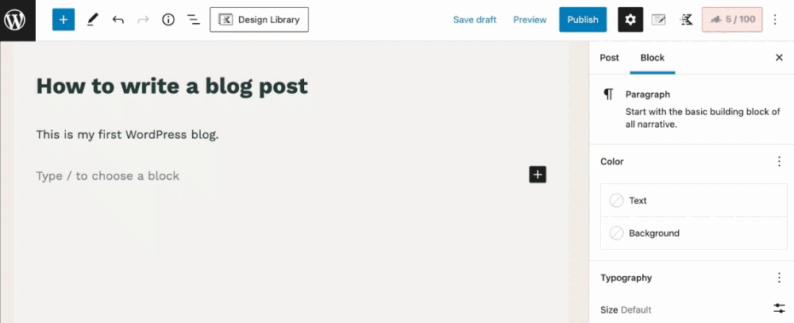
Once you add your content, you can Publish or Save a Draft as per your preference.
How to Promote Your WordPress Blog
Every business needs promotion in order to gain visibility, so as your blog; here I am suggesting some ways through which you can promote your blog and reach a wider audience:
- Promote your blog on social media. Social media is a great way to spread the word about your blog, but it’s also crucial that you can track your traffic and conversions (the number of people who come to the site after being directed there by another source).
Learn: How to Embed a Tweet in WordPress.
- Use search engine optimization (SEO) to help people find your blog. If someone searches for something related to what you write regularly, put an article from one of your blogs at the top of search results—this will increase readership!
Learn: How to Do On-Page SEO in WordPress [Helpful Tips]
Summary
We hope you have enjoyed this guide and are now ready to get started with your own WordPress blog.
Undoubtedly, creating a WordPress blog is simple, as it doesn’t require heavy coding. However, you will need to put in extra effort to maintain and run your blog.
The most important thing is to remember that this is just the beginning of your journey, so enjoy every step along the way. If something comes up that you’re not sure how to do, leave a comment below this post; we’ll be happy to help out.
To learn more about the WordPress ecosystem, you can check out our popular tutorials on:
- How to Speed Up WordPress: 30 Tips
- How to Create A WordPress Staging Site
- How to Choose A WordPress Page Builder
Happy blogging. 🙂
I hope this article helped you, but if you face any trouble, you can ask me in the comments section below or contact me directly, and I’d be more than happy to guide you through the process. 🙂
If you liked this article, please share it with your friends and subscribe to the How-To WP Newsletter below to get the latest WordPress tips, tricks, and how-to tutorials directly into your inbox.
FAQs
Can I Start a WordPress Blog Without Any Technical Knowledge?
Yes, you can start a WordPress blog without touching a single line of code.
In addition to creating your blog, WordPress allows you to add a contact form, take a backup, analyze content performance, and more.
Why Is WordPress Best for Blogging?
Instead of listing many benefits, let me highlight 3 main reasons why you should use WordPress:
1. WordPress is open source and 100% FREE.
2. WordPress is popular and one of the most user-friendly blogging platforms for beginners.
3. WordPress offers tons of free templates and themes that can be customized to match your styling preferences.
You need to note that here we’re talking about self-hosted WordPress, i.e., WordPress.org, which is different from WordPress.com.
For our tutorial, we’ll guide you to build a blog on self-hosted WordPress (WordPress.org). If you want to learn about WordPress.com, check out our blog on how to start a blog for Free with WordPress.com.
You can either choose WordPress.org or WordPress.com to start your blog. However, we recommend you to use the self-hosted WordPress, as it is pocket friendly, offers more customization options, and gives you more control over your website.
How Much Does It Cost to Start a Blog on WordPress?
WordPress is a free and open-source content management system (CMS) that you can use to create and maintain your website.
While building a blog with WordPress, you must pay for a domain name and hosting. Purchasing a domain name for your site (like “myblog.com”) will cost ~ 20 $ USD per year.
Hosting costs vary based on how much traffic each website receives; however, most companies offer discounts if users sign up for more extended periods than just one month!
Is It Safe to Create a WordPress Website?
It is safe to create a blog on WordPress.
Conversely, no content management system can guarantee 100% security. But if you install the right set of WordPress security plugins and follow basic security practices, you can save your site from exploitation, hackers, and spammers.
WordPress is the most popular open-source content management system (CMS)- currently powering more than 43% of all websites on the internet. Many popular websites’ blogs, such as TED, Star Wars, Facebook Newsroom, and others, have trusted and built their blogs on WordPress.
How Do I Choose a Niche for My WordPress Blog?
Choosing a niche is the most challenging and vital part of starting a blog. A blog’s success is determined by its niche/subject.
Even if you want to start a hobby blog, you should first brainstorm content ideas to publish on it. When choosing a blog niche, think about what interests and entertains you the most.
It can be anything, cooking, knitting, DIY ideas, traveling, technology; the list is infinite.
You need to gather ideas about what people are interested in learning more about online by examining what other bloggers have chosen for themselves before you start your own.
Is It Possible to Make Money From a WordPress Blog?
Yes, making money from a WordPress blog is possible but not easy.
The process of earning money through blogging does not happen in a day or a few days, and it takes time and effort to make money via blogging.
It takes consistency, dedication, and hard work to make a blog successful. Here are some ideas to get you started on making money with WordPress.
Subscribe to our Monthly Newsletter
Get monthly updates of WordPress tips, tricks, and tutorials in your email.
Thanks. You have successfully subscribed.
