Encountering the “Upload: Failed to Write File to Disk” error in WordPress, can be a frustrating experience. Especially when you need to upload important files to your site. This error prevents you from uploading any media files. Such as images, videos, or documents, hindering your site’s content management capabilities. Addressing the issue and Fix Write File Error is crucial for maintaining the functionality and efficiency of your WordPress site.
This error not only hinders your ability to enhance your website with new content. But can also signal underlying issues that may affect the overall health and performance of your site. Therefore, understanding how to fix the write file error promptly is crucial for maintaining a smooth and efficient website management experience. Fixing the write file error ensures that you can continue adding content without interruption, which is vital for both user engagement and SEO performance.
In this article, we will delve into the intricacies of the “Upload: Failed to Write File to Disk” error. We will explore its causes, symptoms, and the impact it has on your website’s functionality. Fortunately, this issue can be resolved with a few steps. More importantly, we will provide a comprehensive guide on how to fix the write file error using various solutions.
By the end of this article, you will be equipped with the knowledge. And tools necessary to troubleshoot and resolve this issue. Ensuring your WordPress site remains fully operational and user-friendly. Learning how to fix the write file error will help you maintain your site’s performance. And avoid potential disruptions in your content management workflow. This tutorial will guide you through understanding the causes of this error and provide you with clear, actionable steps to fix it.
Understanding The Upload: Failed to Write File to Disk” Error
Encountering the “Upload: Failed to Write File to Disk” error in WordPress can be both frustrating and perplexing. Especially when you are in the middle of uploading crucial content or media files. This section aims to demystify the error by exploring its causes, symptoms, and the impact it can have on your website’s functionality.
What Causes the Failed to Write File to Disk Error in WordPress?
The “Failed to Write File to Disk” error typically occurs due to incorrect file permissions or issues with the temporary directory where WordPress stores files before uploading them to the media libraryThe Media Library in WordPress is a feature that allows users to easily upload and manage media files such as … More. Understanding what causes this write file error is crucial to applying the right fix and preventing the issue from recurring.
Several factors can contribute to the occurrence of this error:
- Incorrect File Permissions: One of the most common causes is incorrect file permissions on your WordPress directories. If the web server does not have the necessary permissions to write files to the disk, you will encounter this error.
- Exceeding Disk Quota: If your hosting account has a disk quota and you have exceeded it, the server will not allow any more files to be written to the disk.
- Temporary Folder Issues: WordPress uses a temporary folder for uploads before moving them to the designated directory. If this folder is missing or inaccessible, the upload process will fail.
- PHP Configuration Limits: Settings in the PHP configuration file (php.ini) such as `upload_max_filesize`, `post_max_size`, and `max_execution_time` can also lead to this error if they are set too low.
Symptoms of the Error
Recognizing the symptoms of the “Upload: Failed to Write File to Disk” error can help you diagnose and address the issue promptly. Common symptoms include:
- Error Message During Upload: The most obvious symptom is the display of an error message stating “Upload: Failed to Write File to Disk” when you attempt to upload a file via the WordPress media library.
- Failed Media Uploads: You may notice that new media files are not appearing in your media library, even though you have attempted to upload them.
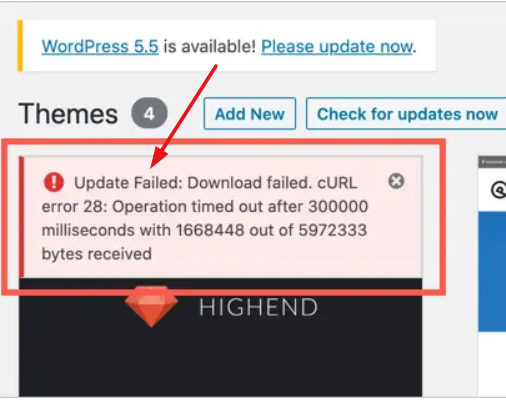
- Inability to Update Plugins or ThemesA WordPress theme is a set of files that determine the design and layout of a website. It controls everything … More: Sometimes, this error can also prevent you from updating plugins or themes, as WordPress needs to write files to the disk during the update process.
Impact on Website Functionality
The “Upload: Failed to Write File to Disk” error can significantly impact your website’s functionality and user experience in several ways:
- Content Management Disruption: Inability to upload media files can hinder your ability to manage and update content effectively, especially if your website relies heavily on multimedia elements.
- PluginA plugin is a software component that adds specific features and functionality to your WordPress website. Esse… More and Theme Updates: As mentioned earlier, this error can prevent you from updating essential plugins and themes, potentially leaving your site vulnerable to security risks and missing out on new features.
- User Experience: A lack of updated content and potential site instability can result in a poor user experience, which may lead to decreased engagement and higher bounce rates.
Understanding the causes, symptoms, and impacts of the “Upload: Failed to Write File to Disk” error sets the stage for implementing effective solutions. In the next section, we will explore various methods to fix this error and ensure your WordPress site runs smoothly.
Why You Get Upload Failed to Write File to Disk Error
Several factors contribute to the upload failed to write file to disk error:
- Incorrect File Permissions: If the folders where WordPress tries to save files do not have the correct write permissions, you’ll encounter the write file error.
- Full Disk Space: If your hosting account has run out of disk space, WordPress will be unable to save the uploaded files, causing the write file error.

- Temporary Directory Issues: WordPress uses a temporary directory to handle file uploads, and if this directory is not accessible, you’ll experience the write file error.
How to Fix the Upload Failed to Write to Disk Error in WordPress
Dealing with the “Upload Failed to Write to Disk” error in WordPress can disrupt your workflow and prevent you from managing your media effectively. This issue often arises from problems with file permissions or temporary directory settings. In this guide, we’ll show you how to fix the write file error by addressing common causes and implementing straightforward solutions. Follow these steps to quickly resolve the upload failed to write to disk error and ensure smooth file uploads on your WordPress site.
Using FTP Client Software
When it comes to managing files on your server, FTP (File Transfer Protocol) client software is an invaluable tool. This section will guide you through the process of choosing the right FTP client, connecting to your server, and efficiently transferring files. Understanding these basic steps will set the foundation for more advanced tasks, such as modifying file permissions and addressing upload issues.
A. Choosing the Right FTP Client
The first step in using FTP client software is selecting the right application for your needs. There are various FTP clients available, both free and paid, each offering a variety of features. Some popular options include FileZilla, Cyberduck, and WinSCP. When choosing an FTP client, consider the following factors:
- Compatibility: Ensure the FTP client is compatible with your operating system, whether it’s Windows, macOS, or Linux.
- User Interface: Look for an intuitive and user-friendly interface, especially if you’re new to FTP.
- Security Features: Prioritize clients that support secure FTP protocols like FTPS and SFTP, which encrypt data to protect sensitive information.
- Advanced Features: Depending on your needs, you might want features like synchronized browsing, drag-and-drop functionality, and automated transfers.
B. Connecting to Your Server
Once you’ve chosen an FTP client, the next step is to connect to your server. Here’s a general guide to get you started:
- Open Your FTP Client: Launch the FTP client you have installed.
- Enter Your Server Credentials: You’ll need to input your server’s hostname (or IP addressAn IP Address (Internet Protocol Address) is a unique numerical identifier assigned to every device connected … More), your FTP username, and password. Some servers may also require a port number, which is typically 21 for FTP and 22 for SFTP.
- Select the Connection Type: Choose between FTP, FTPS, or SFTP based on your server’s configuration and your security needs.
- Connect: Click the ‘Connect’ button to establish a connection. If all credentials are correct, you should see a directory listing of your server’s files and folders.

C. Transferring Files
With a successful connection established, you can now transfer files between your local machine and the server. Here’s how:
- Navigating Directories: Use the FTP client’s interface to navigate through your local files and server directories. Typically, the interface is split into two panels, with the local file system on one side and the server’s file system on the other.
- Uploading Files: To upload a file, simply drag it from your local directory and drop it into the desired directory on the server side. Alternatively, you can use the upload button in the FTP client.
- Downloading Files: To download a file, drag it from the server directory and drop it into a folder on your local machine, or use the download button.
- Managing Files: Most FTP clients offer basic file management options such as creating new directories, renaming files, and deleting unwanted files. Utilize these tools to organize your server’s file system efficiently.
- Monitoring Transfer Status: Pay attention to the transfer status window in your FTP client. This will show the progress of ongoing transfers, any errors encountered, and a log of completed actions.

Understanding these fundamental aspects of using FTP client software will empower you to manage your server files effectively. In the next sections, we will delve into more specific tasks, such as accessing and modifying file permissions, which are crucial for resolving upload write-to-disk issues.
Accessing File Permissions
Understanding and managing file permissions is crucial for maintaining the security and functionality of your website. In this section, we will explore the essentials of file permissions, how to modify them using FTP client software, and address common permission issues that you may encounter.
A. Understanding Permission Levels
File permissions are the access rights granted to users and processes for files and directories on a server. These permissions are typically represented by a combination of three types of access:
1. Read (r): Grants the ability to read the contents of the file or list the contents of the directory.
2. Write (w): Allows modifying or deleting the file, or altering the contents of a directory.
3. Execute (x): Permits running a file as a program or script, or accessing a directory to traverse its contents.
Permissions are set for three categoriesIn WordPress, categories are a fundamental taxonomy used to group and organize posts based on their topics or … More of users:
- Owner: The user who owns the file or directory.
- Group: A set of users who share the same access rights.
- Others: All other users.
The permissions are typically represented in a three-digit octal number (e.g., 755), where each digit corresponds to the permissions for the owner, group, and others, respectively.
B. Using FTP Clients to Modify Permissions
FTP client software can be a powerful tool for managing file permissions on your server. Follow these steps to modify permissions using a typical FTP client:
- Connect to Your Server: Open your FTP client and connect to your server using the appropriate credentials.
- Navigate to the File or Directory: Browse through the server’s file structure to locate the file or directory you wish to modify.
- Right-Click and Select Permissions: Right-click on the file or directory and select ‘Permissions’ or ‘Properties’ from the context menuIn WordPress, a menu is a collection of links that are displayed as a navigation menu on a website. Menus are … More.
- Modify the Permissions: A dialog box will appear showing the current permissions. You can usually check or uncheck boxes corresponding to read, write, and execute permissions for the owner, group, and others. Alternatively, you can enter the numeric value directly.
- Apply Changes: Once you have set the desired permissions, apply the changes and verify that they have been correctly updated.
C. Common Permission Issues
Permission issues can manifest in various ways, from inability to upload files to security vulnerabilities. Here are some common issues and how to address them:
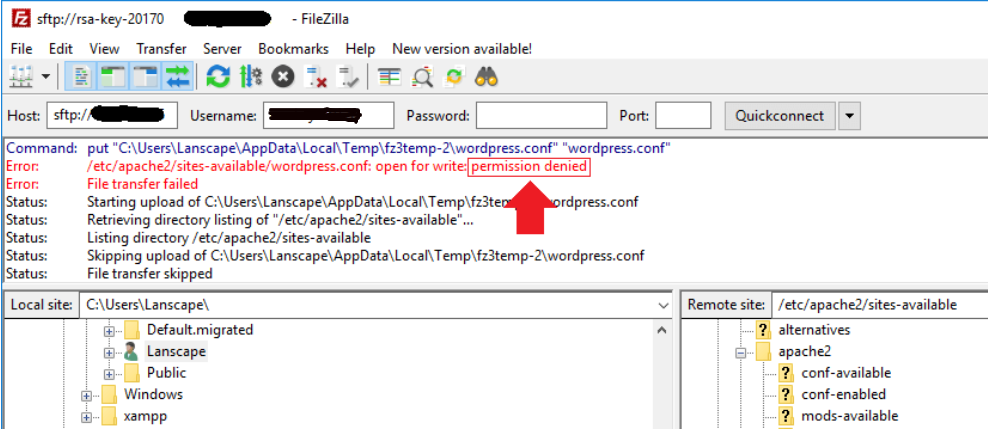
- Permission Denied Errors: If you encounter ‘permission denied’ errors when trying to access or modify a file, ensure that the user has the necessary write permissions. Adjust the permissions using your FTP client as described above.
- Security Risks: Setting permissions too leniently (e.g., 777) can pose security risks by allowing unauthorized users to execute, modify, or delete files. Always use the principle of least privilege, granting only the necessary permissions.
- Conflicting Permissions: Sometimes, permissions set at different levels (owner, group, others) can conflict, leading to unexpected behavior. Review the permission settings holistically to ensure they align with your security and functionality requirements.
Understanding and managing file permissions is an essential skill for maintaining a secure and operational website. By using FTP client software effectively, you can ensure your files and directories have the appropriate access rights, minimizing the risk of errors and vulnerabilities.
Changing the Numeric Value of Folders Only
Changing the numeric value, or permissions, of folders is a crucial step in managing file accessibility and security on your server. This section will guide you through understanding folder permissions, modifying them using an FTP client, and verifying that your changes have been successfully implemented.
A. Identifying Folder Permissions
Before making any changes, it’s essential to identify the current permissions of your folders. File permissions are typically represented by a three-digit numeric value, with each digit ranging from 0 to 7. These digits correspond to the read (r), write (w), and execute (x) permissions for three different user groups: the owner, the group, and others.
- Owner (User): The creator of the folder.
- Group: Other users who belong to the group that owns the folder.
- Others: All other users.
For example, a permission value of 755 means:
- The owner can read, write, and execute (7).
- The group can read and execute (5).
- Others can read and execute (5).
To identify the current permissions, most FTP clients allow you to view this information by right-clicking on the folder and selecting “Properties” or “Permissions.”
B. Changing Permissions Using FTP
Once you’ve identified the existing permissions, you can modify them to suit your needs. Follow these steps to change folder permissions using an FTP client:
- Open Your FTP Client: Launch the FTP client software of your choice and connect to your server.
- Navigate to the Folder: Browse the directory structure to locate the folder whose permissions you want to change.
- Access Permission Settings: Right-click on the folder and select the option that allows you to change permissions. This option is often labeled “Properties,” “File Permissions,” or something similar.
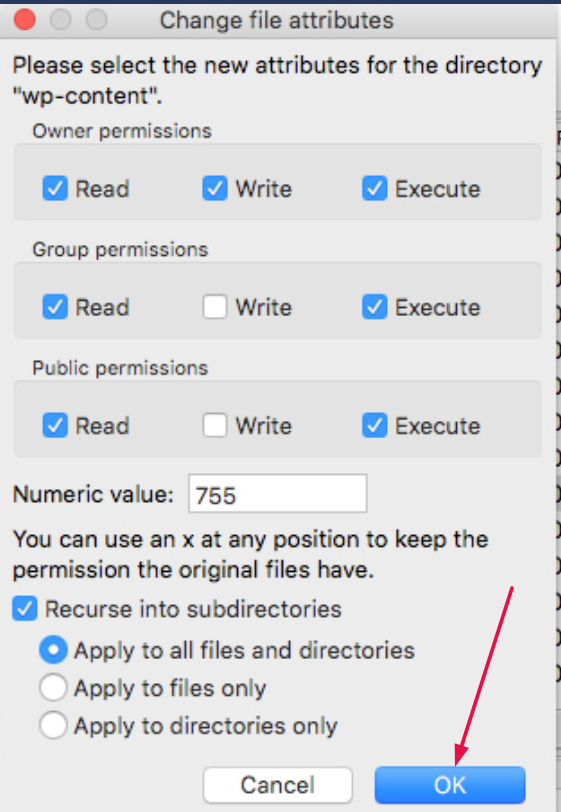
- Modify the Numeric Value: A dialog box will appear, displaying the current numeric value of the folder’s permissions. Change these values according to your requirements. For instance, if you want to make the folder writable by the owner but not by the group or others, you might change the value to 755 or 700, depending on your needs.
- Apply the Changes: Click “OK” or “Apply” to save your changes. The FTP client will communicate with the server to update the folder’s permissions.
C. Verifying Changes
After updating the folder permissions, it’s crucial to verify that the changes have been correctly applied. To do this:
- Refresh the Directory: In your FTP client, refresh the directory listing to ensure that the latest permissions are displayed.
- Check the Numeric Value: Right-click on the folder again and select “Properties” or “Permissions” to confirm that the numeric value has been updated as intended.
- Test Accessibility: If possible, test the folder’s accessibility by attempting to read, write, or execute its contents based on the new permissions. This step ensures that the folder behaves as expected under the new settings.
By carefully managing folder permissions, you can enhance the security and functionality of your server’s file system. Properly configured permissions help prevent unauthorized access while ensuring that necessary operations can be performed efficiently.
Changing the Numeric Value of Files Only
When managing a website or server, it is crucial to understand the distinction between file and folder permissions. While folders often require more lenient permissions to allow for directory listing and navigation, files typically demand stricter controls to maintain security. This section will guide you through the process of changing the numeric value of file permissions using an FTP client, ensuring your files are both accessible and secure.
A. Differentiating File Permissions from Folder Permissions
File permissions determine who can read, write, or execute a file. Unlike folder permissions, which also control navigation and directory listing, file permissions focus solely on the file’s content. The numeric values used to set these permissions are similar for both files and folders but must be applied thoughtfully to avoid compromising security.
The numeric values correspond to the following permission levels:
- 4 (Read): Allows viewing the file’s content.
- 2 (Write): Permits modifying the file’s content.
- 1 (Execute): Enables running the file as a program.
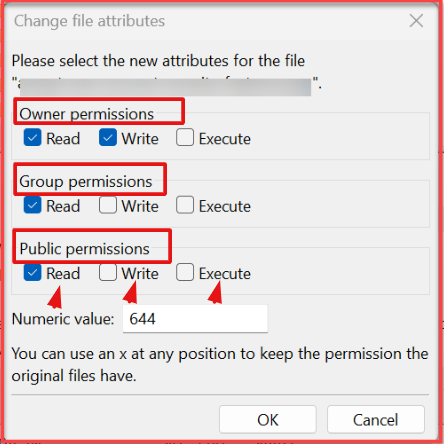
For example, a numeric value of 644 means:
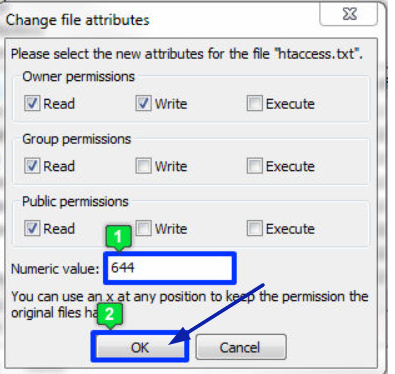
- The owner can read and write the file.
- The group can only read the file.
- Others can only read the file.
B. Using FTP to Modify File Permissions
To change the numeric value of file permissions using an FTP client, follow these steps:
- Connect to Your Server: Open your chosen FTP client and connect to your server using your credentials. Ensure you have the necessary access rights to modify file permissions.
- Navigate to the File: Browse through your server’s directory structure to locate the file you wish to modify. Right-click on the file to open the context menu.
- Modify Permissions: Select the option to change permissions or properties. A permissions dialog box will appear, typically allowing you to set the numeric value directly or by checking boxes for read, write, and execute permissions for the owner, group, and others.
- Set Numeric Value: Enter the desired numeric value for the file permissions. Double-check to ensure the settings align with your security needs—generally, files should not be given execute permissions unless necessary for scripts or programs.
- Apply Changes: Save or apply the changes. The FTP client will send a command to the server to update the file permissions.
C. Ensuring File Security
After modifying file permissions, it is essential to verify that the changes have been correctly implemented and that your files remain secure:
- Double-Check Permissions: Revisit the permissions dialog box to confirm that the numeric value has been applied as intended.
- Test File Access: Attempt to access the file from different user levels (owner, group, others) to ensure that permissions are functioning correctly. For instance, try reading and writing the file as the owner, and only reading it as a group member or other user.
- Review Security Settings: Regularly audit your file permissions to ensure they remain appropriate as your site or server evolves. Remove unnecessary write or execute permissions to minimize security risks.
- Use Logs and Monitoring: Implement logging and monitoring tools to track changes to file permissions. This can help detect unauthorized modifications and maintain the integrity of your server.
By carefully managing file permissions, you can protect sensitive data while ensuring necessary access for authorized users. Properly setting the numeric value of file permissions is a fundamental aspect of server management, contributing to the overall security and functionality of your online presence.
Checking the Temporary File Directory
Temporary file directories are essential components of a system’s file management. They play a crucial role in storing transient data that applications and processes generate during their operations. However, if not managed properly, these directories can become cluttered and lead to various issues, including disk space depletion and application errors. This section will guide you through the steps to locate, clean up, and maintain your temporary file directory to ensure smooth system performance.
A. Locating the Temporary File Directory
The first step in managing your temporary file directory is knowing where it is located. The location can vary based on the operating system you’re using:
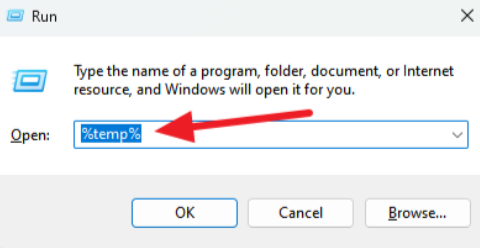
- Windows: On Windows systems, the temporary files are usually stored in the `%TEMP%` or `%TMP%` directories. You can access these directories by typing `%TEMP%` or `%TMP%` in the Run dialog box (press `Win + R` to open it).
- macOS: On macOS, temporary files are typically stored in the `/tmp` directory. You can access this directory using the Terminal application by typing `cd /tmp`.
- Linux: On Linux systems, the temporary files are generally located in the `/tmp` directory, similar to macOS. You can navigate to this directory using any terminal or shell program by typing `cd /tmp`.
B. Cleaning Up Temporary Files
Once you have located the temporary file directory, the next step is to clean it up. This process can be performed manually or using built-in tools and utilities specific to your operating system.
1. Manual Cleanup:
- Windows: Open the temporary directory by typing `%TEMP%` in the Run dialog box. Select all files and folders and delete them. Be cautious not to delete any files currently in use by applications.
- macOS/Linux: Open the Terminal and navigate to the `/tmp` directory. Use the `rm` command to delete files and directories. For example, `sudo rm -rf /tmp/*` will remove all files and directories within `/tmp`.
2. Automated Tools:
- Windows: Use Disk Cleanup, a built-in utility, to clean up temporary files. Open Disk Cleanup by searching for it in the Start menu, select the drive you want to clean, and follow the prompts to remove temporary files.
- macOS: Use third-party applications like CleanMyMac or OnyX, which offer options to clean temporary files and other system junk.
- Linux: Use tools like `BleachBit` to automate the cleanup of temporary files and other unnecessary data.
C. Preventing Future Issues
Regular maintenance of the temporary file directory is crucial to prevent future issues. Here are some best practices to ensure that your temporary files do not cause problems:
- Automate Cleanup: Schedule regular automated cleanups using tools and scripts. For example, on Windows, you can use Task Scheduler to run Disk Cleanup at regular intervals. On macOS and Linux, you can create cron jobsA cron job is a time-based task scheduler in Unix-like operating systems. It allows users to schedule tasks, s… More to clean the `/tmp` directory periodically.
- Monitor Disk Space: Keep an eye on your disk space usage. Tools like Windows Performance Monitor, macOS Activity Monitor, and Linux `df` command can help you track disk space and identify when temporary files are taking up too much space.
- Application Settings: Configure applications to manage their temporary files efficiently. Some applications offer settings to clean up temporary files automatically after a certain period or when the application closes.
By effectively managing your temporary file directory, you can maintain optimal system performance. And avoid potential issues related to disk space and application errors. Regular monitoring and cleanup, combined with the right tools and practices. You can fix Upload: Failed to Write File to Disk” error in WordPress. It will help keep your system running smoothly.
Final Thoughts: Fix Write File Error
Fixing the “Upload: Failed to Write File to Disk” error in WordPress involves adjusting file permissions. And ensuring your temporary directory is properly configured. By following the steps outlined in this guide to fix the write file error, you should be able to resolve the issue and restore your ability to upload files seamlessly.
If the error persists, consulting your hosting provider for further assistance may be necessary. Proper server configuration and adequate disk space are crucial for maintaining a smooth and functional WordPress site. With the right setup, you can avoid similar errors in the future and ensure your site runs efficiently.
Tired of battling the pesky “write file error” in WordPress? This frustrating issue can disrupt your workflow and prevent you from updating your website. Our expert support team can help you fix write file error in WordPress quickly and efficiently.
If you’re looking for reliable WordPress hosting with done-for-you updates and expert troubleshooting for common errors like this, check out our hosting packages by clicking the button below.


