Editing the footer in WordPress is a common customization many website owners undertake to make their site more personalized and professional. This guide will walk you through the entire process of how to edit the footer in WordPress, ensuring you have a comprehensive understanding of how to manage and modify your footer content effectively.
The footer is the bottom section of your website, typically containing information such as copyright notices, links to important pagesIn WordPress, a page is a content type that is used to create non-dynamic pages on a website. Pages are typica… More, contact information, and sometimes social media icons or widgetsA widget is a small block of content that performs a specific function and can be added to certain areas of a … More. Customizing and editing the footer in WordPress can enhance the user experience and add a touch of professionalism to your site.
Explore the importance of editing your WordPress footer to ensure consistent branding, easy navigation with essential links, and compliance with legal requirements. Additionally, optimize it for SEO purposes to improve your website’s search engine visibility and ranking. Editing your WordPress footer is essential for several reasons:
- Branding: Maintain consistent branding throughout your website by customizing the footer to reflect your brand identity.
- Navigation: Include important links in the footer for easy access, enhancing user experience and site navigation.
- Legal Compliance: Display legal information such as terms of service, privacy policies, and copyright details to ensure compliance with regulations.
- SEO: Optimize your footer with relevant keywords and links to improve search engine rankings and enhance visibility online.
Editing the footer in WordPress allows you to personalize your website’s bottom section with important information, links, or design elements. Here’s a concise guide on how to achieve this using five different methods:
1. Using the WordPress Customizer
The WordPress Customizer is a powerful tool designed to simplify the process of customizing your website’s appearance. With its intuitive interface, users can effortlessly tweak various elements of their site in real-time, ensuring a seamless design experience.
One of the key features of the Customizer is its ability to customize the footer section of your website. From adjusting layout and color schemes to adding widgets and custom text, the Customizer offers a comprehensive set of options to tailor your footer to your liking.
Whether you’re a beginner or an experienced user, harnessing the power of the WordPress Customizer can elevate the visual appeal and functionality of your website with ease. Here are the steps to follow in editing footer in wordpress using customizer:
Steps:
- Log in to your WordPress dashboardIn WordPress, the Dashboard is a central hub for managing a website’s content and settings. It is the first sc… More.
- Navigate to Appearance > Customize.
- Select ‘Footer’ or ‘Widgets.’ The options here depend on your theme.
- Save & Publish your changes.
- Make your changes. This can include adding widgets, changing text, or customizing links.

2. Editing Footer via Theme Settings
Learn how to personalize your website’s footer effortlessly through Theme Settings. Discover the built-in tools that enable easy customization, allowing you to tailor the footer to your preferences and enhance your site’s appearance and functionality.
Steps:
- Log in to your WordPress dashboard.
- Navigate to Appearance > Theme Options or Customize.
- Locate the Footer section. This may be under various names like ‘Footer Settings,’ ‘Footer Options,’ etc.
- Customize as needed. Options might include editing text, adding widgets, or changing layout.
- Save your changes.
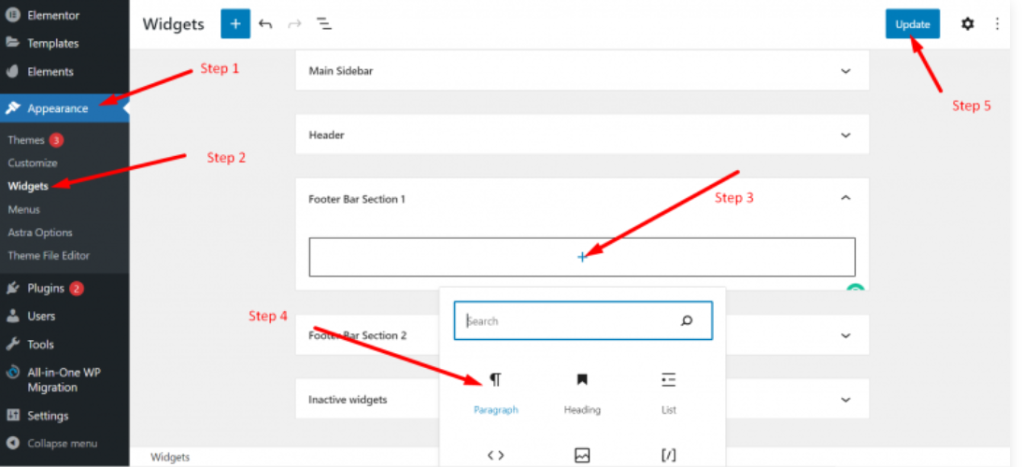
3. Customizing Footer Widgets
Widgets are a flexible way to add content to your footer.
Steps:
- Log in to your WordPress dashboard.
- Navigate to Appearance > Widgets.
- Find the Footer Widget Area. This might be named ‘Footer 1,’ ‘Footer 2,’ etc., depending on your theme.
- Add or edit widgets. You can drag and drop widgets into the footer area.
- Configure each widget as needed (e.g., text, links, images).
- Save your changes.
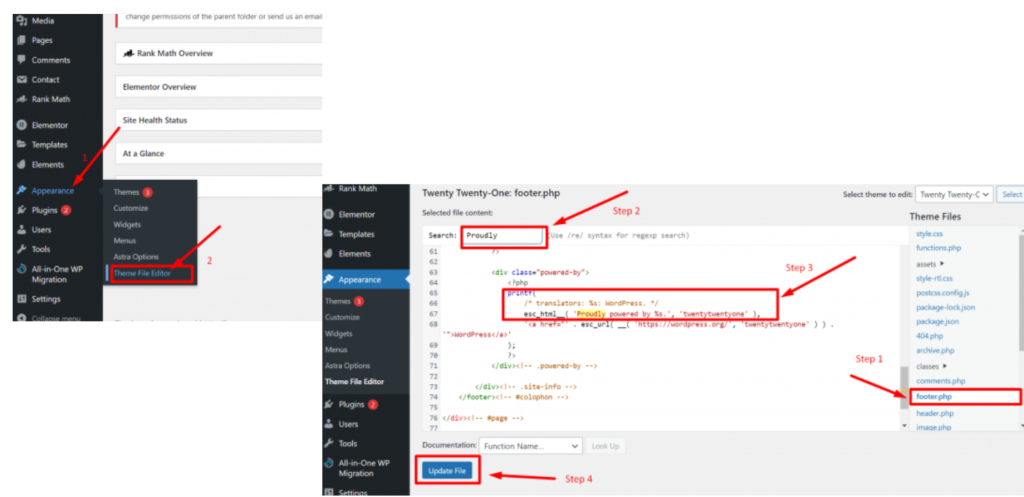
4. Editing the Footer.php File
For advanced customization, you may need to edit the footer.php file directly. Note: This method requires a basic understanding of PHP and HTML. Always back up your site before making any changes.
Steps:
- Log in to your WordPress dashboard.
- Navigate to Appearance > Theme Editor.
- Select the footer.php file from the list on the right.
- Edit the code to make your desired changes. This can include adding custom HTML, PHP, or shortcodesA shortcode in WordPress is a small piece of code that allows users to perform complex functions or display dy… More.
- Save your changes.
5. Using Plugins to Edit Footer in WordPress
There are several plugins available that can help you customize your footer without needing to edit code.
Recommended Plugins:
- Elementor: A powerful page builder that allows for footer customization.
- Footer Putter: Specifically designed for managing footer content.
- WPForms: For adding contact forms to your footer.
Steps:
- Log in to your WordPress dashboard.
- Navigate to Plugins>Add New
- Install and activate your chosen pluginA plugin is a software component that adds specific features and functionality to your WordPress website. Esse… More.
- Follow the plugin-specific instructions to customize your footer.
- Save your changes.

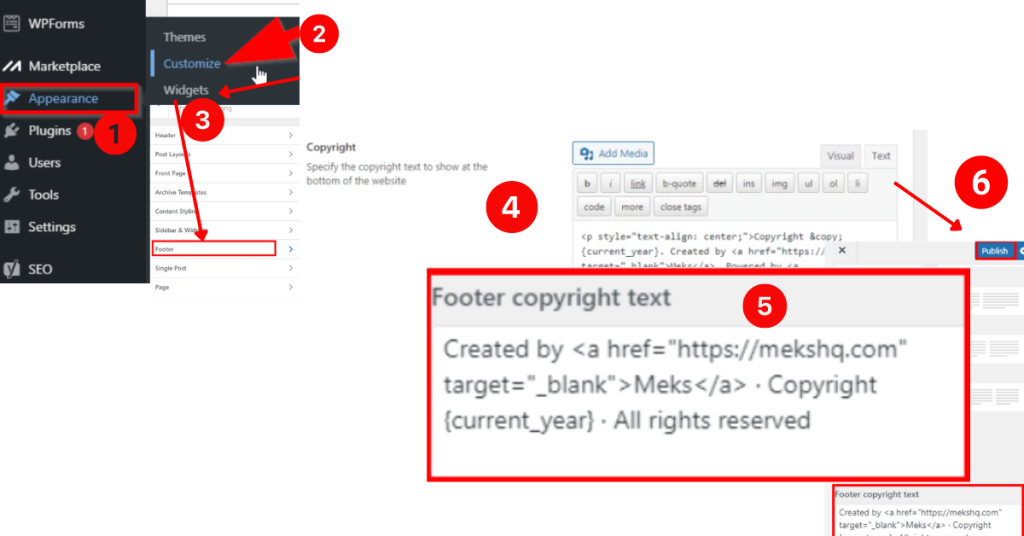
Changing the copyright footer in WordPress is a simple yet important task for ensuring your website reflects the correct ownership and legal information. The footer area, typically found at the bottom of every page on your site, often includes a copyright notice that you may want to customize to reflect your brand and current year accurately. Here’s a QUICK step-by-step guide to help you modify the copyright footer in your WordPress site:
Steps:
- Log in to your WordPress dashboard.
- Navigate to Appearance > Customize.
- Select ‘Footer’ or ‘Widgets.’ The options here depend on your theme.
- Locate the copyright text field.
- Edit the text to display your desired copyright information.
- Save & Publish your changes.
When it comes to refining the appearance and functionality of your WordPress website, edit the footer in WordPress is a crucial task. However, overlooking certain aspects or making common mistakes can compromise the professionalism and usability of your site. Here’s a concise guide on what to avoid when editing your WordPress footer to maintain both its aesthetic appeal and functionality.
Common Mistakes:
- Not Backing Up Your Site: One of the cardinal rules of website management is to always back up your site before making any significant changes. This precautionary step ensures that in case something goes awry during the editing process, you can easily revert to a previous version without losing valuable content or data.
- Editing Core Theme Files: Directly modifying core theme files might seem like a quick fix, but it’s a risky practice. Any alterations made to these files can be overwritten during theme updates, leading to potential loss of customizations. Instead, opt for safer alternatives like creating a child themeA child theme is a WordPress theme that inherits the functionality and styling of another theme, referred to a… More or using custom CSS to make the desired changes without compromising future updates.
- Ignoring Mobile Responsiveness: With the increasing prevalence of mobile browsing, overlooking the responsiveness of your footer can be a costly mistake. Ensure that your footer design adapts seamlessly to various screen sizes, maintaining both visual appeal and functionality across different devices.
- Overloading with Widgets: While widgets can enhance the functionality of your footer, overcrowding it with too many of them can have adverse effects. A cluttered footer not only detracts from the overall user experience but also slows down your website’s performance. Strike a balance by including only essential widgets that serve a purpose without overwhelming the footer space.
- Forgetting SEO: Even in the footer, SEO considerations shouldn’t be overlooked. Incorporate relevant keywords and internal links within your footer content to improve search engine visibility and enhance the overall SEO performance of your website. By optimizing your footer content, you can ensure that it contributes positively to your site’s organic search rankings.
By steering clear of these common mistakes when editing your WordPress footer, you can maintain a professional-looking website that delivers an optimal user experience across all platforms while maximizing its SEO potential.
The WordPress footer serves a purpose, but sometimes that purpose might not align with your website’s design or functionality. Perhaps you have a minimalist aesthetic or prefer to showcase navigation elements elsewhere. Whatever your reason, removing the WordPress footer is achievable with the right approach.
This guide will explore two methods for removing the footer in WordPress, catering to both beginners and more technical users:
- Utilizing Theme Customization Options (For Beginners)
- Editing Theme Files with Code (For Advanced Users)
Before diving in, however, let’s consider some key points:
- SEO (Search Engine Optimization) Impact: Footer content can sometimes contain relevant keywords that contribute to your website’s ranking in search results. Removing the footer entirely might have a slight negative impact on your SEO.
- Alternative Approaches: Instead of complete removal, you might consider hiding the footer visually with CSS code or replacing the default footer content with your own.
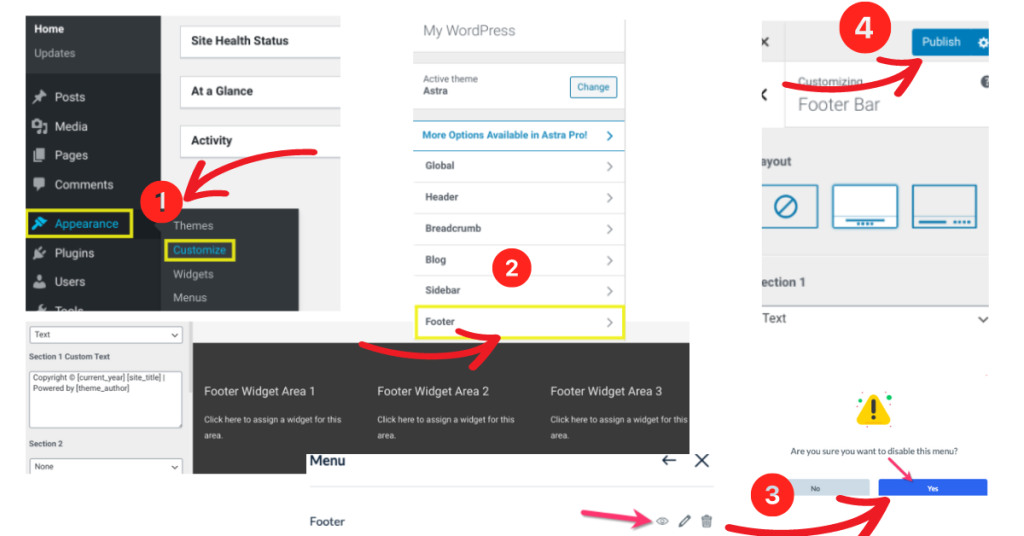
Method 1: Removing the Footer Using Theme Customization
Many WordPress themesA WordPress theme is a set of files that determine the design and layout of a website. It controls everything … More offer built-in options for customizing the footer. Here’s a general process (consult your specific theme documentation for detailed instructions):
- Navigate to Appearance > Customize: Access the WordPress customizer from your admin dashboard.
- Locate Footer Settings: Look for options labeled “Footer”, “Footer Menu”, or similar depending on your theme.
- Disable Footer: The customizer interface might offer an option to disable the footer entirely.
- Save and Publish: Once you’ve made the changes, preview your website and publish them to make them live.
Method 2: Removing the Footer with Code Editing
This method offers more control but requires familiarity with basic coding.
- Access Theme Files (Use Caution!): Use a File Transfer Protocol (FTP) client or your hosting provider’s file manager to access your website’s theme files. Locate the footer.php file within your theme’s directory.
- Identify Footer Code: Look for the code that generates the footer content within the footer.php file.
- Remove or Comment Out Code: Carefully remove or comment out the relevant lines of code to disable the footer functionality.
- Test and Upload: Always test your changes on a staging site before uploading the modified theme files to your live website.
Is It Permissible to Delete the ‘Proudly Powered By WordPress’ Attribution?
The ubiquitous “Proudly Powered By WordPress” tagIn WordPress, tags are a taxonomy used to classify and organize posts. They are similar to categories, but unl… More in website footers is a familiar sight. But what if it clashes with your website’s design or you simply prefer a cleaner look? Is it legal to remove this credit?
This SEO-optimized guide explores the legalities and considerations surrounding the removal of the “Proudly Powered By WordPress” message.
The Power of Open Source: Understanding the GPL License
WordPress operates under the GNU General Public License (GPL), a widely used open-source license. The GPL grants users significant freedom, including:
- The right to use WordPress for free.
- The right to modify the software (including theme files).
- The right to distribute modified versions (not applicable in this case).
In simpler terms, the GPL allows you to customize WordPress in any way you see fit, including removing the “Proudly Powered By WordPress” message.
Beyond Legality: Weighing the Pros and Cons
While removing the credit is legal, there are some factors to consider:
- SEO (Search Engine Optimization): While the impact is likely minimal, the “Powered By WordPress” link might offer minor SEO benefits by associating your website with a reputable platform.
- Transparency and Community: Removing the credit takes away a chance to acknowledge the platform that empowers your website.
- Design Cohesion: If the credit clashes with your website’s design, removing it can enhance visual appeal.
Crafting a Clean Website: Alternative Approaches
Instead of complete removal, here are some alternative options:
- Hide the Credit with CSS: CSS code can be used to visually hide the credit while maintaining the code itself.
Replace the Credit: Create a custom footer message that acknowledges WordPress while reflecting your brand identity.
Editing your WordPress footer is a valuable skill that allows you to tailor your website to your specific needs. Whether you use the Customizer, theme settings, widgets, or direct code editing, there are plenty of options to achieve the perfect footer for your site. Always remember to back up your site before making significant changes and test your new footer to ensure it works well on all devices. Happy customizing!
By following this guide on how to edit the footer in WordPress, you’ll be well on your way to creating a professional and functional footer for your WordPress site.