Do you have a team of talented writers contributing to your WordPress website? Or perhaps you’re just starting out and want to establish yourself as the author of your content. WordPress authorship management is a crucial aspect of maintaining a well-organized and informative website.
In the vast ecosystem of WordPress, managing authorship is a fundamental aspect of content creation and website management. Whether you’re a solo blogger or running a multi-author platform, understanding how to navigate authorship settings can significantly impact your site’s credibility, organization, and SEO performance.
In this comprehensive guide, we’ll delve into the intricacies of WordPress authorship, providing practical insights and step-by-step instructions to empower you in mastering author management. From changing individual post authors to optimizing author archives for enhanced user experience, we’ll cover it all to ensure you have a solid grasp of this crucial aspect of WordPress administration.
Understanding WordPress Authorship Management
Before we dive into the nitty-gritty of authorship management, let’s first establish a clear understanding of what WordPress authorship entails and why it holds such importance in the realm of content creation and website administration. By grasping the fundamentals, you’ll be better equipped to harness the full potential of authorship customization.
How to Easily Change the Author in WordPress:
Embark on a journey through the WordPress dashboardIn WordPress, the Dashboard is a central hub for managing a website’s content and settings. It is the first sc… More as we walk you through the seamless process of changing authors for individual postsA post is a type of content in WordPress, a popular open-source content management system used for creating an… More. With our easy-to-follow steps, you’ll gain confidence in modifying author attributions with precision and efficiency.
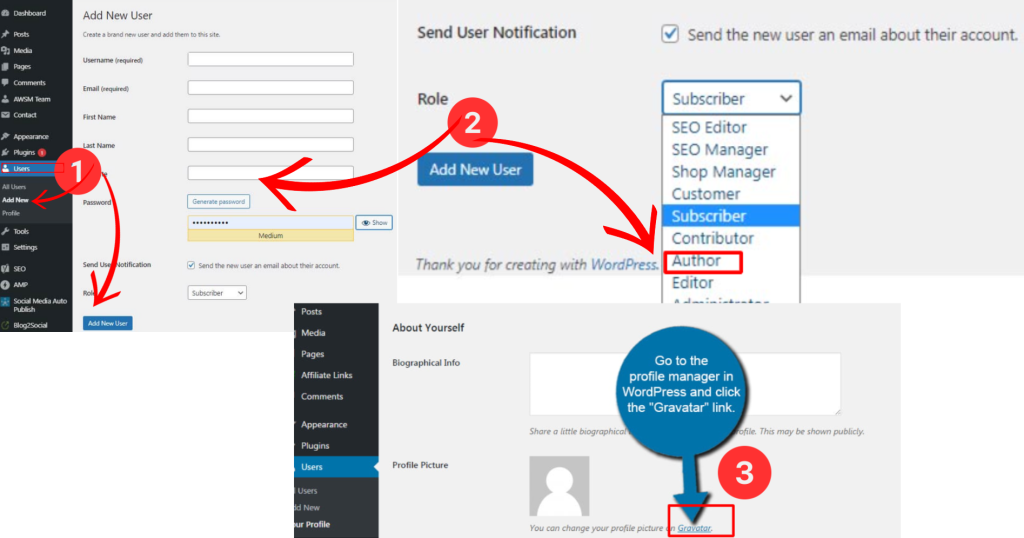
WordPress Authorship Management: Adding New Authors to Your WordPress Team
Building a team of writers can significantly enrich your website’s content. Here’s how to add new authors in WordPress:
- Navigate to Users > Add New: Access the “Users” section from your WordPress dashboard and click on “Add New.”
- Create User Profile: Fill out the user profile details, including username, email address, password, and assign the appropriate user roleIn WordPress, a user role is a set of permissions that determines what actions a user can perform on a website… More (e.g., Author, Editor).
- Bio and Gravatar: Encourage your new author to fill out their bio and set a Gravatar profile picture for increased user engagement.
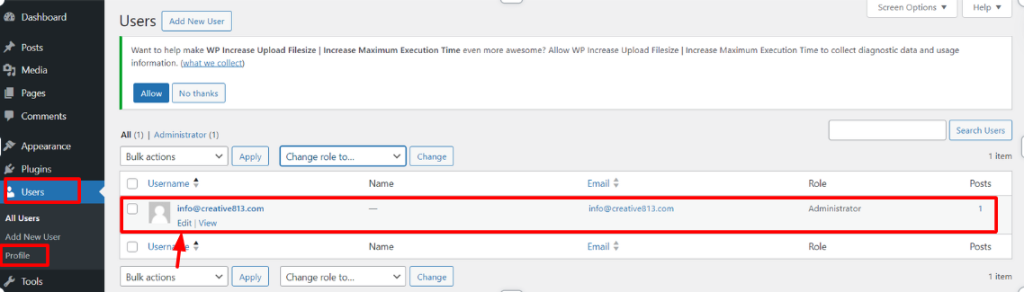
Editing User Settings for Existing Authors
Whether it’s updating display names, author slugsIn WordPress, a slug is the unique text that appears in a URL to identify a specific page or post. This term i… More, or even your own username, managing user settings is straightforward:
- Navigate to Users > All Users: Locate the user you want to edit and click on their username.
- Edit User Profile: Update the relevant details within the user profile section. Here you can change the author’s display name (the name appearing on posts), author slug (part of the URL structure), and even their username (with some restrictions).
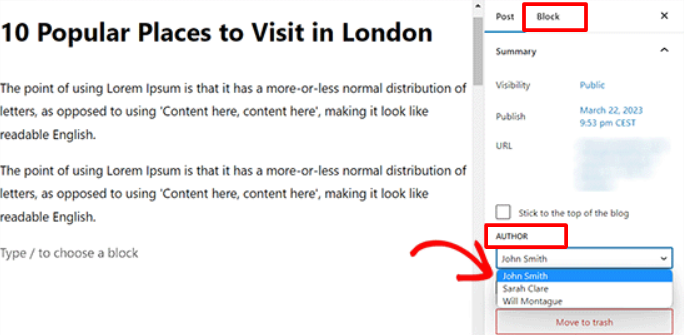
Assigning Authorship in the WordPress Editor
The WordPress editor allows you to easily switch between authors when creating or editing posts:
- Block Editor: In the block editor, locate the “Document” tab on the right-hand sidebar. Under “Author,” you can choose the desired author from a dropdown menuIn WordPress, a menu is a collection of links that are displayed as a navigation menu on a website. Menus are … More.
- Classic Editor: In the classic editor, look for the “Publish” metabox on the right side of the screen. Here, you’ll find an “Author” dropdown menu where you can select the appropriate author.

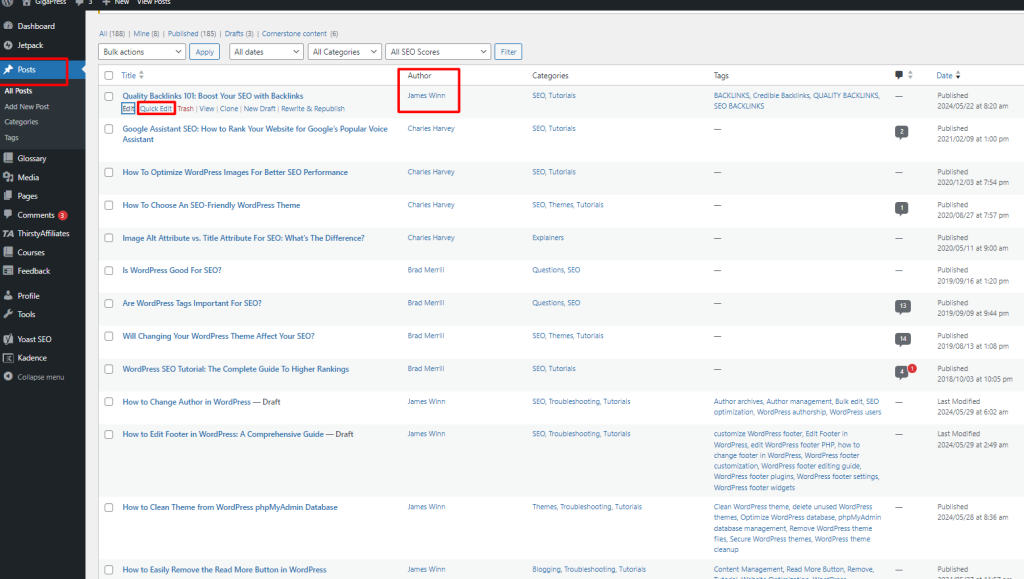
Quick Editing for Swift Author Changes
For a faster approach, WordPress offers quick edit functionality:
- Hover Over the Post: Navigate to the “Posts” section and hover over the post you want to edit.
- Quick Edit Options: Click on “Quick Edit” below the post title.
- Change Author: Within the quick edit options, you can select a new author from the “Author” dropdown menu.
Utilizing Bulk Edit for Efficient Author Management:
For WordPress sites with a multitude of posts and authors, manual authorship changes can be a time-consuming endeavor. Discover the power of bulk edit functionality and learn how to expedite author management tasks with just a few clicks.
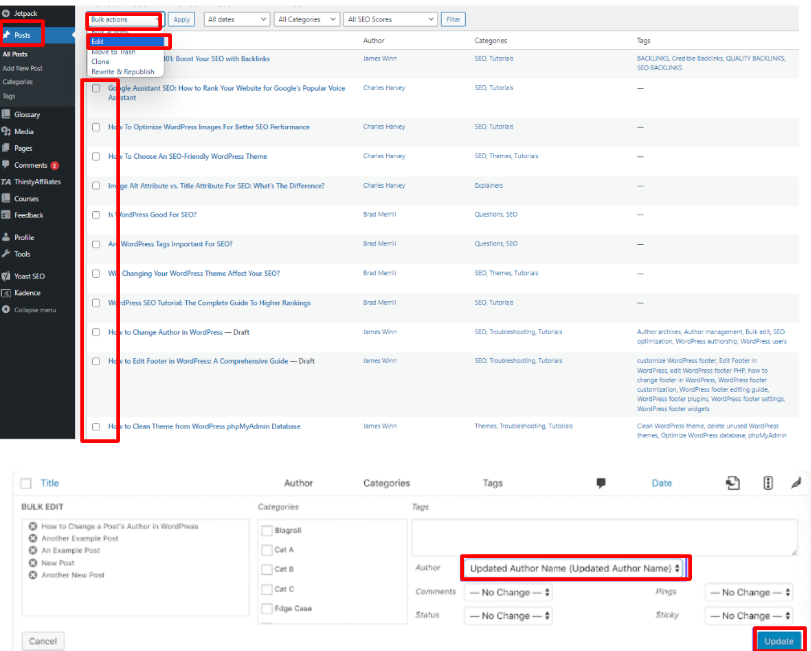
Bulk Editing Authors for Multiple Posts
Need to change the author for multiple posts at once? WordPress has you covered:
- Select Posts: Navigate to the “Posts” section and select the posts you want to edit using the checkboxes.
- Bulk Actions: From the dropdown menu under “Bulk Actions,” choose “Edit.”
- Change Author: In the bulk edit screen, locate the “Author” dropdown menu and select the new author for all chosen posts.
Hiding Authors from Public View (Optional)
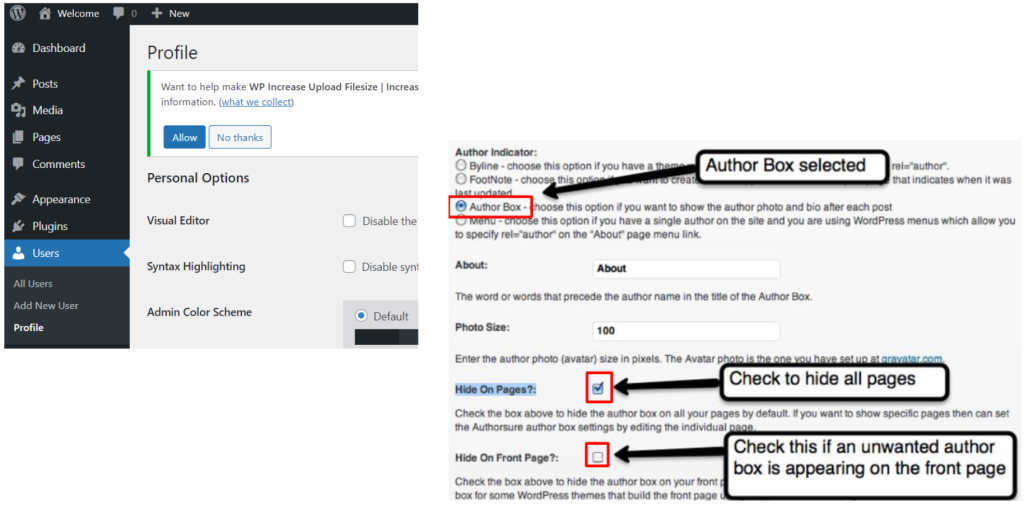
If you don’t want to display author names on your posts, here are three methods:
- Disable Author Box Per User: Go to “Users > All Users” and edit the user profile. Uncheck the option “Show Author Bio” under the “Biographical Info” section.
2. Custom CSS Code: For more control, use custom CSS code to hide the author box. This approach requires some familiarity with CSS.
Steps:
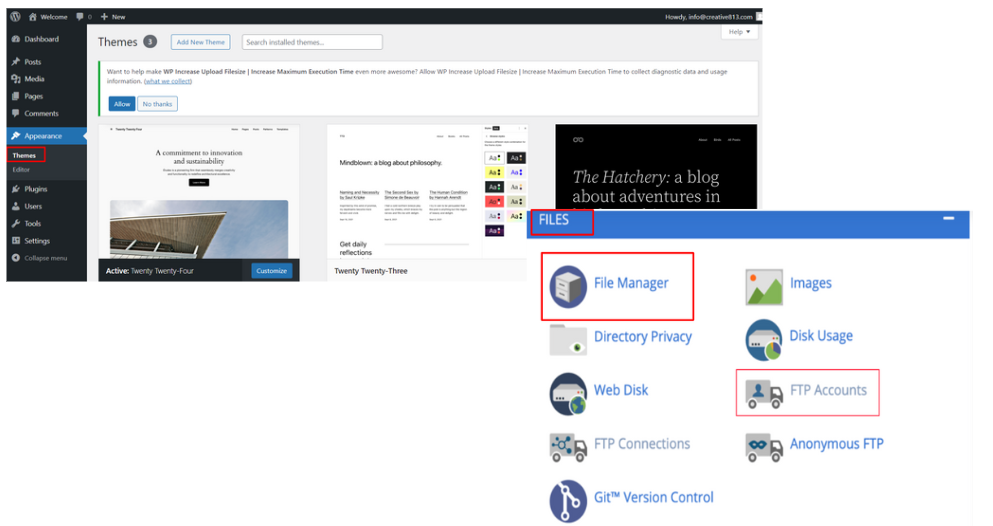
- Access Your Theme Files: You’ll need to access your website’s theme files. This can be done using an FTP client (File Transfer Protocol) or your web hosting provider’s file manager.
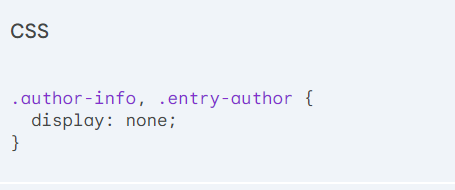
- Locate the Stylesheet: Navigate to your theme’s directory and look for the file named “style.css” (or a similar file containing custom styles for your theme).
- Add the CSS Code: Open the “style.css” file in a text editor. At the end of the file, paste the following CSS code:
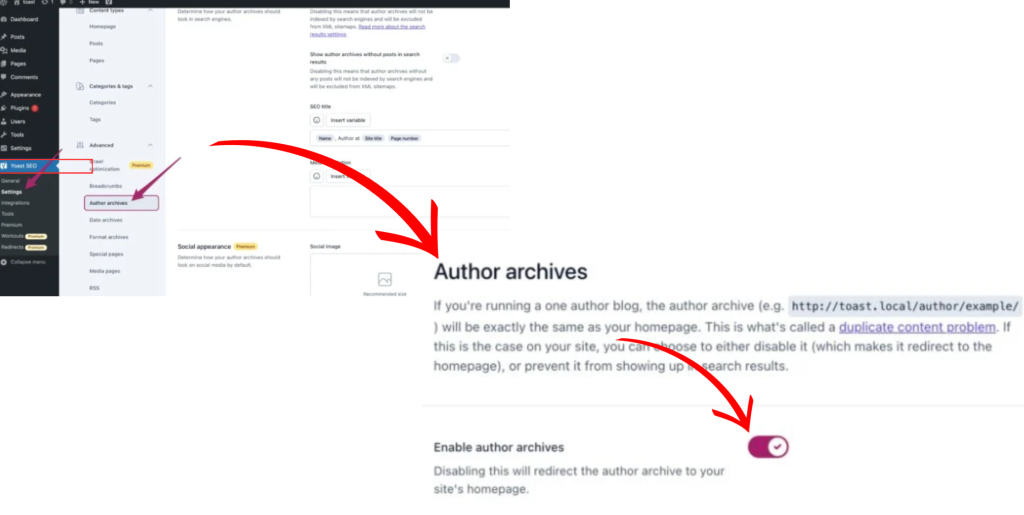
3. Utilize Plugins: Several WordPress plugins offer user management features, including the ability to hide author names. While WordPress doesn’t offer a built-in option to completely hide author names, several plugins can achieve this functionality. Here’s a step-by-step guide using a popular plugin called “Yoast SEO”:
- Install and Activate Yoast SEO: Search for “Yoast SEO” in the WordPress pluginA plugin is a software component that adds specific features and functionality to your WordPress website. Esse… More directory and install it. Once installed, activate the plugin.
- Navigate to Yoast SEO Settings: From your WordPress dashboard, go to “Settings” > “Yoast SEO.”
- Locate the “Search Appearance” Tab: Within the Yoast SEO settings, click on the “Search Appearance” tab.
- Access the “Author Archives” Section: Scroll down to the “Author archives” section within the Search Appearance settings.
- Disable Author Archives (Optional): If you don’t want author archives to appear in search results at all, you can check the box next to “Noindex author archives.”
- Hide Author Names on Posts (Optional): Yoast SEO might not offer a direct option to hide author names on posts by default. However, some themesA WordPress theme is a set of files that determine the design and layout of a website. It controls everything … More might integrate with Yoast SEO and provide this functionality within the theme settings.
- Explore Alternative Plugins: If Yoast SEO doesn’t fulfill your specific needs, other plugins like “WP Hide Author” or “Disable Author” might offer more focused options for hiding author names on posts.
Implementing Author Archives for Enhanced User Experience:
Unlock the potential of author archives to provide visitors with valuable insights into your content creators and their respective contributions. We’ll guide you through the process of setting up author archive pagesIn WordPress, a page is a content type that is used to create non-dynamic pages on a website. Pages are typica… More for seamless navigation and improved user engagement.
Advanced Techniques for Authorship Customization:
Take your authorship management skills to the next level with advanced customization techniques. From tailoring author profiles to integrating authorship with multi-author blogs, explore innovative strategies to personalize the authorship experience for both users and content creators.
Optimizing Authorship for SEO and Branding:
In the competitive landscape of online visibility, leveraging authorship for SEO and branding purposes can give you a significant edge. Learn how to implement authorship markup effectively and establish author authority to enhance your site’s search visibility and brand recognition.
Effective WordPress Authorship Management
By effectively managing your WordPress authors, you can streamline content creation, enhance user experience, and establish a clear authorship structure for your website. This guide has equipped you with the essential tools and knowledge to confidently manage your WordPress authors, from adding new team members to editing user profiles and assigning authorship for posts.
Remember, a well-organized author team can significantly contribute to the success of your WordPress website!


![How to Add Meta Tags in WordPress [A Visual Guide]](https://codingheros.com/wp-content/uploads/2024/06/how-to-add-meta-tags-in-wordpress-a-visual-guide-768x306.webp)