The menu of any WordPress website is the most crucial part when it comes to the first impression. That’s why it’s important to know how to change the background color of the submenu in WordPress.
Some WordPress themes provide a means of changing the color of a submenu, but others do not. Even if a theme does not have this option, the color can still be changed with a little effort.
In this blog, I will tell you how to change the background color of the submenu in WordPress. By following all the steps that I’m going to tell you, it will be able easy to customize the color of your submenu.
The topics which I will cover:
- How to change the menu color in WordPress
- What is a submenu
- Why should you change the submenu color
Let’s start with how to change the background color of the menu.
Table of Contents
WordPress menus’ colors are a bit tricky to change, but with a little bit of patience, you can easily change their color. By the time I wrote this article, there were no plugins available to change the color of the menus, but maybe there will be such plugins in the future.
Currently, there are two methods by which a person can change the color of the menu in WordPress:
- By using the customize option.
- By using CSS.
Let’s begin with the easiest method available.
This method solely depends on which type of theme you are using. The theme I recommend is “OceanWP,” which has the option of changing the sub-menu color.
Note: There are other themes with the option to change submenu colors, but the recommended one is “OceanWP,” which is entirely free.

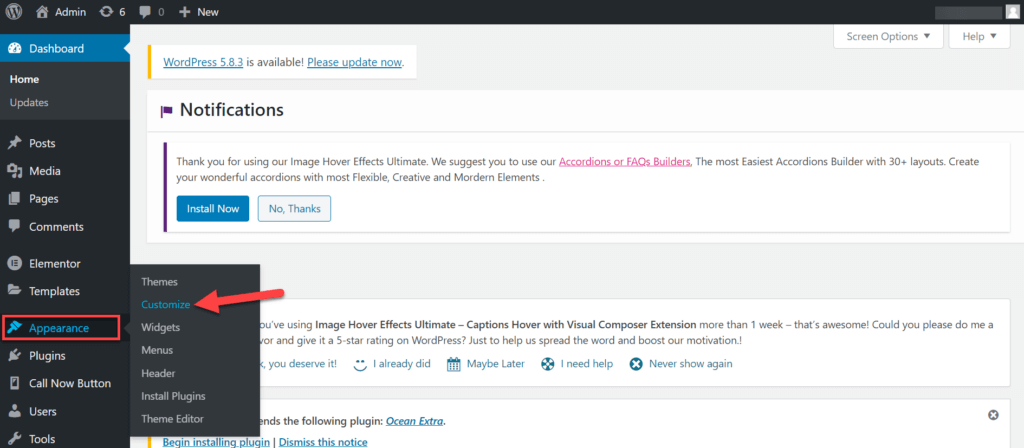
- Step 1: Start by hovering over the “Appearance” option and clicking on the “Customize” option. It will open the customization panel for your website.
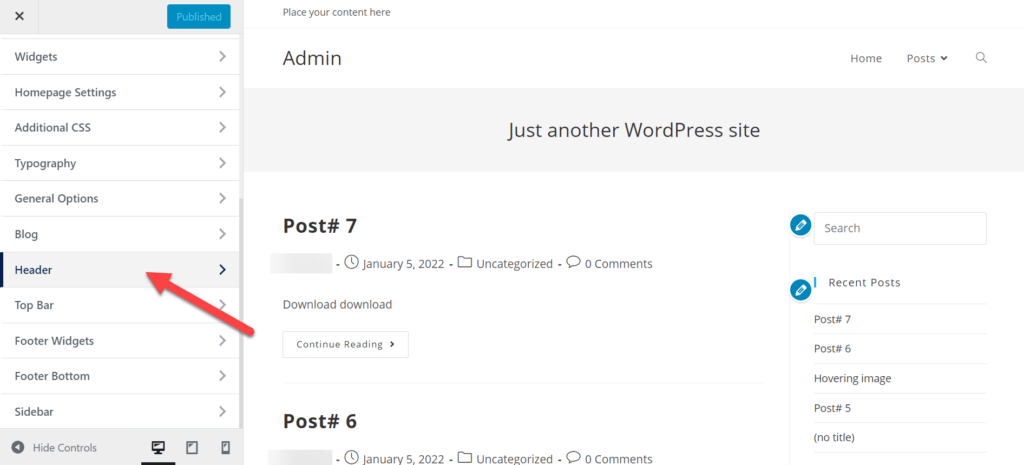
- Step 2: After scrolling down, click on the “Header” option.
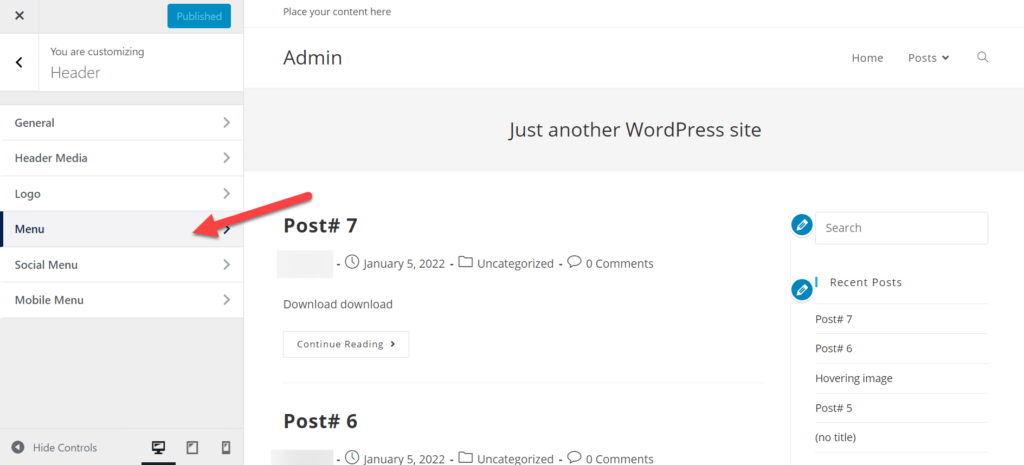
- Step 3: Next, click on the “Menu” option, which opens the settings for your menu bar.
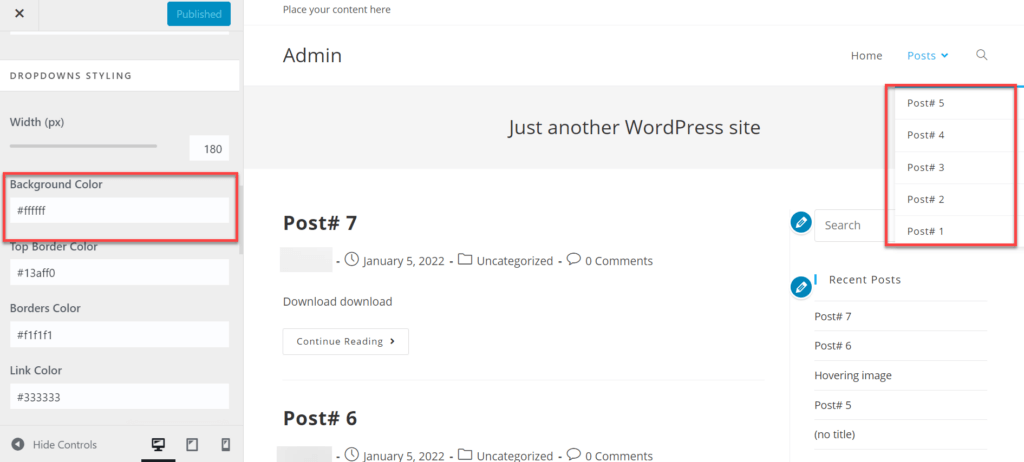
- Step 4: Next, scroll down a bit, and you will see a section labelled “DROPDOWNS STYLING,” which contains all the styling options for the submenu.
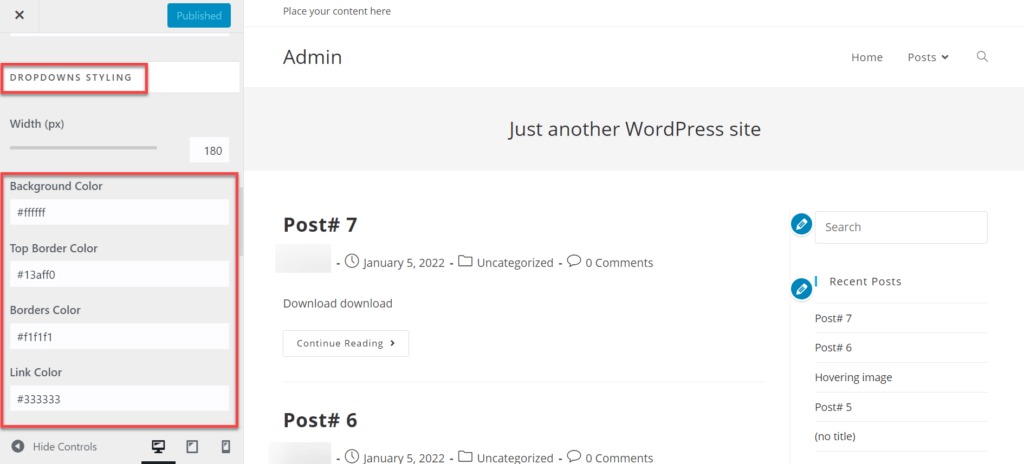
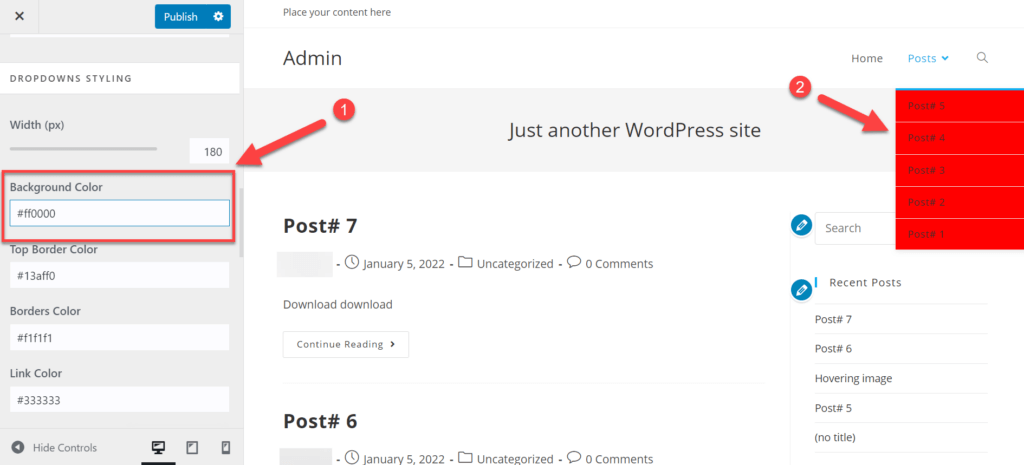
- Step 5: You will see an option labeled “Background Color,” which manages the background color of the submenu. The number you will enter here will depend on the color you want for the background.
- Step 6: As soon as you enter the code for a specific color, the background color will automatically change.
Note: Check out other options available for changing the color of the submenu.
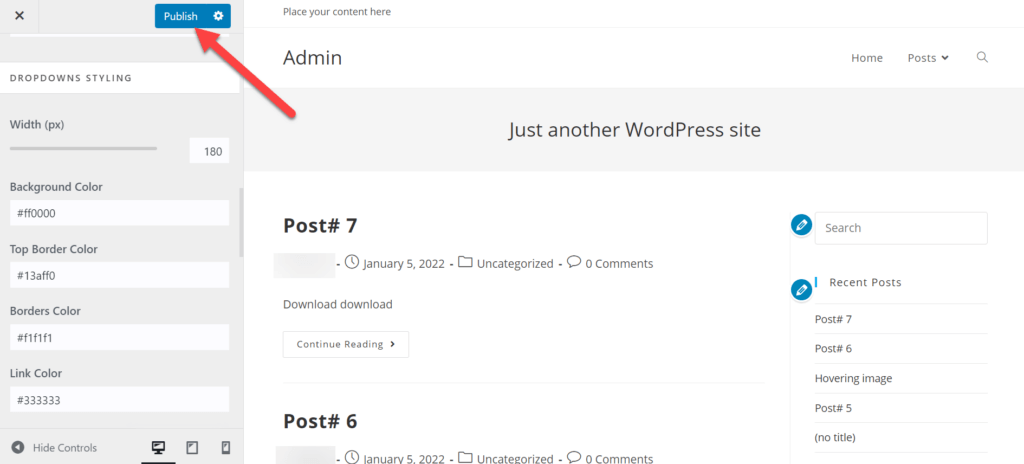
- Step 7: If you’ve decided on the color you want for the submenu, click on the “Publish” button to save the changes.
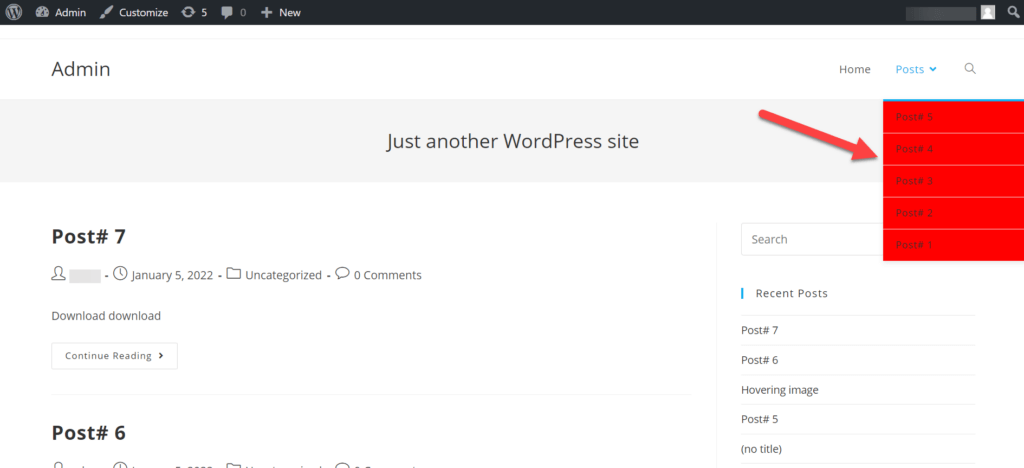
- Step 8: Now go back to your website, and after refreshing the page, go to the submenu of which color you changed.
This method depends on the type of theme that you are using. It isn’t a global solution that anyone can implement on their themes.
Maybe you are using a theme that doesn’t have an option to change the color of the submenu, and you don’t want to change the theme just because of it. It is where CSS coding is helpful. With a basic grasp of CSS, you can easily change the color of the submenu.
Note: It can be a bit tricky and time-consuming to change the color of submenu items one at a time.
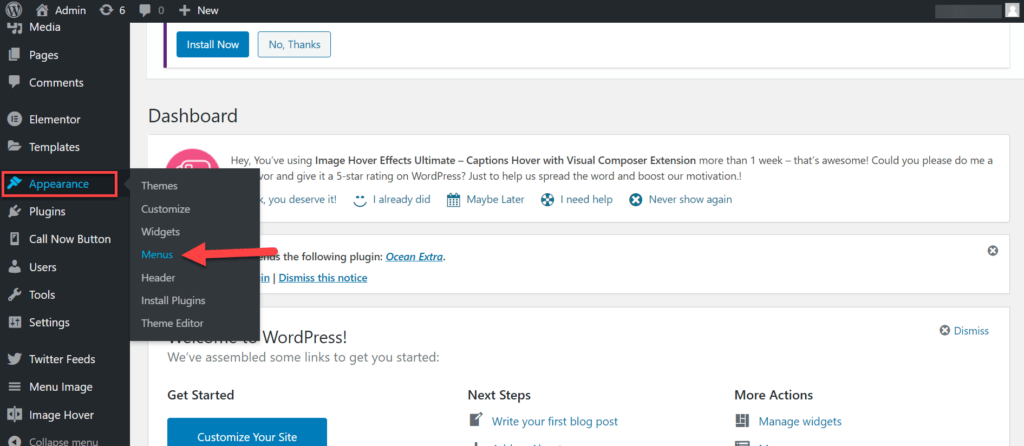
- Step 1: Go to the “Appearance” option and hover over it. It will bring up multiple options, but you will click on the “Menus” option.
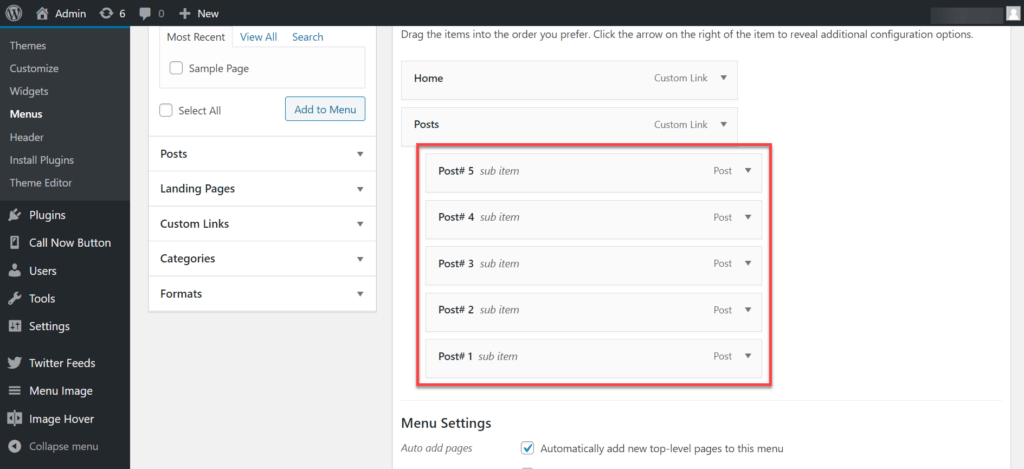
- Step 2: Locate the list of submenu items that you want to edit.
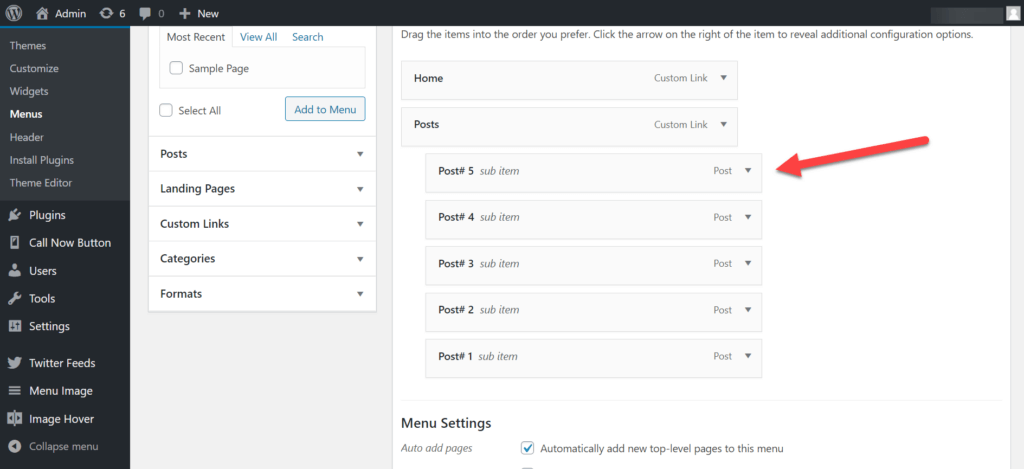
- Step 3: Select the menu item to edit by clicking on it.
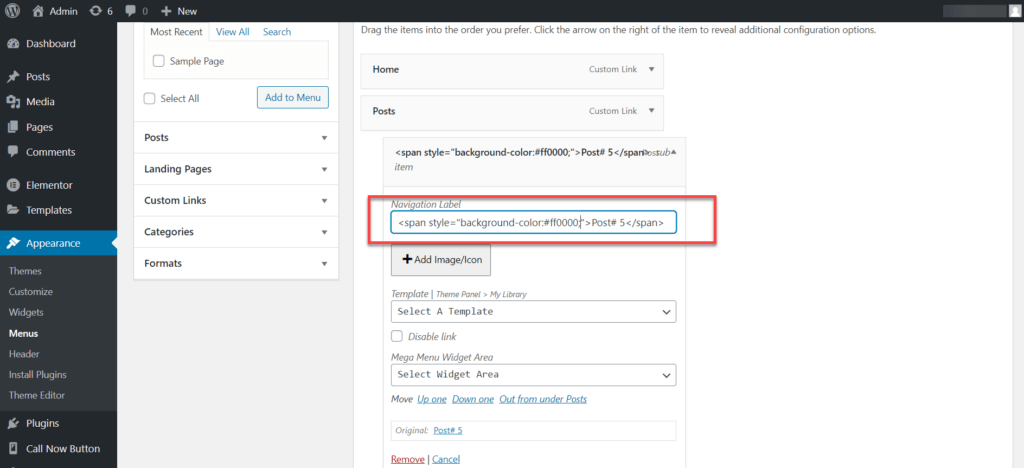
- Step 4: Once the menu item opens, write the code for changing its background color. The code for changing the background color is:
<span style="background-color:#ff0000"></span>Note: Place the label of the menu item within the coding. By changing the color number, you can select any color you want for the submenu.
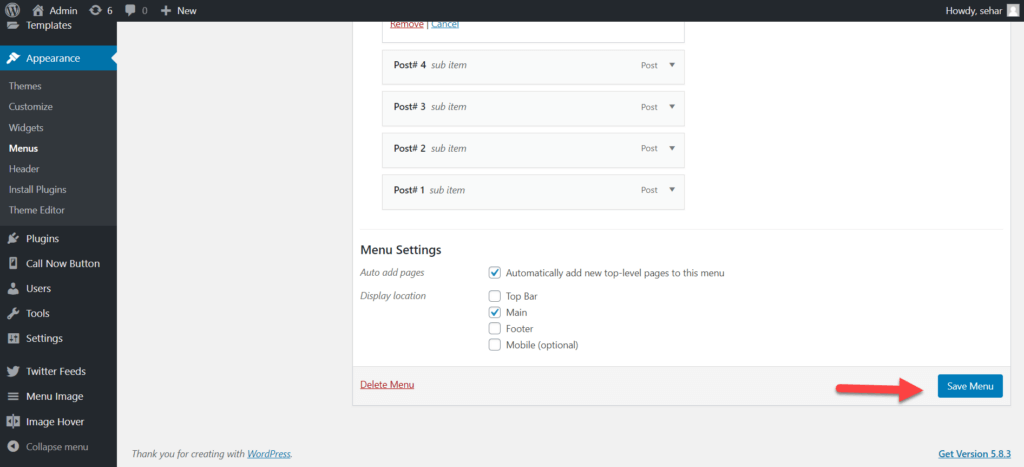
- Step 5: After writing the code, go to the bottom of the page and click on the “Save Menu” button.
- Step 6: If you refresh your website, you will now view the changes.
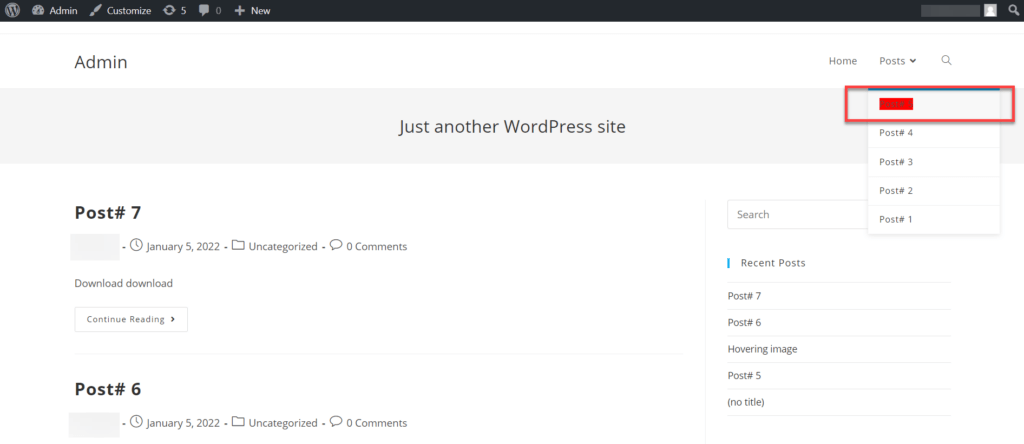
This method is a touch rough since it will not adjust the background color accurately. The editor must know how to use CSS coding for padding to change it.
A submenu is a list of secondary options displayed when you hover over or simply click on a particular option or category. These options are all grouped according to the category in which they appear.
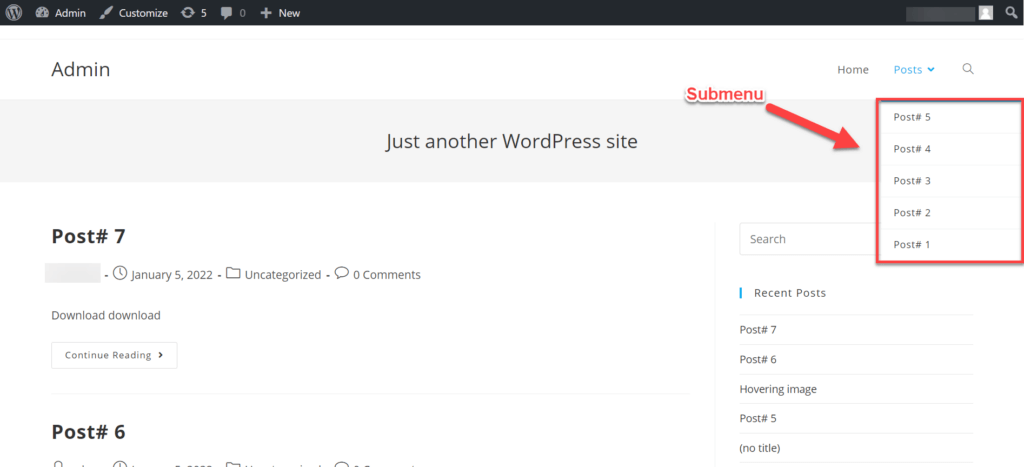
Submenus are helpful for hiding multiple options associated with the same title. The user knows where to find a particular item when he or she visits a website and searches for a specific post or page.
WordPress background colors can be utilized to enhance the visual appeal of submenus, making them stand out and improving the overall user experience.
Many WordPress themes come with color schemes that the user may not like. A website owner may want the theme’s features but be put off by the color scheme of the submenu.
Your website’s submenu may feature a color scheme that makes it difficult to read or does not complement the website’s color scheme. By changing it, you can easily increase its visibility.
Changing the color of the submenu WordPress may also depend on the website owner’s preference. The owner may want a specific color for the submenu that holds meaning to them simply because that person likes it. 😂
A good color scheme can also help with the traffic to your website because visitors to a website don’t like a bad color scheme. The overall end-user experience depends on the type of color.
Summary
By using the above-mentioned methods, anyone can easily change the background color of the submenu in a WordPress website.
Maybe in the future, the developer will make it standard for all themes to change the background color of the submenu. Developers may also create plugins to make changing colors easier for users without coding expertise.
If you continue to encounter difficulties, please do not hesitate to ask a question in the comment section.
FAQ’s
Customizing a submenu in WordPress is fun! You can do this by going to your WordPress Dashboard. Then click “Appearance” and choose “Menus”. Here, you’ll see your menu and can add items to your submenu. Drag items under the main menu item but a little to the right – this makes them part of the submenu. You can also use plugins for more fancy changes!
To change the highlight color in your WordPress menu, go to “Appearance” and then “Customize”. Here, look for “Colors” or “Header” settings. You can pick a new color for when someone hovers over a menu item. If you don’t see this option, your theme might need some custom CSS code. You can add this in the “Additional CSS” section.
If you’re using Elementor, changing the menu background color is easy. Open the page with Elementor, where your menu is. Click on your menu to edit it, and look for the “Style” tab. There, you’ll find options to change the background color. Pick the color you like and see the change right away!
Changing the hover color in your WordPress menu is similar to changing the highlight color. Go to “Appearance” and then “Customize”. Look for “Colors” or “Menu” settings. Find the option for the hover color and choose a new color. If this option isn’t there, you can use custom CSS in the “Additional CSS” section. Write a code that changes the color when you hover over menu items.
How do I change the color of my hover icon?
To change the color of your hover icon in WordPress, you’ll often use a bit of custom CSS code. First, go to your WordPress Dashboard and click on “Appearance”, then “Customize”. Here, look for the “Additional CSS” section. You need to write CSS code that targets your hover icon. The code will look something like this: .icon-class:hover { color: #yourColorCode; }. Replace .icon-class with the actual class of your icon and #yourColorCode with the color code you want. Once you add this code, your icon’s color should change when you hover over it. Remember, if you’re not sure about the class name of your icon, you might need to check your theme’s documentation or ask a developer for help.
Subscribe to our Monthly Newsletter
Get monthly updates of WordPress tips, tricks, and tutorials in your email.
Thanks. You have successfully subscribed.


![How to Hide a Page in WordPress [Step By Step Visual Guide]](https://codingheros.com/wp-content/uploads/2024/07/how-to-hide-a-page-in-wordpress-step-by-step-visual-guide-768x336.png)

