Simple dropdown menusIn WordPress, a menu is a collection of links that are displayed as a navigation menu on a website. Menus are … More are a great way to help users navigate around small websites. However, if you have a content-rich site or a large e-commerce store, these menus can quickly become overcrowded and confusing.

Luckily, mega menus provide a neat, stylish solution. With a mega menu, all your web pagesIn WordPress, a page is a content type that is used to create non-dynamic pages on a website. Pages are typica… More are visible and accessible, enabling you to deliver a better User Experience (UX). Plus, you can make use of icons and images to create menus that look as good as they are functional.
In this postA post is a type of content in WordPress, a popular open-source content management system used for creating an… More, we’ll take a closer look at mega menus and the benefits they offer your website. Then, we’ll discuss three top mega menu plugins. Finally, we’ll show you how to add a mega menu in WordPress. Let’s get started!
An Overview of Mega Menus
Mega menus are an excellent alternative to traditional choices like horizontal or dropdown menus. These types of menus are appropriate for small websites such as static pages and simple blogs.
However, for content-heavy websites or large e-commerce stores, mega menus offer a neat, stylish way of displaying your web pages:

With this type of navigation, all areas of your site are visible and accessible from one space. This avoids the need for users to hover awkwardly above menu items or switch constantly between headings in order to see every category clearly.
There are many benefits to including a mega menu on your website. Here are just a few of them:
If you have lots of different areas on your website, a mega menu might be an excellent solution to help visitors navigate your content.
3 Best Plugins for Building Mega Menus in WordPress
Now that you know the benefits of adding a mega menu to your website, let’s take a look at three plugins that enable you to do this.
1. Max Mega Menu

With over 400,000 installations, Max Mega Menu is the most popular pluginA plugin is a software component that adds specific features and functionality to your WordPress website. Esse… More for adding mega menus to websites. Once activated, you can use it to convert existing menus into fully-fledged mega menus or choose to build new menus from scratch.
Additionally, you don’t have to spring for the premium version since the free version is plenty powerful. For instance, it allows you to add transitions between menu items, choose different layouts, and add icons and widgetsA widget is a small block of content that performs a specific function and can be added to certain areas of a … More to your menus. If you decide to upgrade to the Pro version, you can add custom icons, search bars, and access more menu types.
2. QuadMenu

QuadMenu enables you to create mega menus, tab menus, and carousel menus. This makes it a versatile all-in-one solution. With it, you can design horizontal and vertical menus in desktop and off-canvas menus in mobile.
A unique feature of this tool is that it allows you to build responsive menus with touch screen incorporated natively to support a better UX. Additionally, with the premium version, you can access the customizer dashboardIn WordPress, the Dashboard is a central hub for managing a website’s content and settings. It is the first sc… More which lets you tweak menu color schemes and layouts.
3. UberMenu

UberMenu is a premium plugin, so you’ll need to purchase and download the zip file from the website before you can use it. With this tool, you can create responsive WordPress menus and choose from a variety of layouts including rows, columns, tabs, maps, and images.
This mega menu plugin offers plenty of customization options including HTML, shortcodeA shortcode in WordPress is a small piece of code that allows users to perform complex functions or display dy… More, and widgets. Plus, UberMenu is compatible with WooCommerce. It enables you to add products, categories, featured imagesA featured image, also known as a post thumbnail, is an image that represents the contents of a WordPress post… More, and a cart summary to your shop menu.
How to Add a Mega Menu in WordPress (In 4 Steps)
Now, we’re going to show you how to add a mega menu in WordPress using the Max Mega Menu plugin.
Step 1: Install and Configure the Max Mega Menu Plugin
After successful installation, you’ll see Mega Menu appear in the sidebar of your WordPress admin area. Most of the plugin’s default settings should work fine for your menu.
However, you might prefer to change the menu colors to match your theme. You can do this by navigating to Max Mega Menu > Menu Themes > Menu Bar:

Here, you can also adjust the alignment, fonts, and padding of different level menu items.
Step 2: Set Up Your Mega Menu in WordPress
To set up your mega menu, head to Appearance > Menus in WordPress. You can either use a menu you’ve already created or build a new one from scratch. If you’re working with an existing menu, use the dropdown to find it. Otherwise, click on create a new menu:

You can organize your menu structure in this screen. Simply, select the pages you’d like to include by ticking the checkboxes on the left. Then, drag-and-drop your menu items to organize their order.
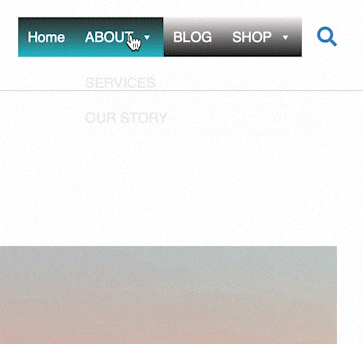
Also, make sure to position submenu items within top-level menu items. For instance, in the example below, both the SERVICES and OUR STORY pages come under the ABOUT section:

Once you’re happy with the structure of your menu, tick the checkbox to enable Max Mega Menu. You’ll find this on the left side of your screen, under Max Mega Menu Settings:

Then, click on Save. If the plugin has been enabled successfully, you should now see a Mega Menu button appear when you hover beside each of your item headings:

At this point, you’ve transformed your WordPress menu into a mega menu with the Max Mega Menu plugin. However, you might like to customize the menu to get it looking exactly how you want it.
Step 3: Change the Layout of Your Mega Menu
To change the layout of your menu, click on the blue Mega Menu button to bring up a popup. Under the Mega Menu tab, you can change how your menu is displayed. For example, you can choose between flyout, grid, and standard formatting:

If you opt for a grid or standard layout, you can access additional widgets to include in your menu, including forms and images. This can be useful for e-commerce sites that might like to add product images or featured photos.
You can also gain more flexibility with your layout. You can add rows and columns so that your items don’t simply sit in a long list. Better yet, it’s easy to rearrange your navigation menu using an intuitive drag-and-drop editor:

Above, you can see that our SHOP menu consists of six pages. Therefore, we added an extra column so that we can display three items in one column and three items in another. This enables you to conserve screen space and it’s more appealing for users.
If you decide to include any widgets in your menu, such as for images, simply drag the widget where you want it to sit within your menu. Next, hit the wrench icon to select your image and add a URL:

Then, click on Save to add the image as a menu item.
Step 4: Finish and View Your Menu
At this stage, you can add the final touches of customization to your mega menu. Under Settings, you can change the alignment of your items and opt to hide certain headings either in desktop or mobile devices. Plus, you can choose to close your submenus when clicked.
You can also select icons to accompany your menu headings. Alternatively, with the Pro version, you can choose custom icons from your Media LibraryThe Media Library in WordPress is a feature that allows users to easily upload and manage media files such as … More. Once you’re happy with your mega menu, exit the popup and hit Save Menu:
You can check out how your menu displays by viewing your website on the front end.
Conclusion
Traditional dropdown menus are a great option for some websites. However, if you have lots of web pages, they can easily become cluttered and negatively impact your UX. Mega menus make all your pages visible, can enhance the look of your website, and encourage visitors to check out other pages.
To recap, here is how to add a mega menu in WordPress:
- Install the Max Mega Menu plugin and configure your settings.
- Set up your mega menu in WordPress.
- Change the layout of your mega menu.
- Finish and view your menu.
Do you have any questions about adding a mega menu in WordPress? Let us know in the commentsComments are a feature of WordPress that allow users to engage in discussions about the content of a website. … More section below!


![How to Move Blocks in WordPress [A Step-by-Step Guide]](https://codingheros.com/wp-content/webp-express/webp-images/uploads/2025/01/how-to-move-blocks-in-wordpress-a-step-by-step-guide.png.webp)
![How to Update PHP Version in WordPress [3 Visual Methods]](https://codingheros.com/wp-content/webp-express/webp-images/uploads/2024/06/how-to-update-php-version-in-wordpress-3-visual-methods-243.png.webp)
