Images are a vital part of any website, enhancing visual appeal, breaking up text, and improving user engagement. However, many WordPress users encounter common image-related issues that can be frustrating and time-consuming to resolve. This tutorial aims to guide you through the process of addressing these issues, offering practical solutions that you can easily follow and implement to fix WordPress image issues.
In this comprehensive guide, we will cover various topics, from uploading images correctly to optimizing them for performance without compromising quality. Whether you’re a beginner or an experienced WordPress user, you’ll find valuable insights to help you manage and enhance your website’s visual content effectively and fix WordPress image issues seamlessly.
How to Fix WordPress Image Issues When Uploading Images
WordPress, the widely popular content management system, offers a seamless process for uploading images to enhance your website’s visual appeal. However, encountering image-related issues along the way can be frustrating. Fear not, as we delve into troubleshooting tips to resolve common WordPress image problems and ensure a smooth uploading experience.
- Navigate to the Media LibraryThe Media Library in WordPress is a feature that allows users to easily upload and manage media files such as … More: Go to your WordPress dashboardIn WordPress, the Dashboard is a central hub for managing a website’s content and settings. It is the first sc… More, hover over “Media,” and click “Add New.”
- Upload Your Image: Click the “Select Files” button, choose the image file from your computer, and wait for the upload to complete.

- Insert the Image: In your post or pageIn WordPress, a page is a content type that is used to create non-dynamic pages on a website. Pages are typica… More editor, click the “Add Media” button, select your uploaded image, and click “Insert into post.”
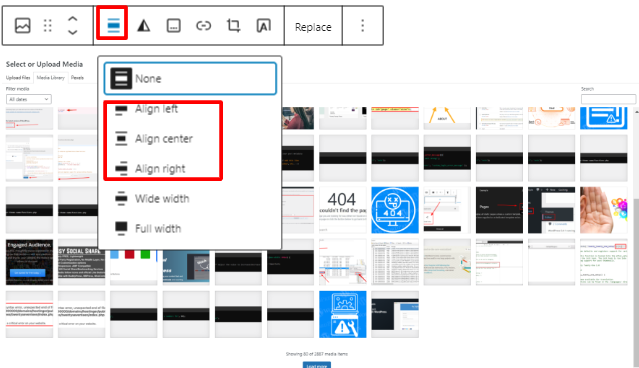
How to Align an Image to the Left or Right in WordPress
Optimizing the placement of images is key to enhancing the overall presentation of your content. To address any alignment issues with images, follow these steps:
- Select the Image: Begin by clicking on the image located within the post editor.
- Choose Alignment: Utilize the toolbar displayed above the image to select the preferred alignment option – whether it be left, right, or center. This simple adjustment not only enhances the visual appeal of your content but also contributes to a more structured layout that translates well across various devices.
How to Fix WordPress Image Issues When Adding Captions Below Images
In the world of online content, adding captions to images serves a dual purpose – providing context to visual elements and boosting SEO performance. Captions are a valuable tool that can elevate the user experience and help search engines better understand your content. Here’s a guide on how to optimize your images with captions effectively:
- Upload and Insert the Image: Begin by uploading your image to the desired location on your website. Follow the platform-specific steps to ensure the image is correctly inserted into your content.
- Add a Caption: Once the image is inserted, click on it to select it. A caption field will typically appear below or beside the image. This is where you can input your caption text. Captions should not only describe the image accurately but also provide additional context or relevant keywords to improve search engine visibility.
By incorporating well-crafted captions into your images, you can create a more engaging and informative user experience while also enhancing the SEO performance of your website. Remember, every detail counts when it comes to optimizing your online presence, and captions are a simple yet effective way to make a significant impact.
How to Display Photos in Columns and Rows
Creating a visually appealing gallery on your WordPress website can enhance the overall aesthetic and engagement of your content. By organizing your photos in columns and rows, you can achieve a professional gallery effect that captivates your audience. Here are some simple steps to address any image layout issues you may encounter:
- Add a Gallery Block: Within the post editor, click the “+” button and choose “Gallery” to start building your visual showcase.
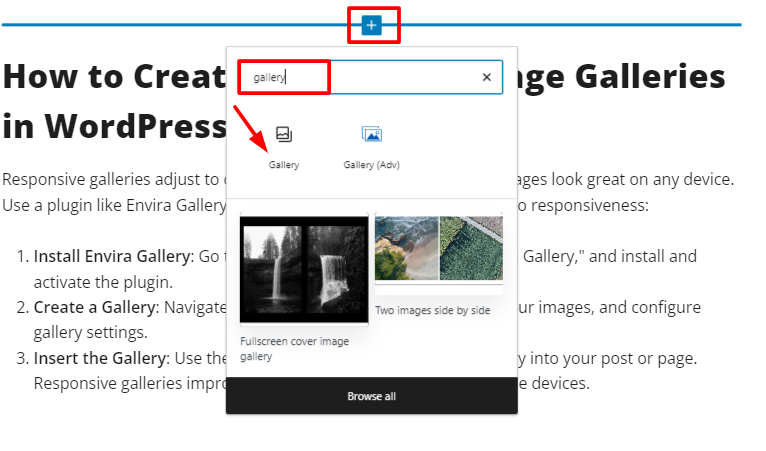
- Upload or Select Images: Incorporate your desired images by either uploading new ones or selecting from your existing media library. Curate a collection that aligns with your content’s theme and message.
- Adjust Settings: Customize the gallery layout by configuring the number of columns and exploring other available settings to tailor the display to your liking. This step allows you to create a cohesive and visually striking arrangement.
By following these steps, you can transform your WordPress images into an engaging and interactive gallery that elevates your storytelling capabilities and captivates your audience’s attention. Embrace the power of visual content to enhance the overall user experience and leave a lasting impression on your visitors.
How to Create Responsive Image Galleries in WordPress
Responsive galleries adjust to different screen sizes, ensuring your images look great on any device. Use a pluginA plugin is a software component that adds specific features and functionality to your WordPress website. Esse… More like Envira Gallery to fix WordPress image issues related to responsiveness:
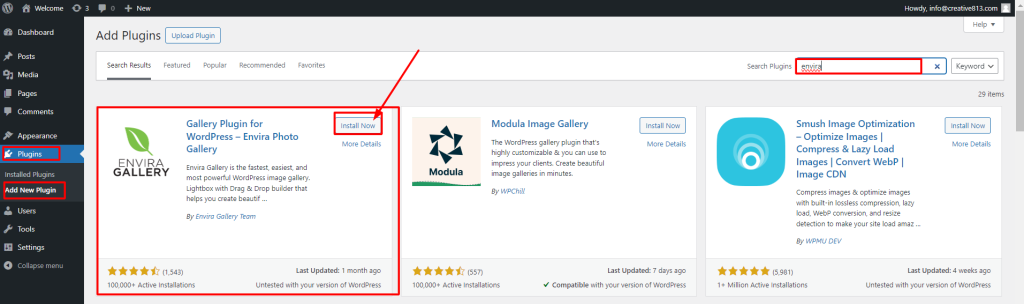
- Install Envira Gallery: Go to Plugins > Add New, search for “Envira Gallery,” and install and activate the plugin.
- Create a Gallery: Navigate to Envira Gallery > Add New, upload your images, and configure gallery settings.
- Insert the Gallery: Use the provided shortcodeA shortcode in WordPress is a small piece of code that allows users to perform complex functions or display dy… More to insert the gallery into your post or page. Responsive galleries improve user experience, especially on mobile devices.
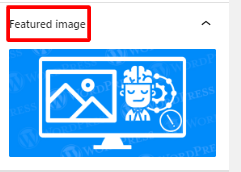
How to Fix Missing Post Thumbnails / Featured Image in WordPress
Dealing with missing post thumbnails on your WordPress site can be frustrating, but fear not – there are solutions to help you resolve this issue. Here are some tips to troubleshoot and fix WordPress image problems related to missing thumbnails:
- Set a Featured Image: One common reason for missing thumbnails is the absence of a featured image. To set a featured image, navigate to the post editor and locate the “Featured Image” meta box. Click on “Set featured image,” choose an image from your media library or upload a new one, and then save the changes. This simple step can often rectify the problem and ensure that the thumbnail appears as intended.
- Check Theme Compatibility: It’s essential to ensure that your WordPress themeA WordPress theme is a set of files that determine the design and layout of a website. It controls everything … More supports featured imagesA featured image, also known as a post thumbnail, is an image that represents the contents of a WordPress post… More. Some themes may require you to enable this feature in the theme settings or make adjustments to the theme’s code. By confirming that your theme is compatible with featured images, you can eliminate any potential conflicts that may be causing the thumbnails to go missing.
- Verify Plugin Conflicts and Image Paths: If you’ve set a featured image and confirmed theme compatibility but are still experiencing issues with missing thumbnails, it’s time to investigate further. Check for conflicts with any plugins that might be affecting the display of thumbnails. Additionally, verify that the image paths are correct, as incorrect URLs can prevent thumbnails from appearing correctly.
By following these troubleshooting steps, you can address missing post thumbnails on your WordPress site and ensure that your content displays as intended. Remember to approach the issue systematically, starting with the basics such as setting a featured image and checking theme compatibility, before delving into more technical aspects like plugin conflicts and image paths. With a methodical approach, you can effectively resolve WordPress image issues and enhance the visual appeal of your website.
How to Add Cover Images in WordPress Posts and Pages
When it comes to creating captivating content, integrating cover images can significantly elevate the visual appeal of your postsA post is a type of content in WordPress, a popular open-source content management system used for creating an… More. If you encounter any image-related challenges on your WordPress site, follow these steps to address them effectively:
- Integrate a Cover Block: Navigate to the post editor, and initiate the process by clicking on the “+” button. Next, opt for the “Cover” block to kickstart your visual enhancement journey.
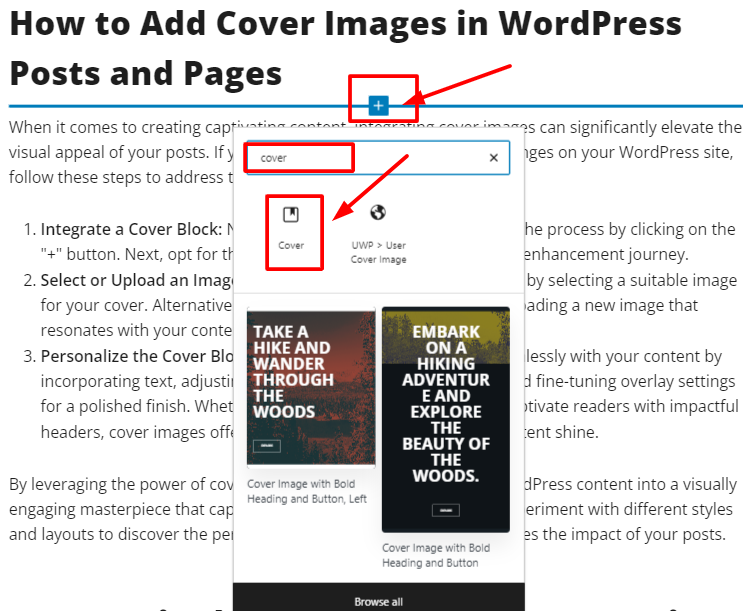
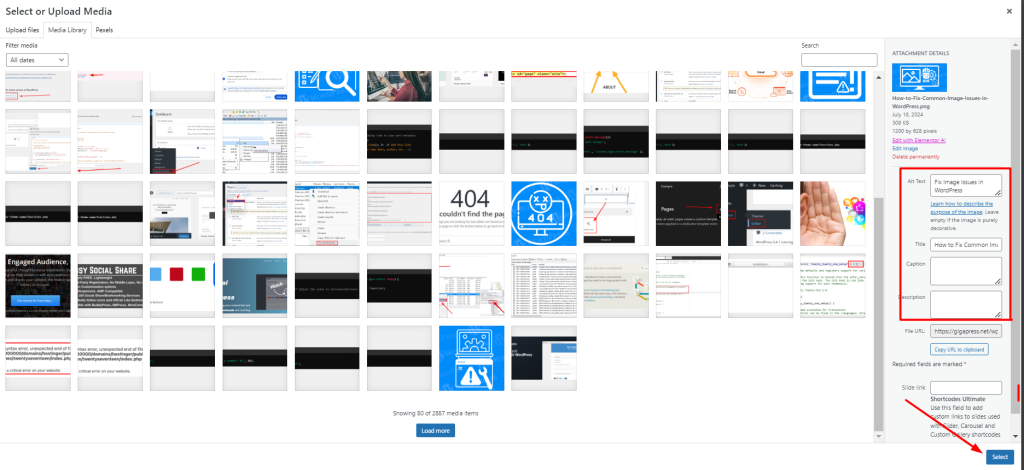
- Select or Upload an Image: Take advantage of your media library by selecting a suitable image for your cover. Alternatively, introduce a fresh perspective by uploading a new image that resonates with your content.
- Personalize the Cover Block: Tailor the cover image to align seamlessly with your content by incorporating text, adjusting alignment to enhance readability, and fine-tuning overlay settings for a polished finish. Whether you aim to delineate sections or captivate readers with impactful headers, cover images offer a versatile solution to make your content shine.
By leveraging the power of cover images, you can transform your WordPress content into a visually engaging masterpiece that captures the essence of your message. Experiment with different styles and layouts to discover the perfect visual accompaniment that amplifies the impact of your posts.
How to Fix the Featured Image Appearing Twice Issue in WordPress
When encountering challenges with WordPress images, the source of the problem can often be traced back to theme settings. Resolving issues with duplicate featured images in WordPress involves taking the following steps:
- Theme Options Examination: Navigate to Appearance > Customize > Theme Options within your WordPress dashboard. Locate the section dedicated to featured image settings within the theme customization panel.
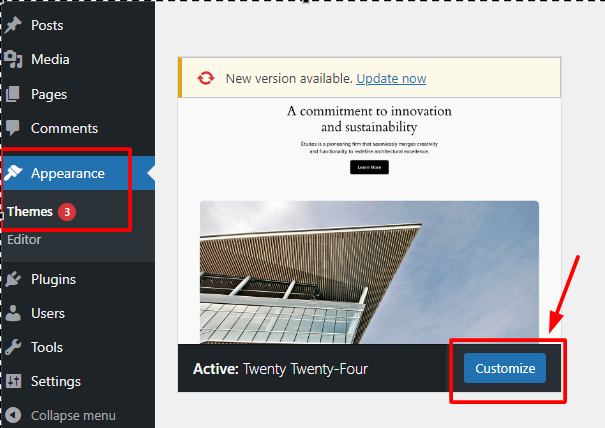
- Disabling Duplicate Display: Confirm that the featured image is not configured to appear both in the post header and the body of the post. If necessary, you may need to make adjustments to your theme files to eliminate any redundant calls for the featured image.
By addressing these key points within your theme settings, you can effectively troubleshoot and rectify WordPress image issues associated with duplicate featured images.
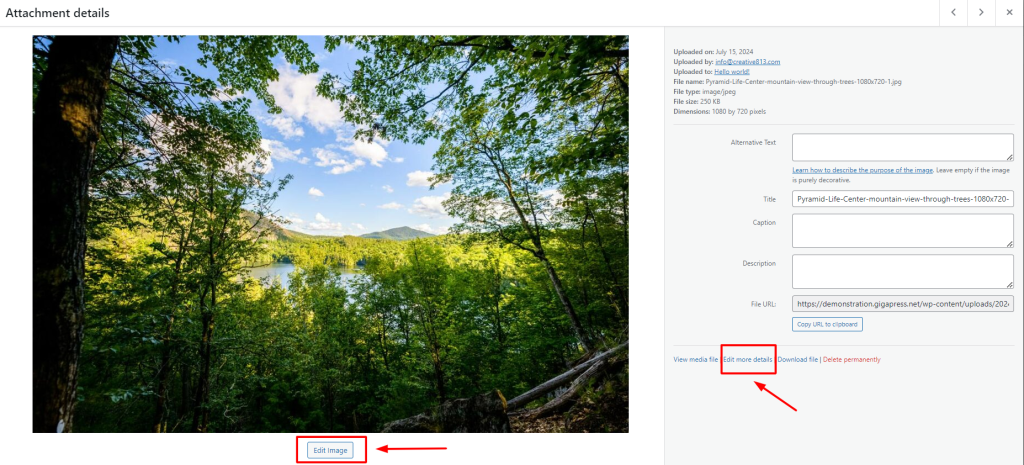
How to Crop Images in WordPress
Cropping images in WordPress is a simple process that can enhance the visual appeal of your website. Follow these steps to crop images effectively:
- Access the Image Editor: Navigate to Media > Library in your WordPress dashboard. Select the image you wish to crop and click on the “Edit Image” button.
- Utilize the Cropping Tool: Within the Image Editor, use the cropping tool to outline the specific area of the image you want to focus on. Adjust the selection as needed until you are satisfied with the composition.
- Apply the Crop: Once you have defined the desired crop area, click on the “Crop” button to finalize the changes.
- Save Your Edits: To ensure that the cropped image is saved, click on the “Save” button. This action will apply the crop and update the image with the new dimensions.
Cropping images in WordPress enables you to highlight key elements within an image, improving its overall visual impact on your website. Experiment with different crop selections to find the most compelling compositions for your content.
How to Add a Header Image in WordPress
Setting header images in WordPress can be done easily through the Customizer tool. If you encounter any image-related issues with your header, follow these steps to resolve them:
- Access the Customizer: Start by navigating to Appearance > Customize in your WordPress dashboard.
- Upload Your Header Image: Locate the “Header Image” section within the Customizer, upload or select your desired image, and then save your changes by clicking “Save & Publish.”
- Purpose of Header Images: Header images are commonly utilized for branding purposes or to provide a visual introduction to your website, enhancing its overall appeal and identity.
By following these simple steps, you can effectively manage and customize your header images in WordPress to create a more engaging and visually appealing website.
How to Add a Background Image in WordPress
In the realm of web design, background images play a crucial role in elevating the visual appeal of your site. They have the power to set the tone, create a mood, and engage visitors in a unique way. If you encounter image-related issues on your WordPress site, here are some steps to address them effectively:
- Access the Customizer: Begin by navigating to the Customizer section within WordPress. You can find this option under “Appearance” in the main menuIn WordPress, a menu is a collection of links that are displayed as a navigation menu on a website. Menus are … More.
- Select a Background Image: Once you are in the Customizer interface, locate the “Background Image” section. Here, you can either upload a new image or choose from existing options. Take the time to adjust the settings according to your preferences, ensuring that the image aligns with your site’s overall design aesthetic.
- Save Your Changes: After finalizing the adjustments to your background image, be sure to save the changes to apply them to your site. This step is crucial in ensuring that your chosen image enhances the visual impact of your website effectively.
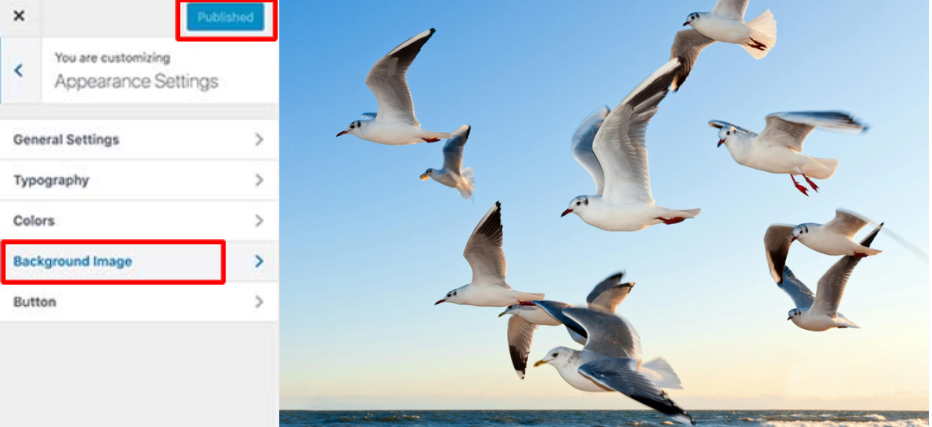
By incorporating compelling background images into your website design, you can create a more immersive and engaging user experience. These images have the potential to captivate your audience, convey your brand’s identity, and leave a lasting impression. Embrace the power of background images to transform your site and make a memorable impact on visitors.
How to Optimize Images for WordPress Without Losing Their Quality
Enhancing website performance through image optimization is crucial for boosting site speed and user experience. Utilizing tools such as Smush can help resolve image-related optimization challenges on WordPress sites effectively:
- Installation Process: To begin optimizing images, navigate to the Plugins section on WordPress, click on Add New, search for “Smush,” and proceed to install and activate the plugin.
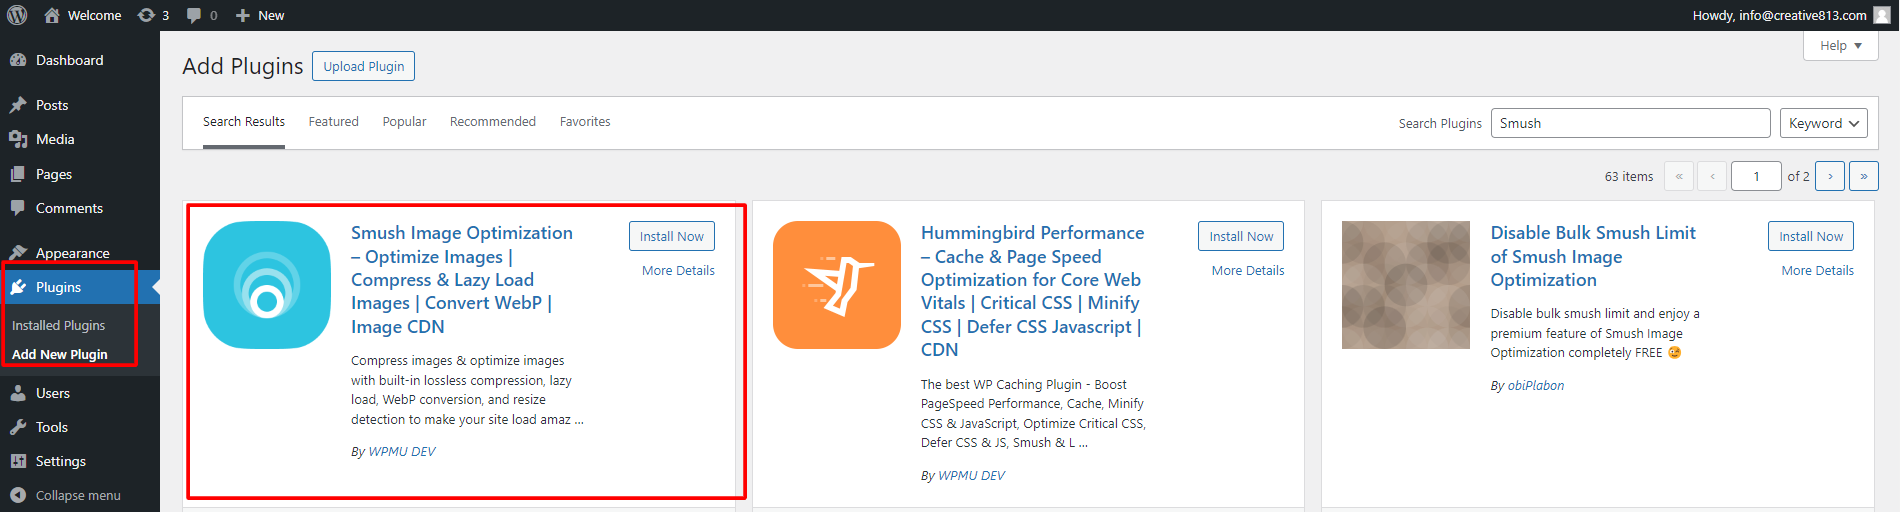
- Image Optimization: Smush simplifies the process by automatically optimizing newly uploaded images. Additionally, the tool enables bulk optimization of existing images stored in your media library. This optimization results in faster load times, ultimately enhancing user satisfaction and search engine optimization (SEO) rankings.
How to Add Title Attributes to WordPress Images
WordPress users can optimize their website’s accessibility and search engine visibility by incorporating title attributes into images. To address any image-related challenges, follow these steps:
- Image Editing: Navigate to the image within the post editor and select it.
- Adding Title Attributes: Access the “Advanced” settings of the image block and input the desired title attribute text.
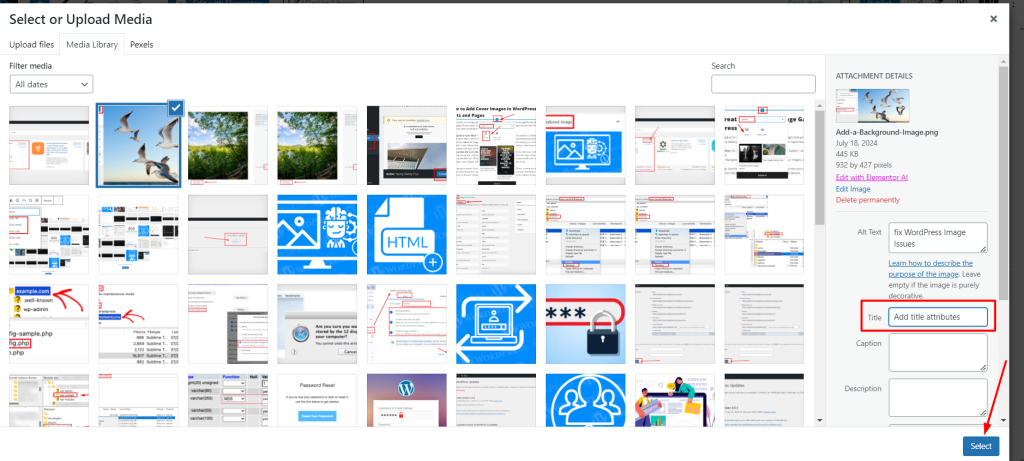
Title attributes not only contribute to improved SEO practices but also play a crucial role in supporting users who rely on screen readers to access content. By integrating title attributes effectively, WordPress users can enhance the overall user experience and ensure that their website is accessible to a wider audience.
How to Find Free Images for Your WordPress Blog Posts
Free images can be found on various platforms. To fix WordPress image issues related to sourcing images:
- Use Free Image Sites: Websites like Unsplash, Pexels, and Pixabay offer high-quality free images.
- Download and Upload: Download images from these sites and upload them to your media library. Always check the licensing terms to ensure proper usage.

How to Categorize and Tag Images in WordPress
Categorizing and tagging images helps organize your media library. To fix WordPress image issues related to organization:
- Use a Plugin: Install a plugin like Media Library CategoriesIn WordPress, categories are a fundamental taxonomy used to group and organize posts based on their topics or … More.

- Categorize and TagIn WordPress, tags are a taxonomy used to classify and organize posts. They are similar to categories, but unl… More: After installing the plugin, go to your media library, and you’ll see options to categorize and tag images. This organization makes it easier to find and manage images, especially in large libraries.

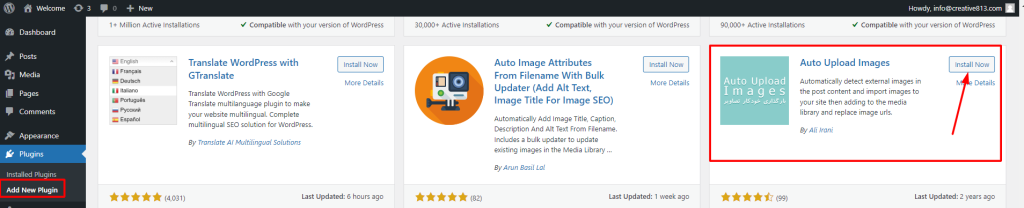
How to Import External Images in WordPress
Importing external images can be done with a plugin. To fix WordPress image issues related to external images:
- Install a Plugin: Use a plugin like Auto Upload Images.
- Configure and Import: The plugin will automatically download and upload external images used in your posts. This is useful for migrating content from other platforms or blogs.
How to Require Featured Images for Posts in WordPress
Ensuring every post has a featured image can be enforced with a plugin. To fix WordPress image issues related to mandatory featured images:
- Install Require Featured Image: Go to Plugins > Add New, search for “Require Featured Image,” and install and activate it.

- Configure the Plugin: The plugin will prevent posts from being published without a featured image. This ensures consistent visual presentation across your site.
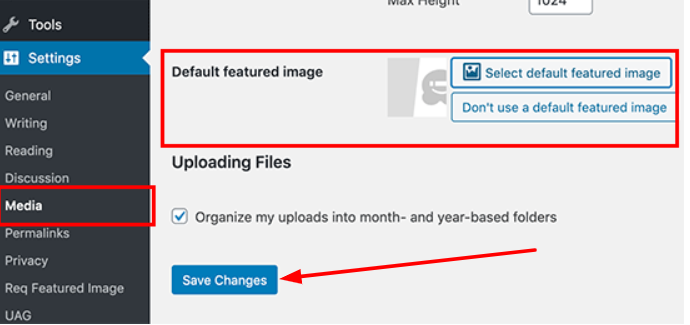
How to Fix WordPress Image Issues by Setting a Default Featured Image
A default featured image is useful when one is not set. To fix WordPress image issues related to default images:
- Install Default Featured Image: Go to Plugins > Add New, search for “Default Featured Image,” and install and activate the plugin.
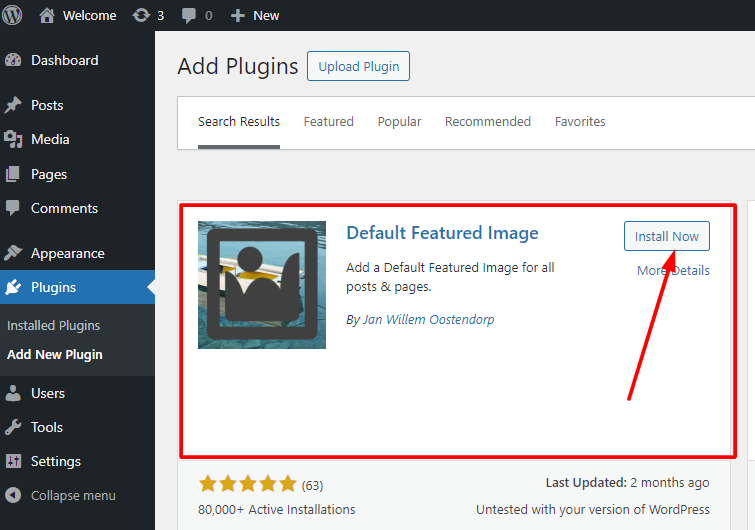
- Set the Default Image: Upload your default image in the plugin settings. This ensures your posts always have a featured image, maintaining a uniform look.
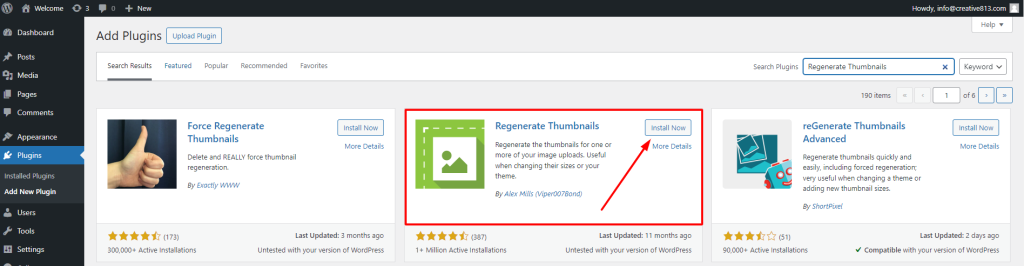
How to Create Additional Image Sizes in WordPress
Creating additional image sizes is done via functions.php. To fix WordPress image issues related to image sizes:
Edit functions.php: Add the following code to your theme’s functions.php file:
add_image_size( 'custom-size', 800, 600, true );Regenerate Thumbnails: Use the Regenerate Thumbnails plugin to apply the new sizes to existing images. This allows you to have multiple versions of an image for different purposes.
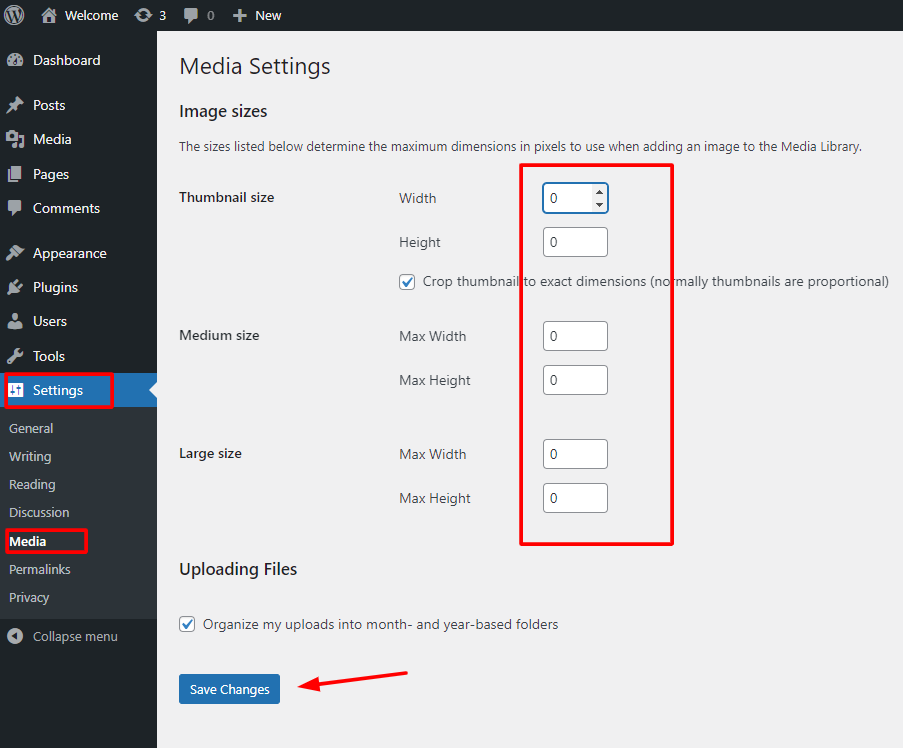
How to Fix WordPress Image Issues by Preventing Automatic Image Size Generation
Preventing automatic image size generation helps save server space. To fix WordPress image issues related to excessive image sizes:
Edit functions.php: Add the following code to your theme’s functions.php file:
remove_image_size( 'medium' );
remove_image_size( 'large' );
Stop Core Sizes: In Settings > Media, set the width and height to 0 for image sizes you don’t need. This prevents WordPress from creating unnecessary image sizes.
How to Fix WordPress Image Issues by Preventing Image Theft
Protect your images from theft with these methods to fix WordPress image issues related to security:
- Use Watermarks: Apply watermarks to images using a plugin like Easy Watermark.
- Disable Right-Click: Use a plugin like WP Content Copy Protection to disable right-click on your site. These measures help protect your content and maintain your intellectual property rights.

Conclusion
Managing images in WordPress can be a seamless experience when you know the right steps and tools. From uploading and aligning images to optimizing and protecting them, each aspect plays a crucial role in enhancing your website’s visual appeal and performance. By following this comprehensive guide, you’ll be able to fix WordPress image issues effectively, ensuring your site remains visually engaging and functional.
Remember, regular updates and maintenance are key to a smooth-running website. Stay informed about the latest WordPress features and best practices to keep your site optimized and secure. Happy blogging!
If you’re seeking reliable WordPress hosting along with hassle-free updates and expert support for fixing common image issues in WordPress, explore our hosting packages today. Click the button below to learn more and get started with optimizing your website for seamless performance.

![How to Fix Duplicate Meta Descriptions in WordPress [Step-by-Step]](https://codingheros.com/wp-content/webp-express/webp-images/uploads/2026/05/how-to-fix-duplicate-meta-descriptions-in-wordpress-step-by-step.png.webp)


