Adding HTML to a WordPress text area can enhance your website’s content, allowing for more customization and functionality. Whether you want to embed a video, add a form, or style your text, this guide will show you how to do it easily.
Ever dreamt of adding a little extra flair to your WordPress blog postsA post is a type of content in WordPress, a popular open-source content management system used for creating an… More? While the built-in editor is fantastic for basic text and media, sometimes you need the power of HTML to truly bring your vision to life. Maybe you want to embed a dazzling infographic, highlight a key quote with a pull quote style, or even create a custom table for better data presentation.
The good news? Adding HTML to your WordPress text area is surprisingly easy and opens a world of creative possibilities for your content. In this SEO-friendly guide, we’ll break down the process step-by-step, ensuring you can confidently add that extra “wow factor” to your blog posts..
Here’s what you’ll need:
- A WordPress website with editing access
- Basic understanding of HTML code (don’t worry, we’ll keep it simple!)
What is HTML?
HTML, or HyperText Markup Language, is the standard language used to create and design web pagesIn WordPress, a page is a content type that is used to create non-dynamic pages on a website. Pages are typica… More. It allows you to structure content, add multimedia elements, and control the layout of your web pages. Understanding HTML can significantly enhance your ability to customize and optimize your WordPress site.

Why You Need to Add HTML to WordPress Text Area
Adding HTML to the WordPress text area enables you to go beyond the default capabilities of the WordPress editor. By incorporating HTML, you can:
- Enhance Customization: Create custom layouts, embed multimedia content, and apply specific styling that might not be possible with the visual editor alone.
- Improve SEO: Use HTML tagsIn WordPress, tags are a taxonomy used to classify and organize posts. They are similar to categories, but unl… More to structure your content properly, which helps search engines better understand and index your site.
- Boost Functionality: Add features like buttons, forms, and tables that enhance user experience and engagement.
By learning how to add HTML to a WordPress text area, you gain greater control over your website’s design and functionality, ultimately creating a more dynamic and user-friendly site.
How to Add HTML to WordPress Text Area
Adding HTML to a WordPress text area can enhance the functionality and appearance of your content. Whether you want to embed videos, create custom layouts, or add special styling, knowing how to use HTML within WordPress is a valuable skill. Here’s a step-by-step guide to help you do just that.
Step 1: Accessing the Text Editor
- Log in to Your WordPress DashboardIn WordPress, the Dashboard is a central hub for managing a website’s content and settings. It is the first sc… More: Navigate to your WordPress login page and enter your credentials to access the dashboard.
- Create or Edit a Post/Page: Go to the sidebar menuIn WordPress, a menu is a collection of links that are displayed as a navigation menu on a website. Menus are … More and click on “Posts” or “Pages” to either create a new post/page or edit an existing one.
- Switch to the Text Editor: In the WordPress editor, you’ll find two tabs at the top right corner of the editing area: “Visual” and “Text.” Click on the “Text” tab to switch to the HTML editor. This is where you can add and edit HTML code directly.
Step 2: Adding HTML Code
- Insert Your HTML Code: Place your cursor in the text area where you want to add your HTML. Type or paste your HTML code directly into the editor. For example, to add a simple link, you can use:

- Format Your Content: Use HTML tags to format your text. Here are some common tags you might use:
- Bold text: <strong>Bold Text</strong>
- Italic text: <em>Italic Text</em>
- Headings: <h1>Heading 1</h1>, <h2>Heading 2</h2>, etc.
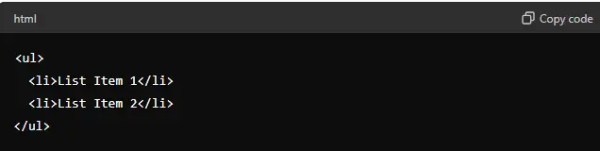
- Lists:
Step 3: Preview and Publish
- Preview Your Changes: Switch back to the “Visual” tab to see how your HTML will look on the front end. This helps ensure everything appears as expected.
- Save or Publish: Once you’re satisfied with your HTML additions, click “Save Draft” or “Publish” to make your changes live on your website.

Tips for Adding HTML to WordPress
- Use Proper HTML Syntax: Ensure your HTML is correctly formatted to avoid any display issues. Unclosed tags or incorrect nesting can break your layout.
- Test Thoroughly: Preview your post/page in different browsers and devices to make sure your HTML renders correctly across all platforms.
- Utilize ShortcodesA shortcode in WordPress is a small piece of code that allows users to perform complex functions or display dy… More: For commonly used HTML snippets, consider creating shortcodes. This makes it easier to reuse code without manually entering it each time.
The Easy Way to Add HTML to Your WordPress Text Editor
1. Choosing Your HTML Playground:
WordPress offers two main ways to add HTML to your text area:
- The Classic Editor (Optional): If you haven’t switched to the GutenbergGutenberg is the name of a modern WordPress editor that was introduced with the release of WordPress 5.0 in De… More editor yet, you’ll see a familiar text box where you can directly paste your HTML code.
- The Gutenberg Editor (Most Common): This block-based editor requires a slightly different approach. Here’s how to do it:
- Navigate to the edit screen of your blog post.
- Click the “+” icon to add a new block.
- Search for and select the “Custom HTML” block.
2. Pasting Your HTML Code:
Now comes the fun part! Here’s where you paste your desired HTML code into the designated area. Remember, keep the code clean, well-formatted, and relevant to your content for optimal results.
3. Preview and Publish (the Crucial Steps):
Before hitting publish, it’s essential to preview your post. This allows you to see how the added HTML elements will appear on your live website. Make any necessary adjustments and once satisfied, hit that glorious “Publish” or “Update” button!

Important Considerations:
While adding HTML offers greater control, it’s crucial to use it responsibly:
- Prioritize User Experience: Ensure the added HTML elements enhance, not hinder, your reader’s experience. Maintain a clean and readable layout.
- Security Matters: Only use trusted HTML code from reputable sources to avoid security vulnerabilities on your website.
- Start Simple: If you’re new to HTML, begin with basic elements and gradually expand your skills. There are plenty of online resources and tutorials to help you learn more.
By following these steps and keeping these considerations in mind, you can leverage the power of HTML to create visually engaging and informative blog posts that stand out from the crowd.
Remember: Consistent, high-quality content with strategic use of HTML can significantly improve your website’s ranking in search engines, attracting more organic traffic eager to explore your creative content. So unleash your inner web designer and start crafting visually compelling blog posts that inform and impress your audience!
Conclusion: Elevate Your WordPress Content with HTML
Adding HTML to a WordPress text area allows you to customize your content beyond the capabilities of the standard editor. By following these steps, you can enhance your posts and pages with additional functionality and styling. Practice using HTML, and soon you’ll be able to create richer, more engaging content for your WordPress site.
If you’re looking for fast wordpress hosting as well as done-for-you updates such as adding HTML to your WordPress text area, check out our hosting packages by clicking the button below: