Images play a huge role in improving the readability and visual appeal of blog postsA post is a type of content in WordPress, a popular open-source content management system used for creating an… More. One of the most effective formatting techniques used by professional websites is the WordPress wrap text around image method. Instead of placing an image on its own line, this approach allows the surrounding text to flow neatly beside it, creating a cleaner layout and a more engaging reading experience.
If you’re running a WordPress blog, learning how to wrap text around an image in WordPress can make your articles look more professional and magazine-style.
In this guide, you’ll learn:
- How to wrap text around images in the WordPress GutenbergGutenberg is the name of a modern WordPress editor that was introduced with the release of WordPress 5.0 in De… More editor
- How to do it using the Classic Editor
- How to control image wrapping using CSS
- Best practices for maintaining responsive layouts
By the end of this tutorial, you’ll be able to format your WordPress posts with clean and visually appealing layouts.
What Does Wrapping Text Around an Image Mean in WordPress?
Wrapping text around an image means allowing paragraphs of text to flow beside an image instead of appearing above or below it.
This layout style is common in:
- News websites
- Online magazines
- Blog posts
- Editorial articles
Instead of creating large gaps in your content, the image is aligned to the left or right while text automatically fills the available space.
Why Bloggers Use Image Text Wrapping
Many bloggers prefer wrapping text around images because it improves the overall layout and reading experience.
Here are the main benefits:
1. Better Visual Design Images integrated with text create a more balanced and attractive layout.
2. Improved Readability Readers don’t have to scroll past large empty spaces created by standalone images.
3. Professional Blog Formatting Many high-authority blogs use this layout style to mimic magazine formatting.
4. Increased Engagement Readers are more likely to stay longer on visually appealing pagesIn WordPress, a page is a content type that is used to create non-dynamic pages on a website. Pages are typica… More.

How to Wrap Text Around an Image in WordPress Gutenberg Editor
The WordPress Gutenberg editor makes wrapping text around images extremely easy. You don’t need coding knowledge to do it.
Step 1: Add an Image Block
First, insert the image you want to use.
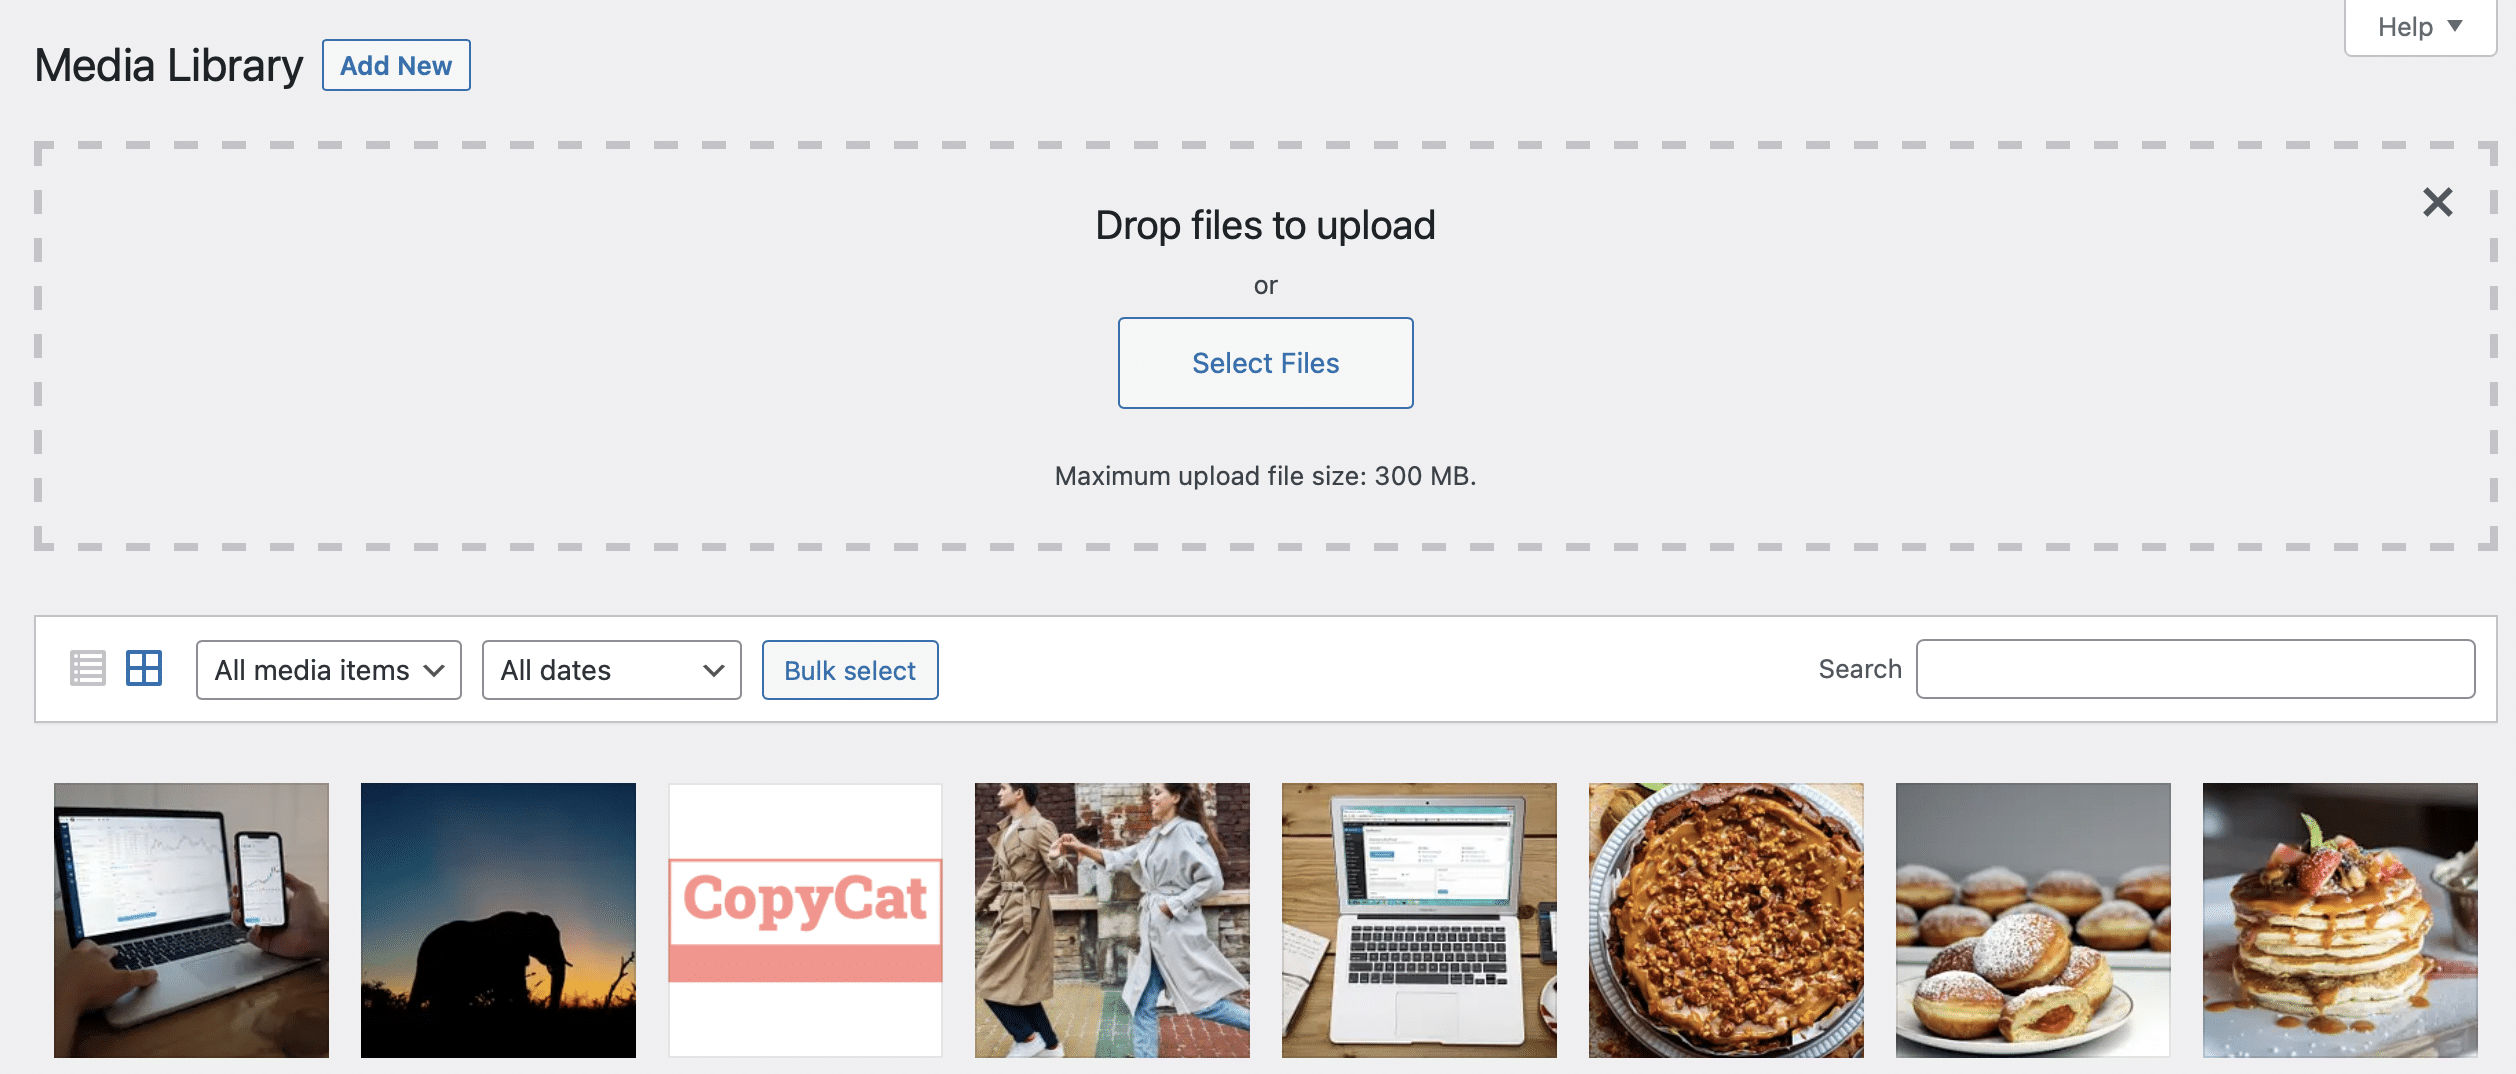
Steps:
- Open your WordPress postA post is a type of content in WordPress, a popular open-source content management system used for creating an… More or pageIn WordPress, a page is a content type that is used to create non-dynamic pages on a website. Pages are typica… More.
- Click the Add Block (+) button.
- Select Image Block.
- Upload an image or select one from the Media LibraryThe Media Library in WordPress is a feature that allows users to easily upload and manage media files such as … More.
Once inserted, the image will appear centered by default.
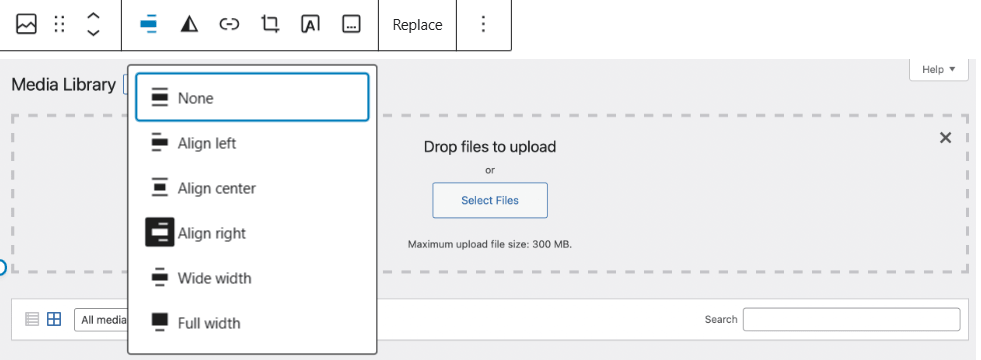
Step 2: Change Image Alignment
To wrap text around the image, you need to adjust the alignment.
Click on the image and choose one of the following options from the toolbar:
- Align Left
- Align Right
Avoid using center alignment, because it prevents text from wrapping around the image.
When you select left alignment, the image moves to the left side and the text will appear on the right.
When you select right alignment, the image moves to the right and the text flows on the left.
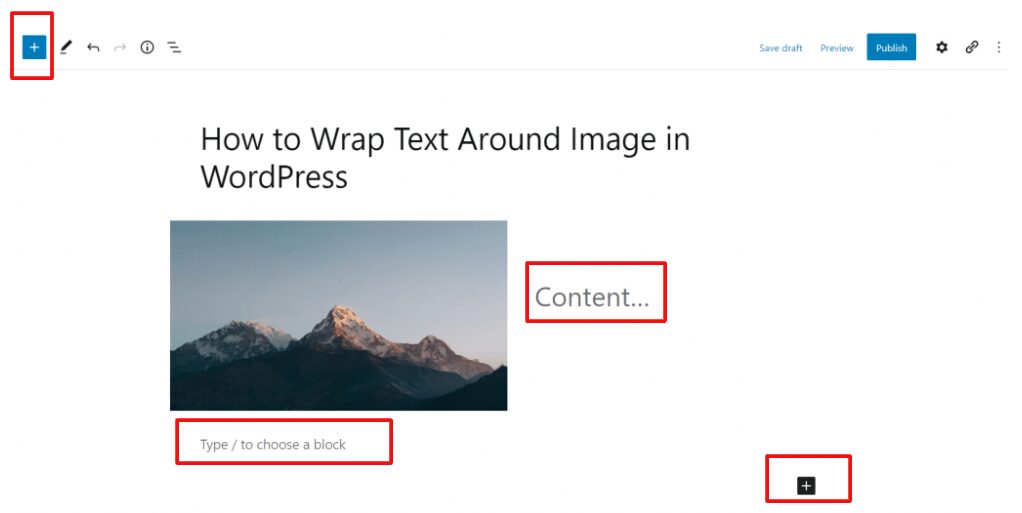
Step 3: Add Text Beside the Image
After aligning the image:
- Place your cursor below the image block.
- Add a paragraph block.
- Start typing your text.
WordPress automatically wraps the text around the image.
This method works seamlessly for most blog posts and requires no additional configuration.
Tips for Better Image Text Wrapping in Gutenberg
Although the process is simple, following a few design tips can greatly improve your layout.
Use Medium-Sized Images
Large images may push text too far down the page.
Use sizes like:
- Medium
- 300–500px width
- Optimized thumbnails
Keep Enough Margin Around Images
Spacing prevents text from touching the image border.
WordPress themesA WordPress theme is a set of files that determine the design and layout of a website. It controls everything … More usually handle margins automatically, but if needed you can adjust them with CSS.
Avoid Multiple Wrapped Images in a Row
Too many wrapped images can create a cluttered layout. Instead, alternate between:
- Full-width images
- Wrapped images
- Headings
How to Wrap Text Around Images in the Classic Editor
If you’re using the Classic Editor pluginA plugin is a software component that adds specific features and functionality to your WordPress website. Esse… More, the process is slightly different but still very simple.
Step 1: Insert an Image
In the Classic Editor:
- Click Add Media
- Upload your image
- Select the image you want to insert
Before inserting it, you’ll see alignment options.
Step 2: Choose Image Alignment
Select one of these options:
- Align Left
- Align Right
- Align Center
- None
To wrap text around the image, choose Align Left or Align Right.
Once you insert the image, the text will automatically wrap around it.
Step 3: Adjust Image Size
Choose an appropriate image size such as:
- Thumbnail
- Medium
- Custom size
Using large images may disrupt your layout.
WordPress Wrap Text Around Image: Alternative Method
Another modern approach is using the Columns block.
Instead of wrapping text around an image automatically, you create a structured layout with two columns.
Steps to Create an Image + Text Layout
- Add a Columns block.
- Choose two columns.
- Insert the image in the first column.
- Add text in the second column.
This method provides more control over spacing and alignment.
Advantages of the Column Layout
Many website designers prefer columns because they offer better flexibility.
Benefits include:
- Better Mobile Responsiveness: Columns adjust automatically for smaller screens.
- Precise Layout Control: You can adjust column width and spacing.
- Cleaner Content Structure: This method prevents awkward text flow around very tall images.
WordPress Wrap Text Around Image: Using CSS
For advanced users, CSS offers full control over image wrapping.
You can use the float property to wrap text around images.
Example CSS Code
.wrap-image-left {
float: left;
margin: 0 20px 20px 0;
}

.wrap-image-right {
float: right;
margin: 0 0 20px 20px;
}
This code creates custom classes for image alignment.
How to Apply the CSS Class in WordPress
Follow these steps:
- Select the image block.
- Open Block Settings.
- Scroll to Advanced.
- Add a custom CSS class such as:
wrap-image-leftor
wrap-image-rightThis allows you to customize how text wraps around images.
WordPress Wrap Text Around Image: Common Issues
Sometimes text wrapping may not behave as expected. Here are the most common problems and their solutions.
Text Not Wrapping Around the Image
Possible reasons include:
- Image alignment is set to center
- ThemeA WordPress theme is a set of files that determine the design and layout of a website. It controls everything … More CSS overrides image positioning
- Incorrect HTML formatting
Fix: Set the image alignment to left or right.
Image Too Large
Large images can break the layout and push text downward.
Fix: Resize the image or use the medium size option.
Mobile Display Issues
On smaller screens, wrapped images may look cramped.
Fix: Use responsive CSS rules such as:
img {
max-width: 100%;
height: auto;
}
This ensures images scale properly on mobile devices.
Best Practices for WordPress Image Text Wrapping
To maintain a professional blog layout, follow these best practices.
Use Optimized Images
Large images slow down your website.
Use tools like:
- Image compression plugins
- WebP image formats
- Proper resizing
Maintain Consistent Alignment
- If you wrap one image left, try wrapping the next one right.
- This creates a balanced layout throughout the article.
Add Descriptive Alt Text
Alt text improves both accessibility and SEO.
Example:
Instead of:
image1.jpgUse:
wordpress-wrap-text-around-image-exampleKeep Paragraph Length Balanced
- Long paragraphs may push the image too far down the page.
- Use shorter paragraphs for better readability.
WordPress Plugins That Help With Image Layout
While WordPress already supports image wrapping, page builder plugins can provide more advanced design options.
Popular plugins include:
These tools allow you to create complex layouts without coding.
Gutenberg vs Classic Editor for Image Wrapping
Both editors support text wrapping, but Gutenberg offers more flexibility.
| Feature | Gutenberg Editor | Classic Editor |
|---|---|---|
| Ease of Use | Very Easy | Easy |
| Layout Flexibility | High | Medium |
| Modern Design Tools | Yes | Limited |
| Column Layouts | Built-in | Not Available |
For most modern WordPress websites, Gutenberg is the better choice.
FAQs About WordPress Wrap Text Around Image
How do I wrap text around an image in WordPress?
Simply align the image to the left or right in the image block. WordPress automatically wraps the text around it.
Why is my text not wrapping around my image?
This usually happens when the image is center aligned. Change the alignment to left or right.
Can I wrap text around images without plugins?
Yes. WordPress supports image text wrapping natively in both the Gutenberg and Classic editors.
How do I wrap text around images on mobile?
Ensure images are responsive by using CSS such as:
max-width: 100%;
height: auto;
This prevents layout issues on smaller screens.
Learning how to wrap text around an image in WordPress is a simple yet powerful design technique that can significantly improve the look and readability of your blog posts.
You can wrap text around images using several methods:
- Align images left or right in the Gutenberg editor
- Use alignment settings in the Classic Editor
- Apply custom CSS for advanced control
- Create structured layouts with the Columns block
By following the tips and best practices in this guide, you can create visually appealing content that keeps readers engaged while maintaining a professional blog layout.
If you’re looking for fast hosting to power your WordPress Wrap Text Around Image layouts and other content features, plus done-for-you updates and maintenance, check out our WordPress hosting packages by clicking the button below.


![How to Remove Navigation Bar in WordPress [A Complete Guide]](https://codingheros.com/wp-content/webp-express/webp-images/uploads/2024/12/how-to-remove-navigation-bar-in-wordpress-a-complete-guide-178.png.webp)