Keeping your WordPress site running well is very important. One key step is to update PHP on WordPress regularly. Outdated PHP versions can lead to security vulnerabilities, slower performance, and incompatibility with the latest plugins and themes.
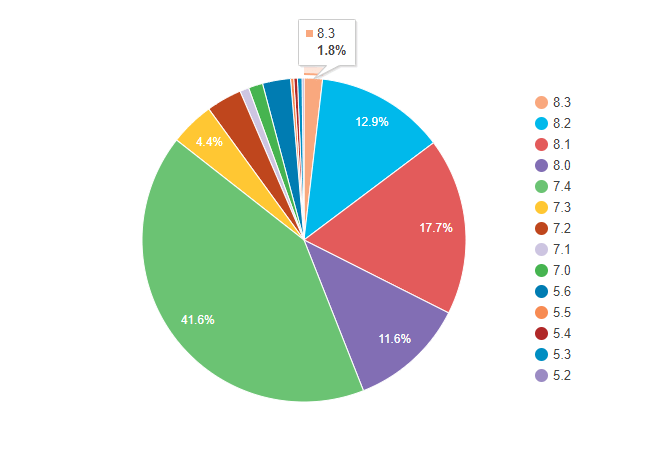
According to WordPress.org, 41.56% of WordPress sites are still running on PHP 7.4. In contrast, only 1.84% of sites have updated to PHP 8.3. The newer versions, such as PHP 8.1 and 8.2, have adoption rates of 17.68% and 12.91%, respectively.
Despite the advantages of these newer versions, many users hesitate to update due to fear of potential conflicts or lack of knowledge on how to proceed.
In this article, you will learn:
- 3 simple Methods to Update PHP on WordPress
- What to do before & after PHP update
- How to check the PHP version in WordPress
- What if the PHP update breaks my site
No matter if you’re an expert WordPress website developer or just really into WordPress, knowing how to update PHP can make your website run better and provide a smoother browsing experience for your visitors. Let’s go through the steps to ensure your WordPress site is running on the latest available PHP version.
Table of Contents
Top 3 Methods to Update PHP in WordPress
Although WordPress can run on different PHP versions, I suggest you go for the newest one, PHP 8.1 in 2024, for better security and updates on your website. But keep in mind, not all WordPress versions work well with the latest PHP versions.
Check out this table for the PHP versions compatible with different WordPress releases:
| WordPress Version | Supported PHP Versions |
|---|---|
| WordPress 6.5 | 7.4, 8.0, 8.1 |
| WordPress 6.4 | 7.4, 8.0, 8.1 |
| WordPress 6.3 | 7.3, 7.4, 8.0 |
| WordPress 6.2 | 7.3, 7.4, 8.0 |
| WordPress 6.1 | 7.2, 7.3, 7.4 |
| WordPress 6.0 | 7.2, 7.3, 7.4 |
I recently noticed that my WordPress site was running an insecure version of PHP, specifically 7.2.34. The dashboard showed a warning message recommending an update. It’s crucial to keep PHP updated for better security and performance.
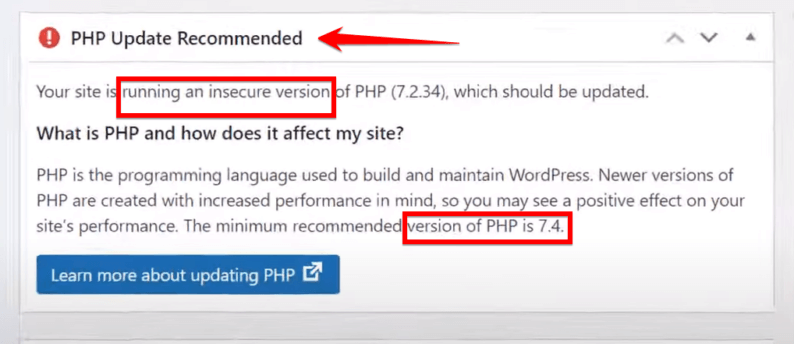
So, let’s go through the steps to update PHP to a more secure version, at least PHP 7.4, to improve our site’s performance and safety.
Note: You’ll find many methods on different websites, mostly using cPanel. But what if you want to do it without cPanel? People might say it’s not possible to update PHP on your WordPress dashboard, but I found a way after researching for hours and trying it out myself. I’ll share the steps with screenshots.
I will walk you through three simple methods to update PHP in WordPress: utilizing cPanel, the WordPress dashboard, and WordPress plugins. I will provide steps and benefits for each method, along with screenshots. Let’s get started with the first method.
Method 1: Update the PHP Version Via cPanel
If you use WordPress and want to quickly update your PHP version without getting into complicated technical stuff, one of the easiest ways to do so is through your web hosting control panel, known as cPanel.
This method is great for beginners or those who prefer an easy, visual way to manage their website. With just a few clicks, you can ensure that your WordPress site is using the latest, safest, and fastest PHP version.
Let’s explore together how to update your PHP version step by step using cPanel, which is the most popular control panel for web hosting. So, let’s start with the steps!
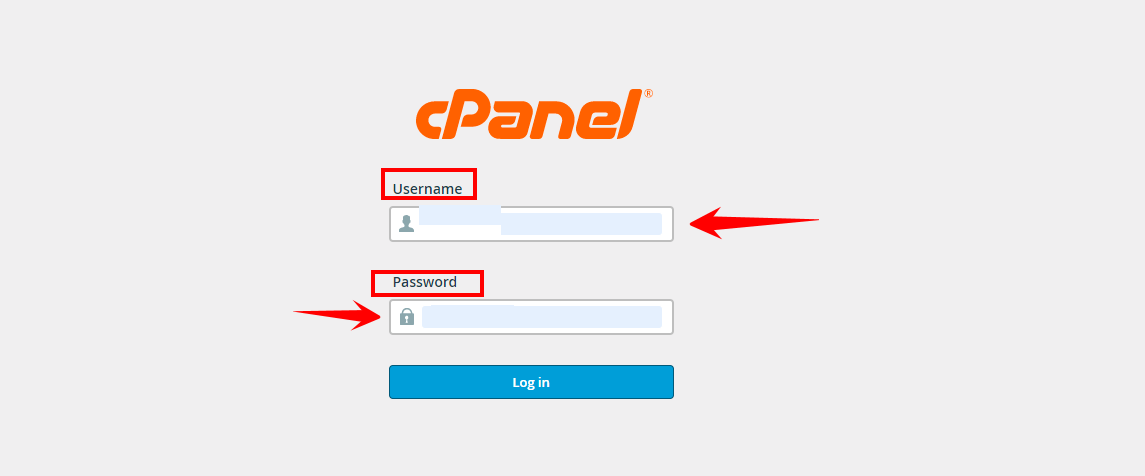
Step 1: Open your hosting account’s cPanel. Go to yourdomain.com/cpanel and enter your username and password.

Step 2: Once you log in to cPanel, you will be taken to the cPanel dashboard. Now, you need to look for the “Search bar” at the top of the dashboard. It’s usually on the right side.
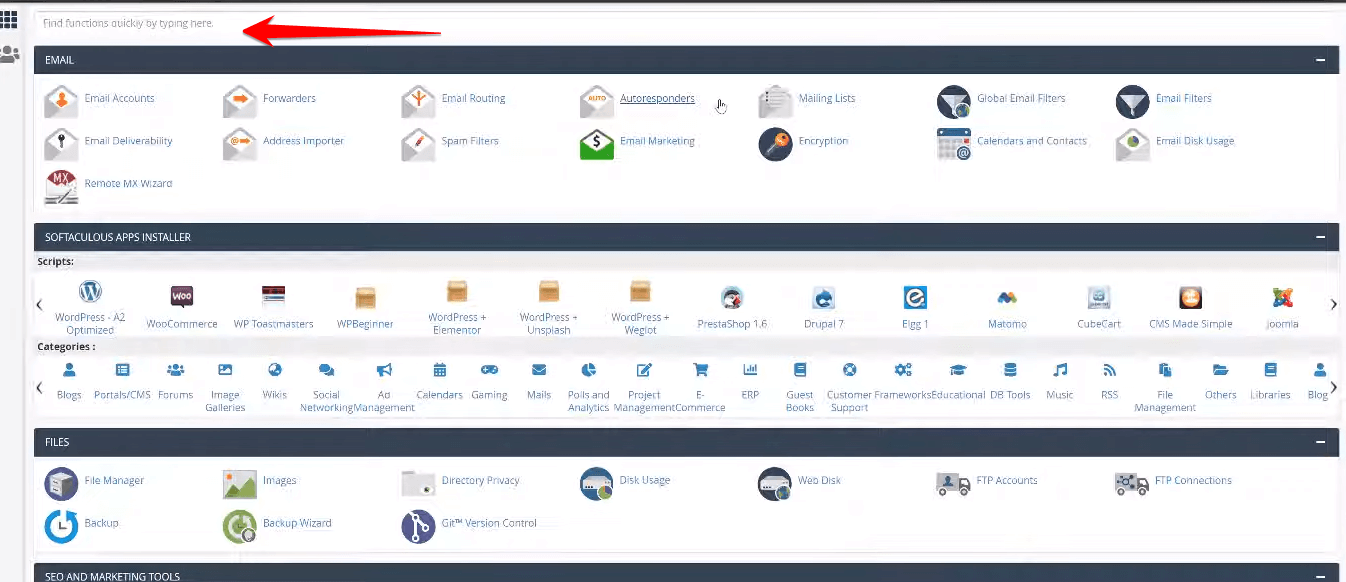
Step 3: In the search bar, type “PHP” and press Enter. This will show you all the options related to PHP.
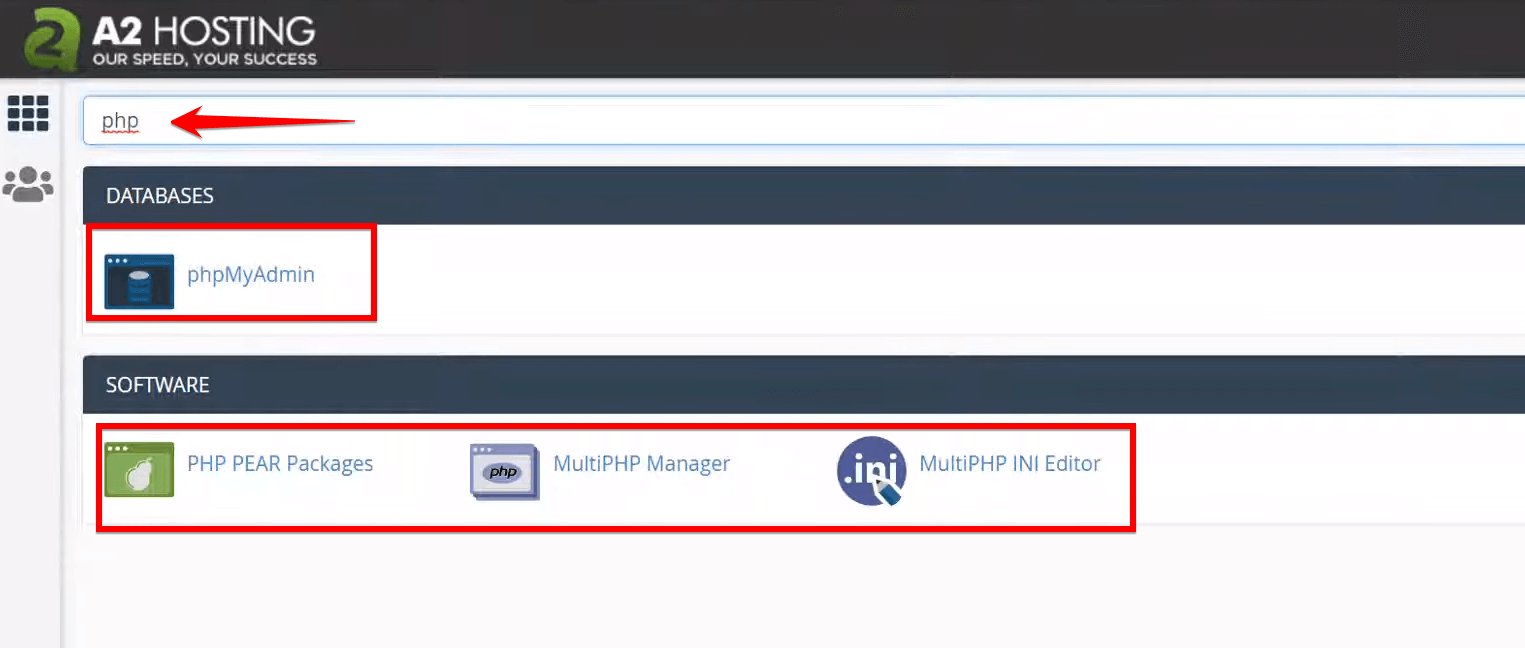
Step 4: From the search results, look for the option that says “MultiPHP Manager” and click on it.
Note: In the MultiPHP Manager interface, you will see a list of your domains. Select the checkbox next to the domain for which you want to update the PHP version.
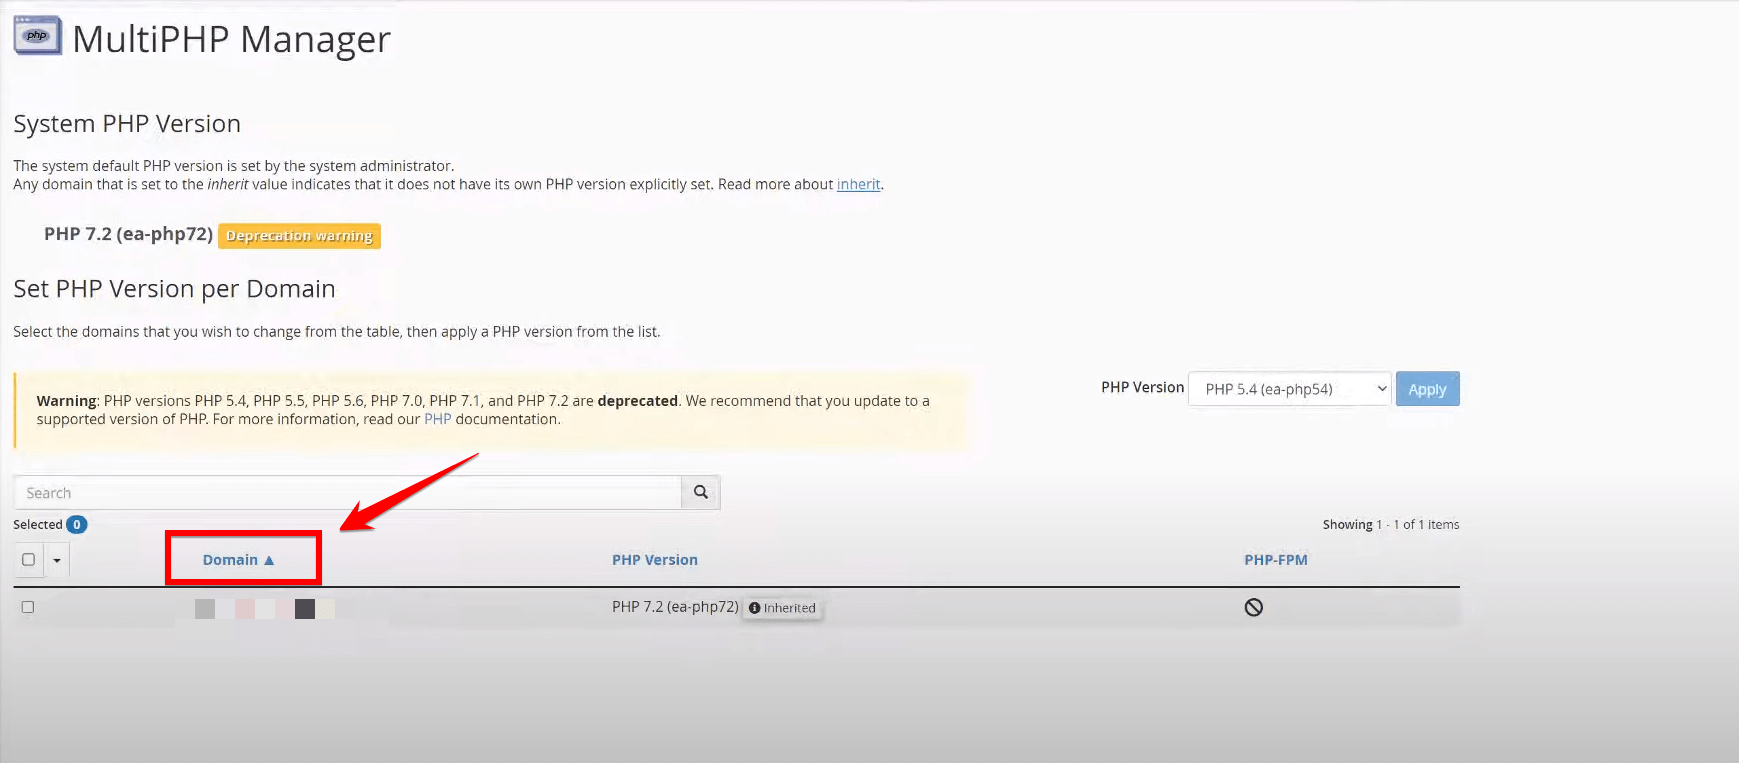
Step 5: Once you have selected your domain, look for the “PHP Version” dropdown menu. Click on it and choose the latest available version (at least PHP 7.4) from the list..
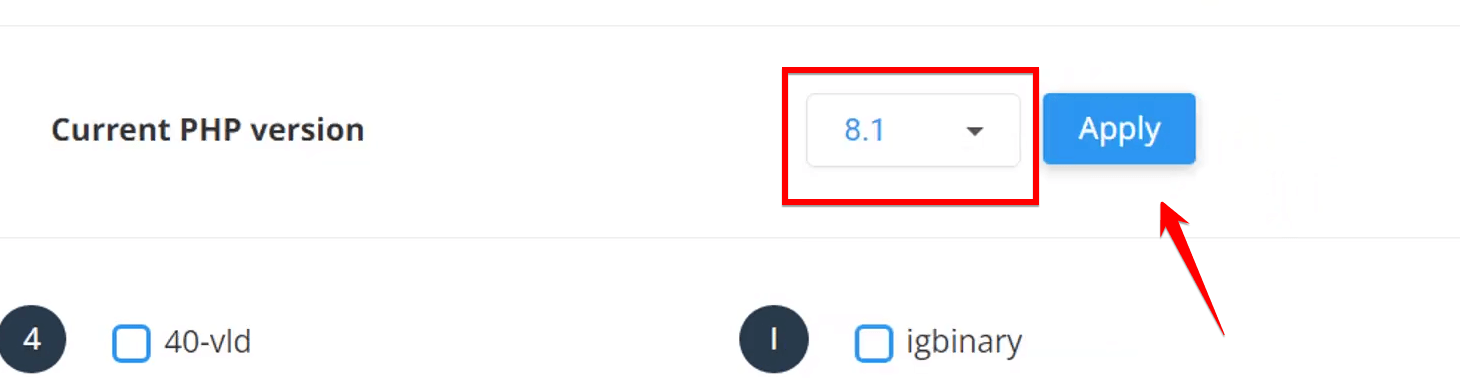
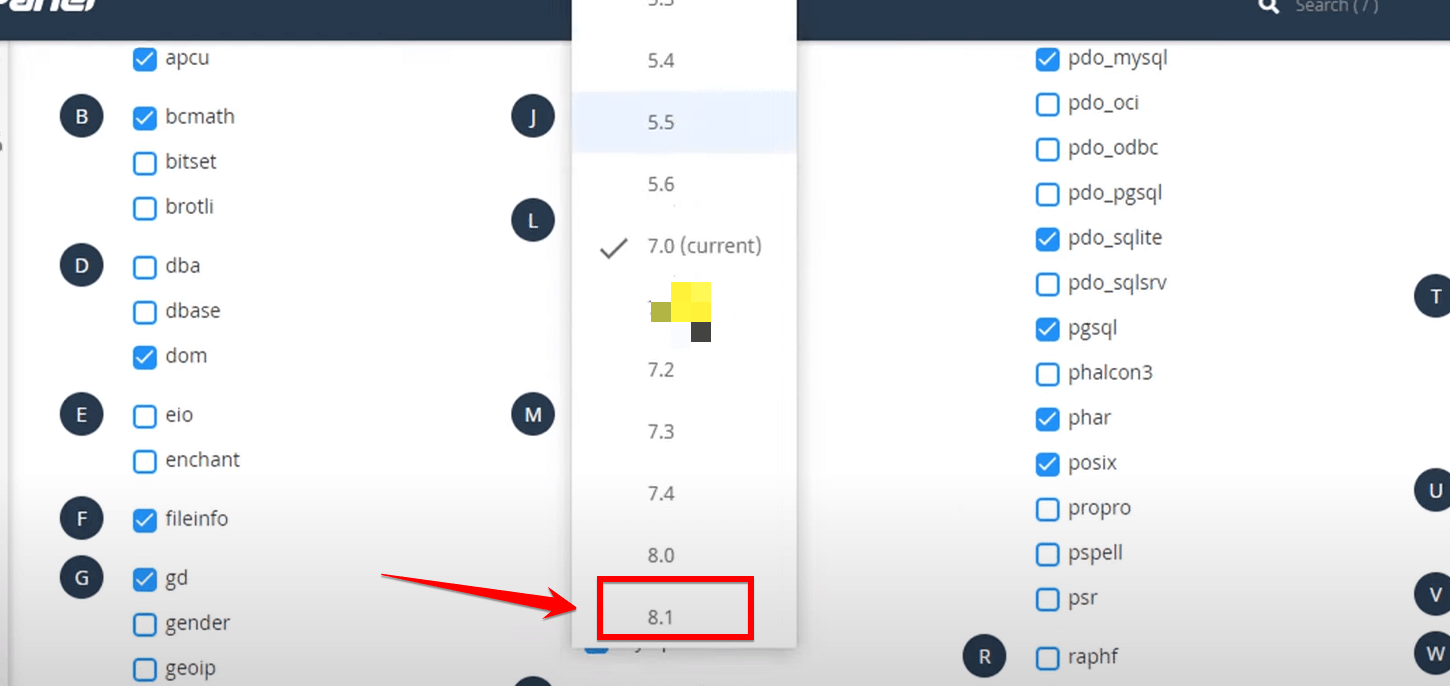
Note: To update my PHP version to the latest 8.1 version, continue scrolling through the list until you locate the 8.1 version.
Step 6: After selecting the desired PHP version, click the “Apply” button to update your PHP version. This change will be applied immediately, and your site will start using the new PHP version..
Note: Now, we need to verify if the changes we made are working or not. To do this, go back to your WordPress dashboard and refresh the page.
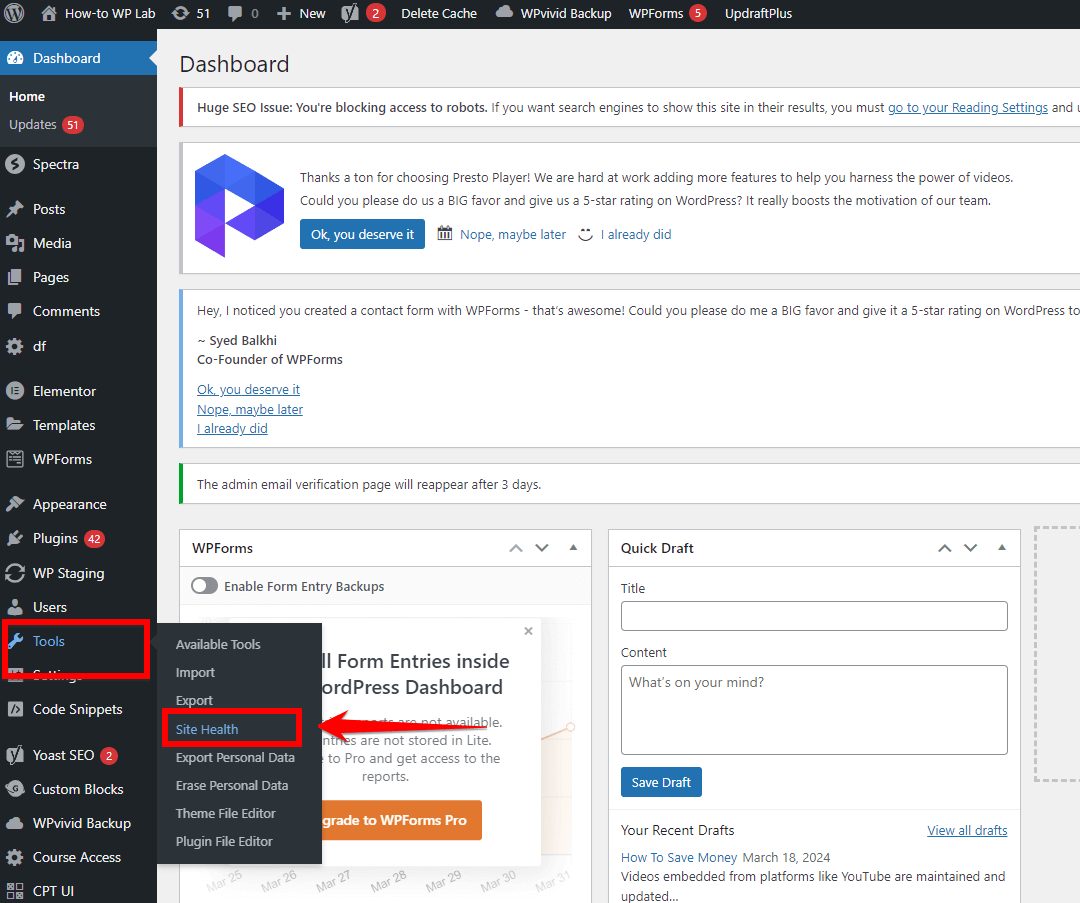
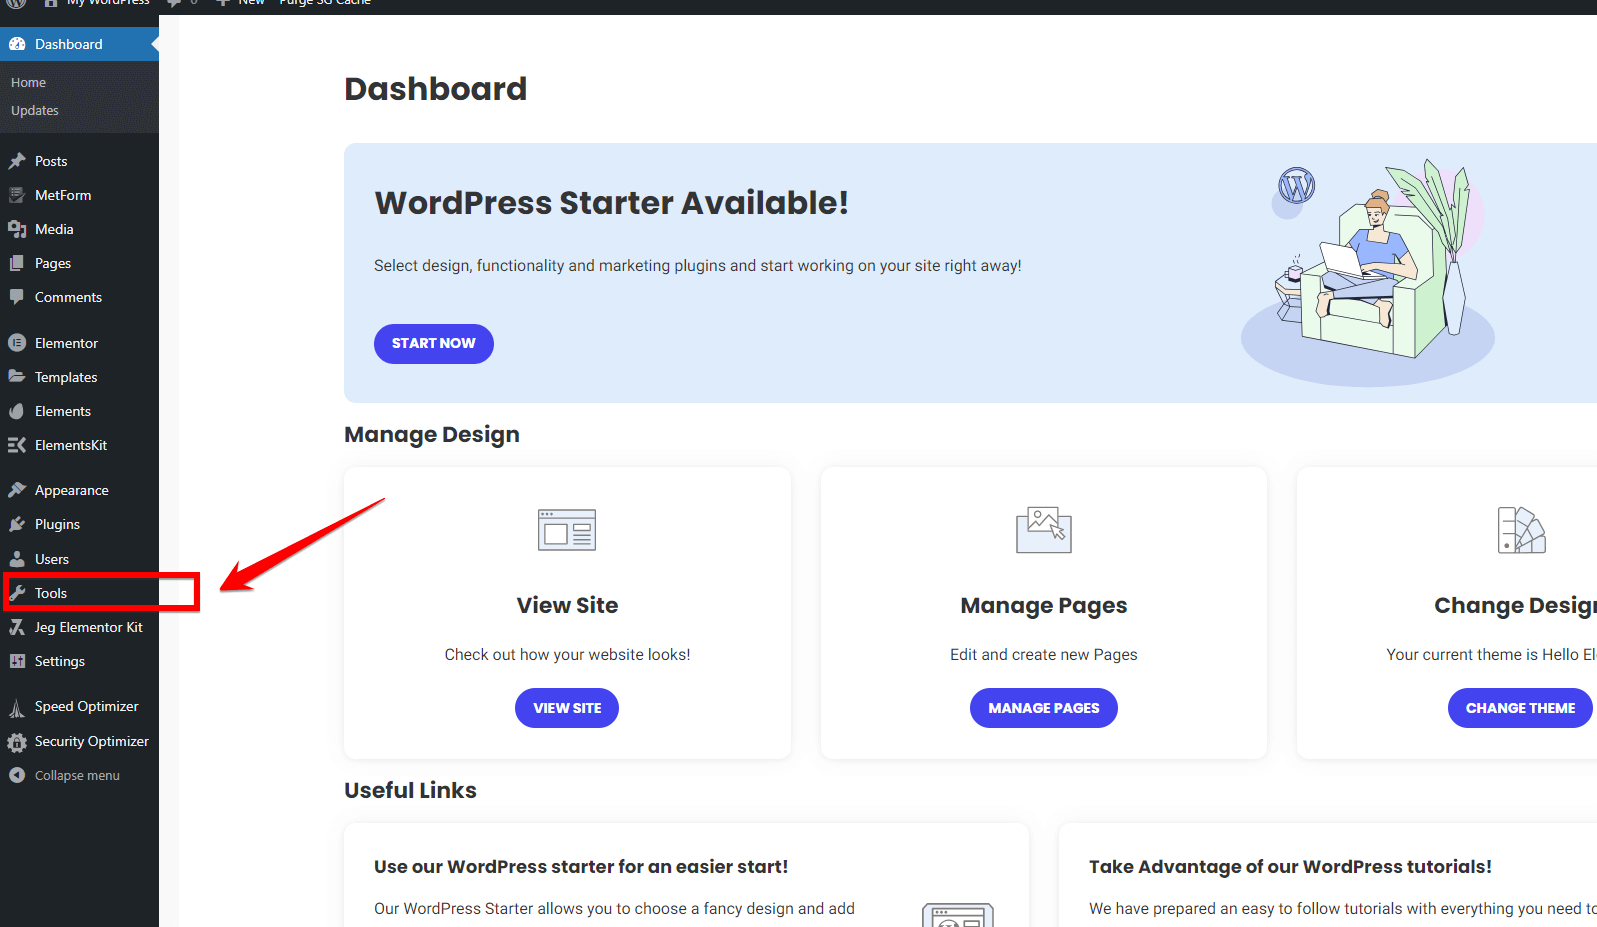
Step 8: On your WordPress dashboard, look at the left side of the screen. You will see a long menu with many options. In that menu, find the option that says “Tools” and click on it.
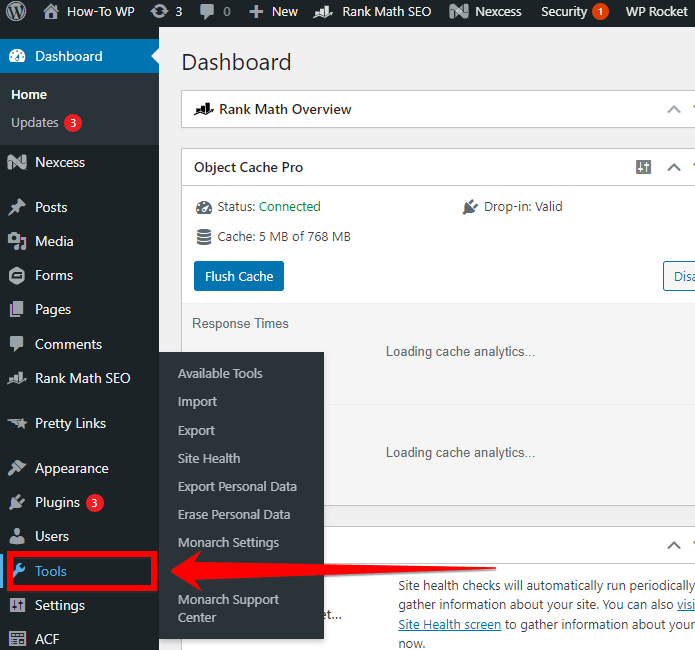
Step 9: You will see different tools that WordPress provides. Look carefully for the option that says “Site Health”. It might be somewhere in the middle of the page. When you find it, click on it.
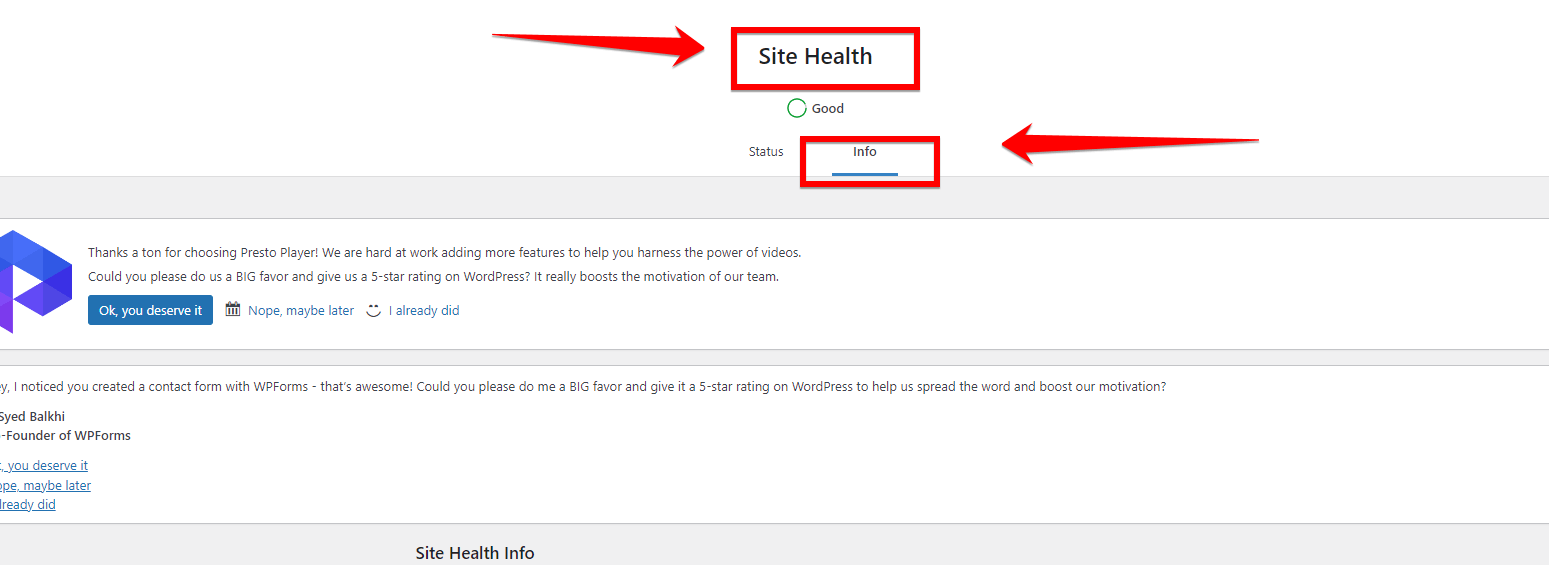
Step 10: After clicking on “Site Health”, you will be taken to a new page. This page has a lot of information about your website’s health and performance. To see more details, look at the top of the page. There, you will see two tabs: “Status” and “Info”. Click on the “Info” tab.
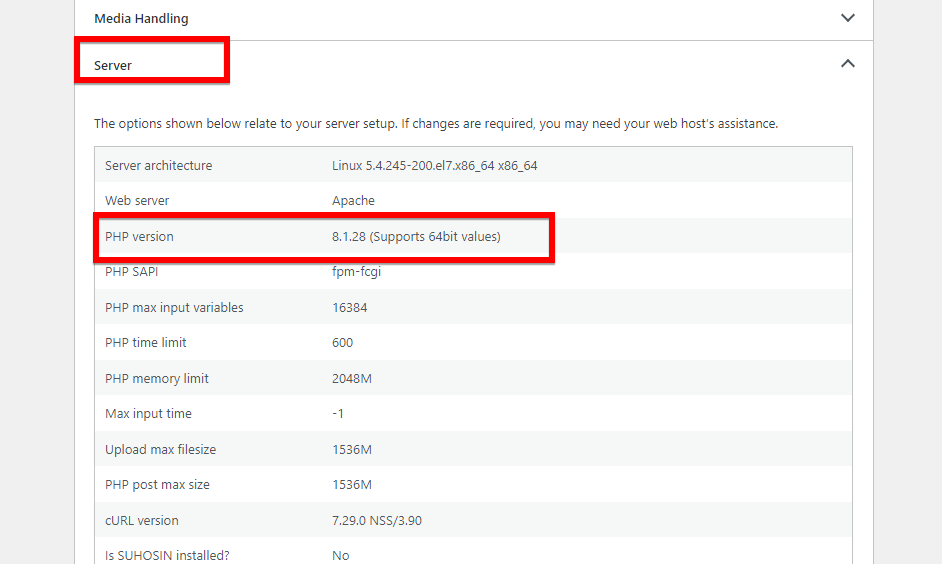
Step 11: Inside the “Server” section, look for the “PHP Version” line. It will show you the current version of the PHP your website is using.
Note: If you updated the PHP version correctly, the “PHP Version” line should show the new version you selected, like 8.1.28. If it still shows the old version, something might have gone wrong, and you may need to double-check the steps or ask for help.
By following these simple steps, you can easily update your PHP version through cPanel and ensure your WordPress site is running on a compatible and secure version of PHP.
Now that you’ve seen how straightforward it is to update PHP using cPanel, let’s explore another method that offers more control and flexibility for those who prefer a hands-on approach or don’t have access to cPanel.
Method 2: Update the PHP Version in WordPress Without cPanel
If you’re a more advanced WordPress user or don’t have access to cPanel, updating your PHP version manually by editing the “.htaccess” file is a powerful alternative. This method gives you full control over your WordPress site’s PHP configuration and is suitable for those who are comfortable working with files and code.
By modifying the .htaccess file, you can specify the desired PHP version for your WordPress site, ensuring it runs on a compatible and secure release. This method is particularly useful for WordPress developers, system administrators, and users who manage their own servers or use hosting providers that don’t offer cPanel.
Before diving into the step-by-step guide, it’s essential to understand what the “.htaccess” file is and how it works.
The .htaccess file is a configuration file used by Apache web servers to control various settings on a per-directory basis. It allows you to define rules and directives that affect how your website behaves, including PHP version selection.
Now, let’s walk through the process of updating your PHP version without the hosting cPanel.
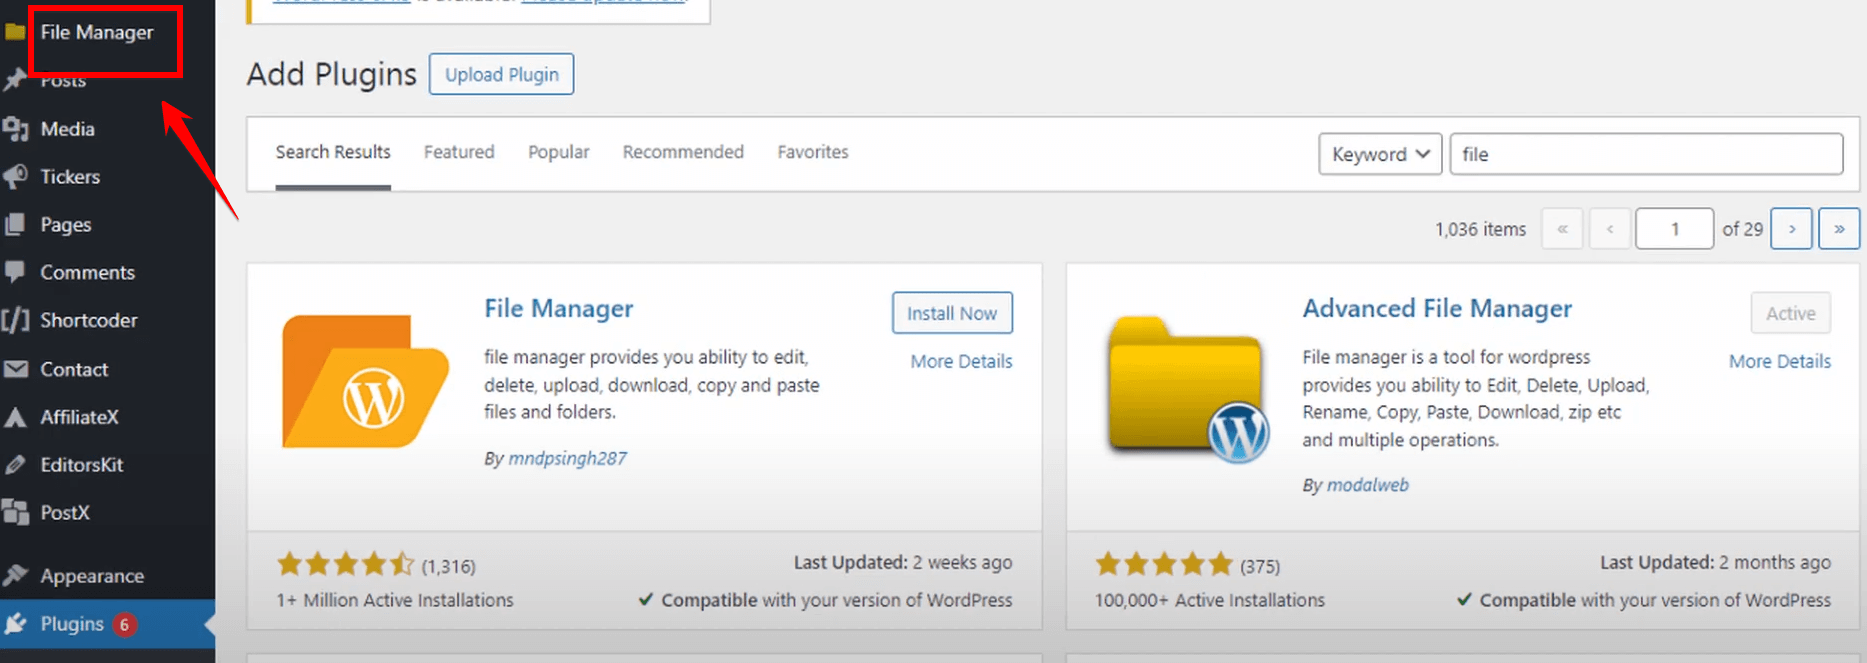
Step 1: Go to the “Plugins” section in your WordPress dashboard and click on “Add New” to install a new plugin.

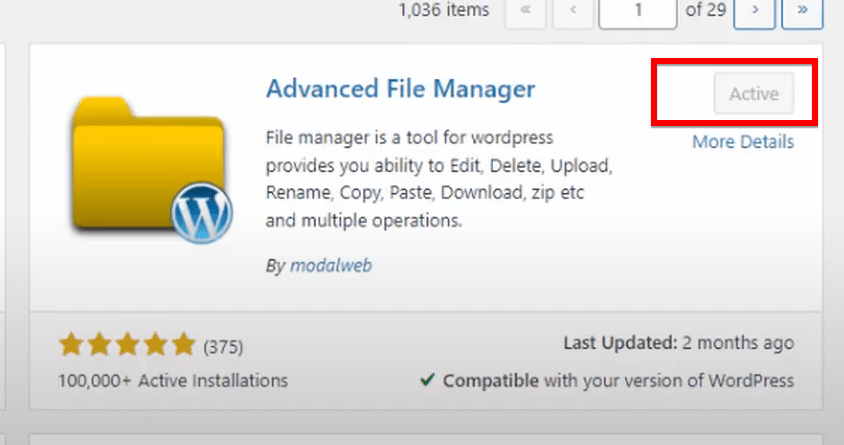
Step 2: Search for the “Advanced File Manager” plugin using the search bar, and click on the “Install Now” button when you find it. After the installation is complete, click on the “Activate” button to activate the “Advanced File Manager” plugin.
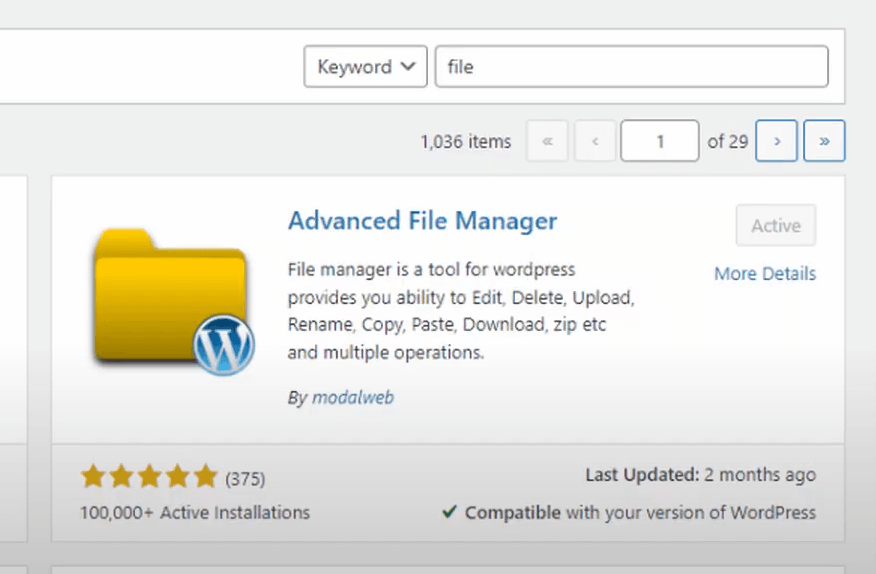
Note: As I was personally experimenting with updating PHP without cPanel, I have already installed and activated this plugin.
Step 3 With the plugin activated, you will see a new menu item called “File Manager” in your WordPress dashboard. Click on it to access the file manager interface.
Step 4: In the File Manager, look for the “.htaccess” file. If it’s not visible, go to the “Settings” within the File Manager and check the “Display .htaccess” option, then save the settings.
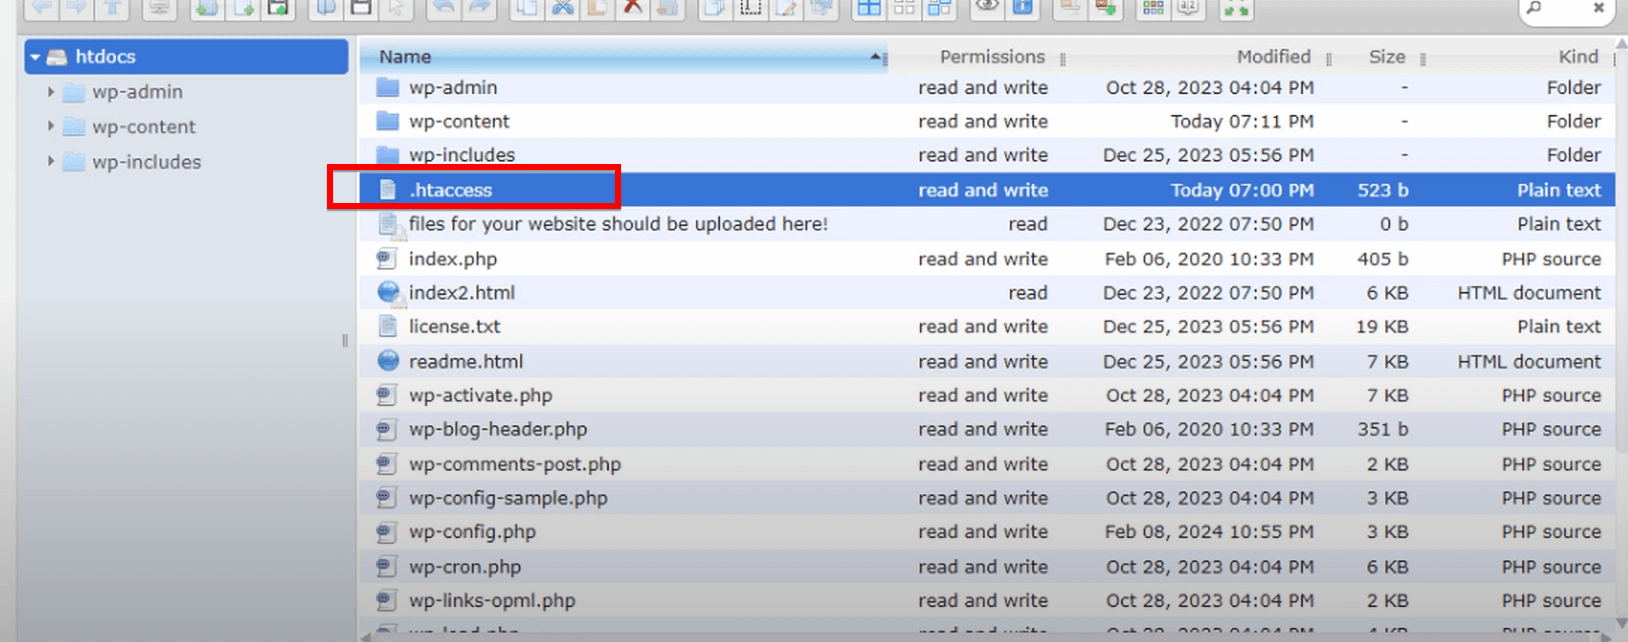
Step 5: Locate the “.htaccess” file in the File Manager, right-click on it, and select the “Edit Code” option from the context menu.
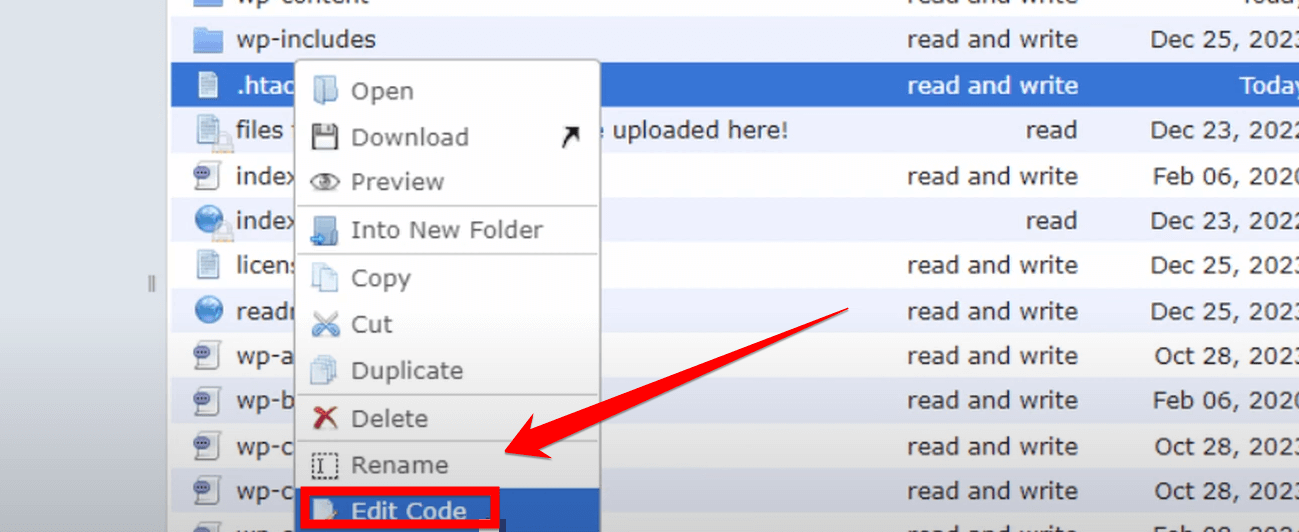
Step 6: The “.htaccess” file will open in the code editor. Scroll to the bottom of the file and find the line that says “# END WordPress”.
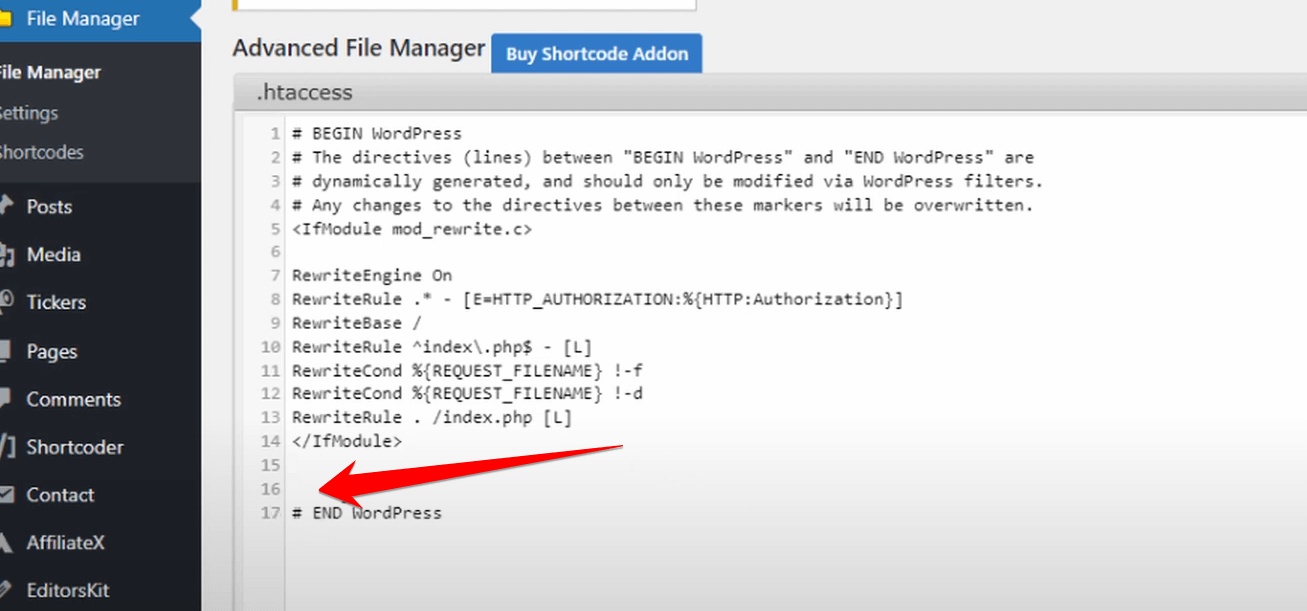
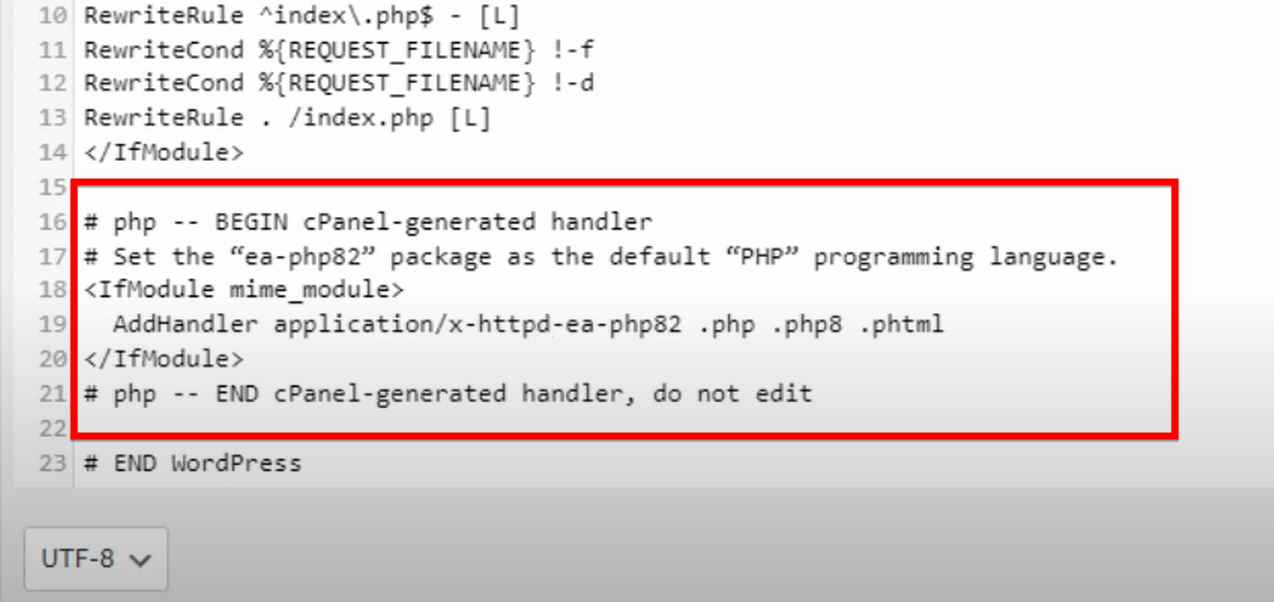
Step 7: Just above the “# END WordPress” line, add the following code snippet:
# php -- BEGIN cPanel-generated handler
# Set the “ea-php82” package as the default “PHP”
# programming language.
<IfModule mime_module>
AddHandler application/x-httpd-ea-php82 .php .php8 .phtml
</IfModule>
# php -- END cPanel-generated handler, do not edit
Step 8: After adding the code, click on the “Save” button to save the changes made to the “.htaccess” file.
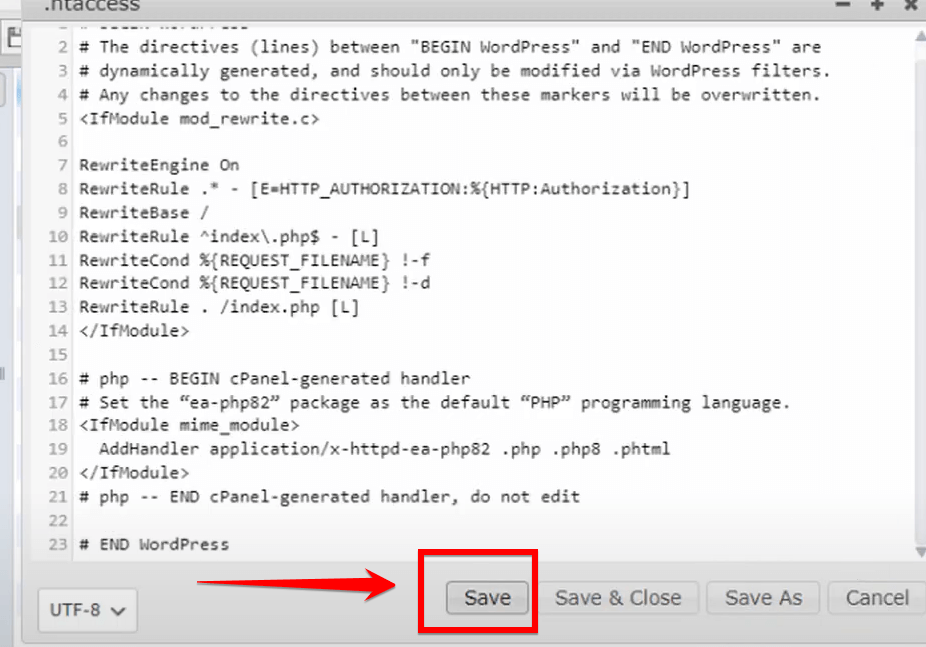
Note: Before applying these steps, ensure that the desired PHP version is already available on your server. Otherwise, the changes won’t take effect.
If you’re looking for an even simpler approach to updating your PHP version in WordPress, the next section explores a user-friendly solution using WordPress plugins. Continue reading to discover how plugins can streamline the PHP update process and make it accessible to users of all skill levels.
Method 3: Using Plugins to Update PHP Version in WordPress
For WordPress users who like an easy way to update their PHP version, plugins are a good option. WordPress plugins help you do extra things on your website and make tasks like managing your PHP version simpler.
I have personally researched and tested various plugins for updating PHP versions in WordPress. After careful consideration and experimentation, I found the “PHP Compatibility Checker” plugin to be an invaluable tool in the PHP update process. I have used this plugin to update the PHP version on my client’s WordPress website, ensuring their site is running on a compatible and secure version of PHP.
Note: The PHP Compatibility Checker plugin was created by WP Engine. This plugin not only assists in updating your PHP version but it also enables you to identify potential issues that could arise from the new PHP version.
Here’s how you can use this plugin to update your PHP version in WordPress:
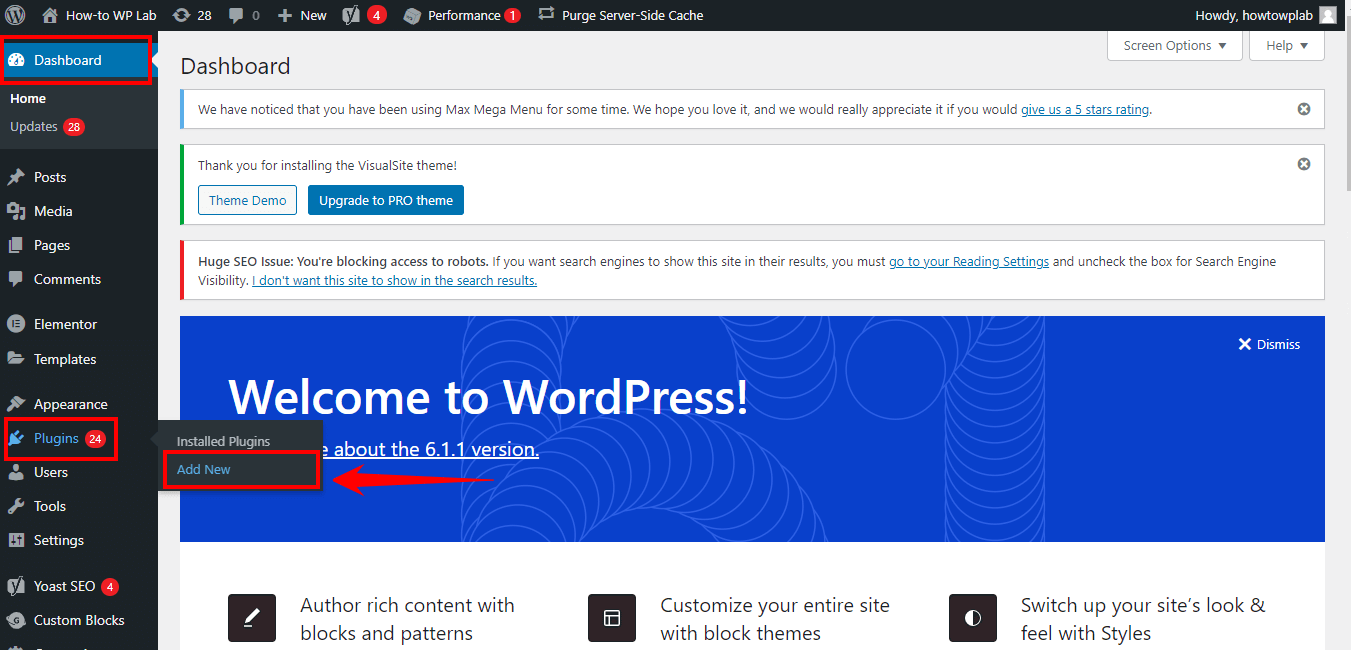
Step 1: Open your WordPress dashboard and hover over the “Plugins” menu in the left sidebar.
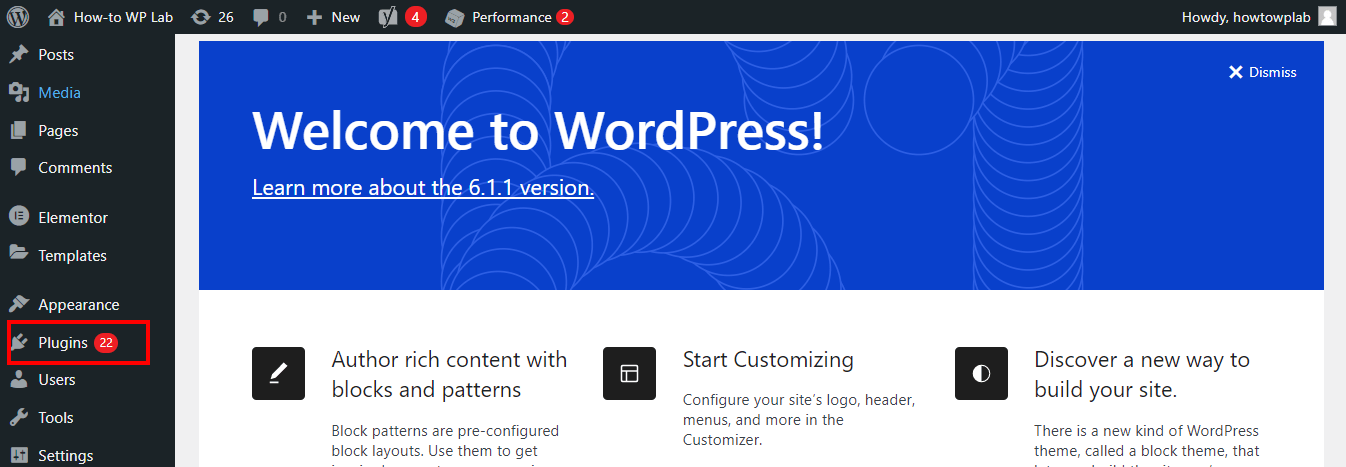
Step 2: Once you’re in the dashboard, look for the “Plugins” menu item in the left sidebar. Hover your mouse over it, and a submenu will appear. From the submenu, click on “Add New” to access the plugin installation page.
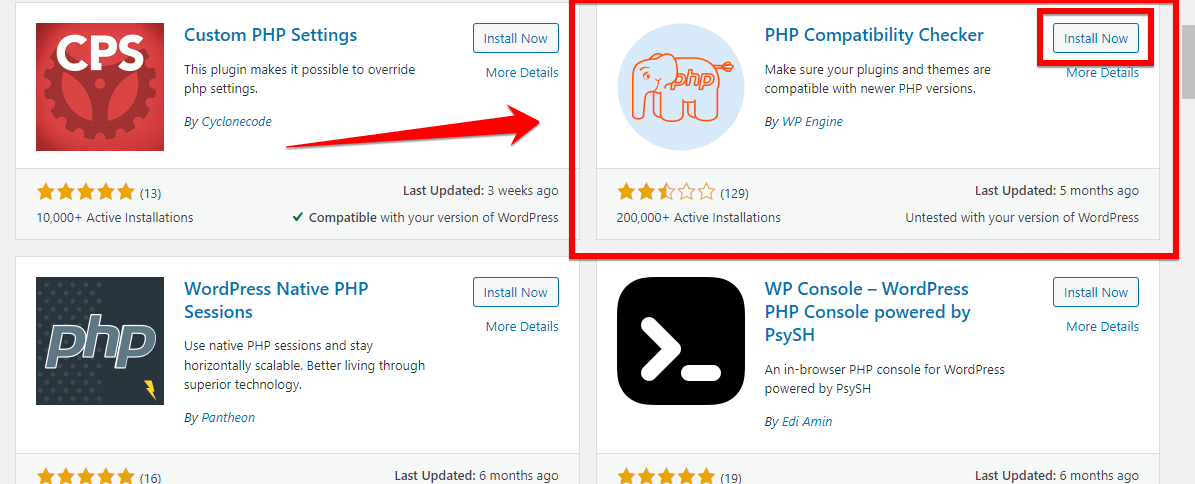
Step 3: In the search bar, type “PHP” and press Enter to search for PHP-related plugins.

Step 4: After the search results appear, look for the “PHP Compatibility Checker” plugin. It should be one of the top results. Once you’ve found it, click on the “Install” button next to the plugin’s name to begin the installation process.
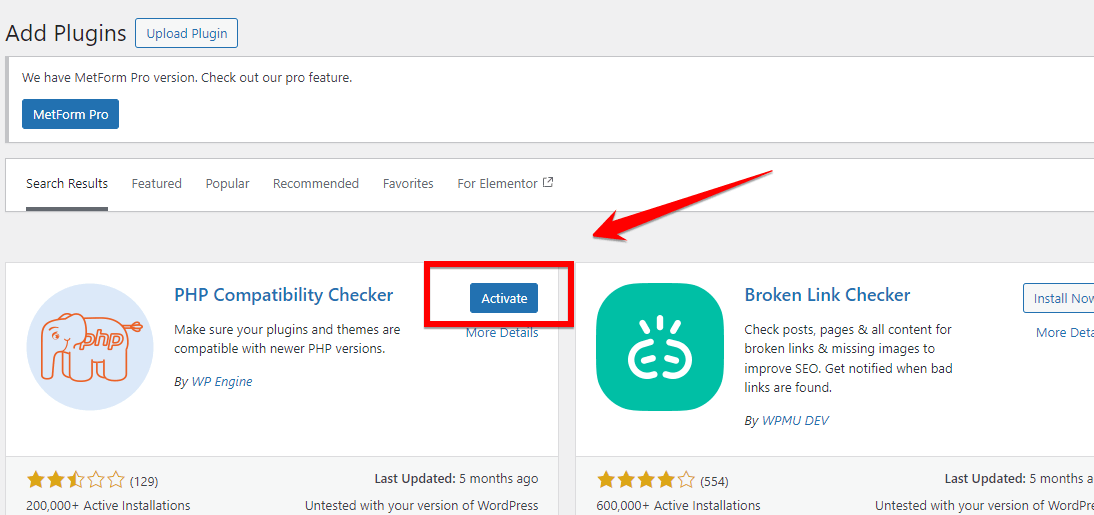
Step 5: Once the installation is complete, click on the “Activate” button to activate the plugin.
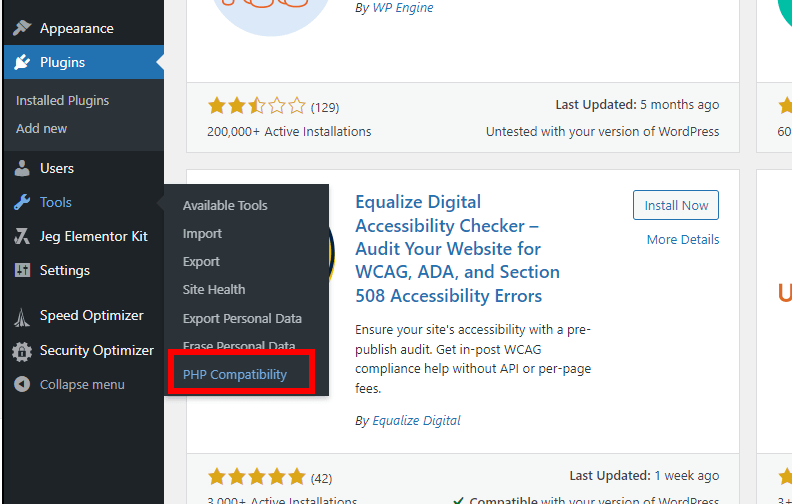
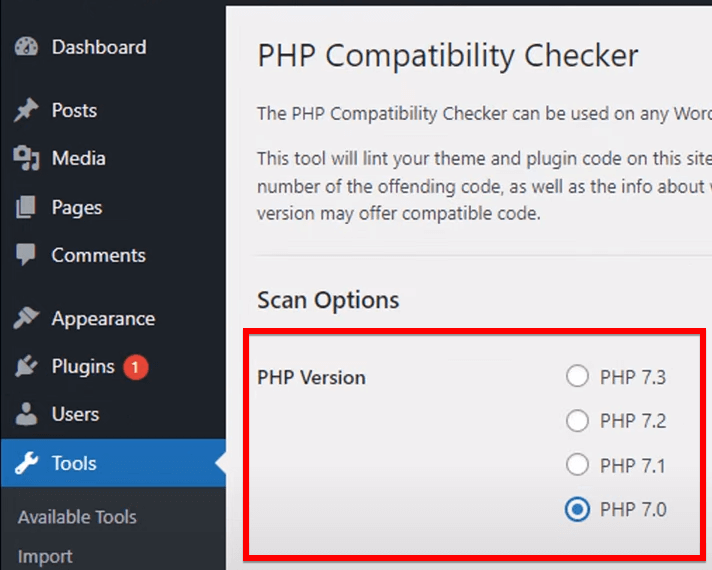
Step 6: After activating the plugin, go to the “Tools” menu in the left sidebar of your WordPress dashboard and click on “PHP Compatibility” to access the plugin’s settings.
Step 7: On the PHP Compatibility page, you will see your current PHP version displayed.
Step 8: To change your PHP version, you’ll need to access your website’s cPanel. Open a new browser tab and log in to your cPanel account using your hosting provider’s credentials.
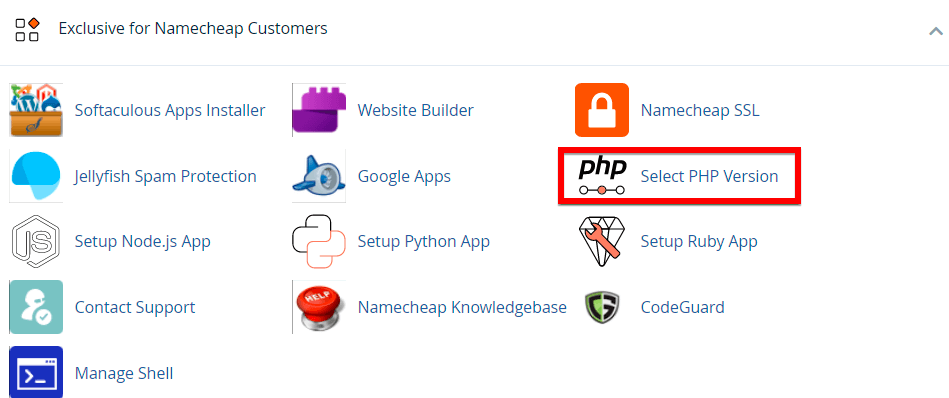
Step 9: Inside your cPanel, look for the search bar (usually at the top of the page). Click on the search bar and type in “PHP” to search for PHP-related options. From the search results, click on “Select PHP Version” to access the PHP version management page.
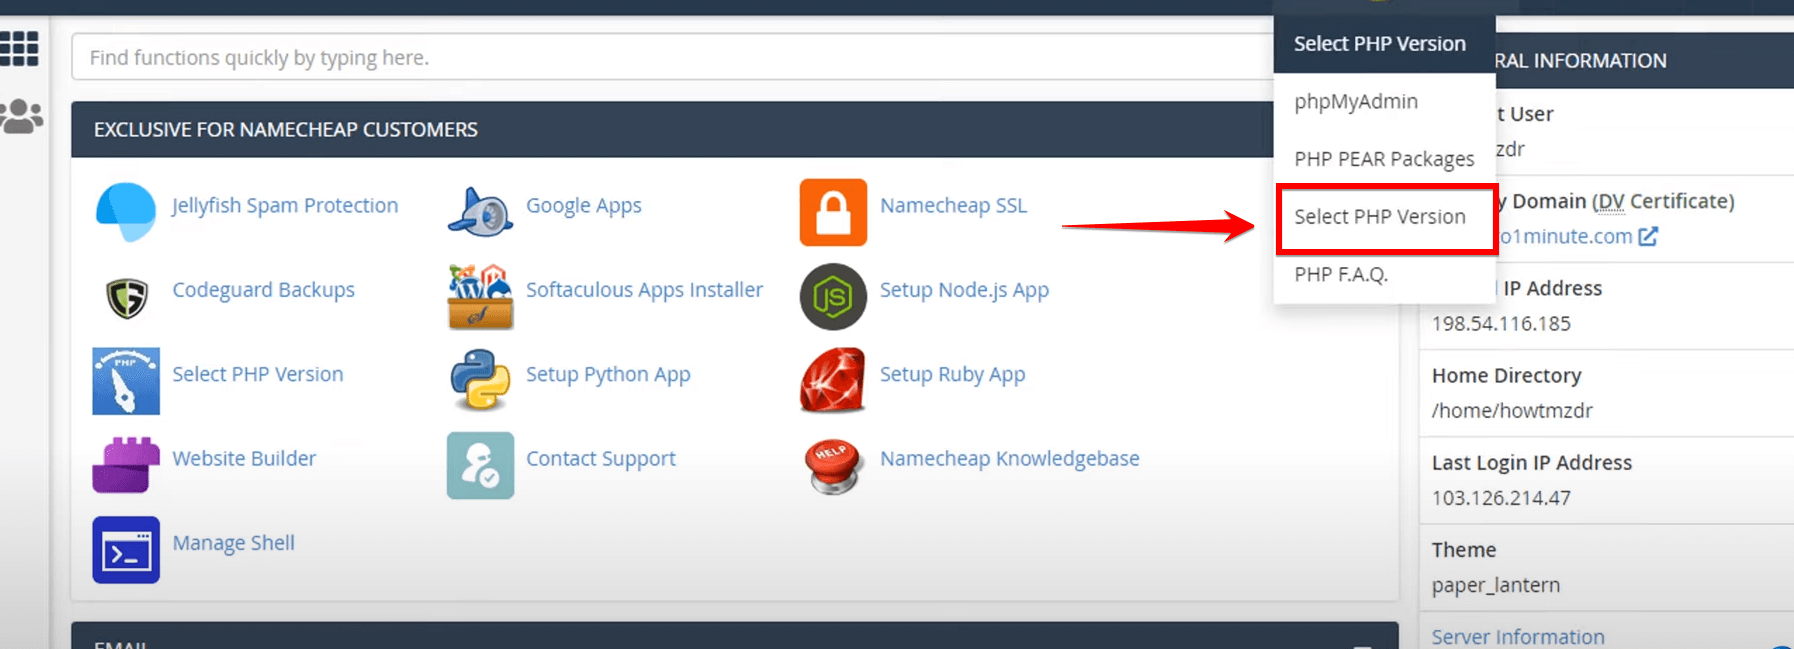
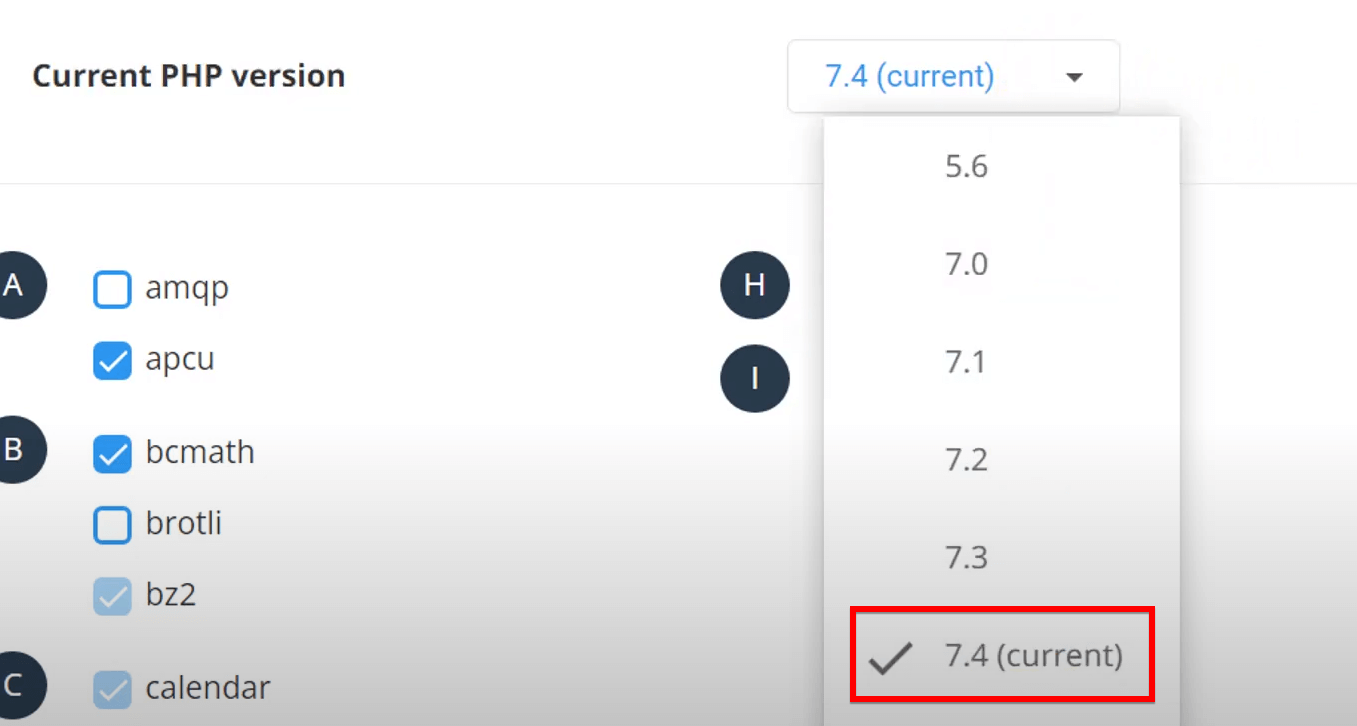
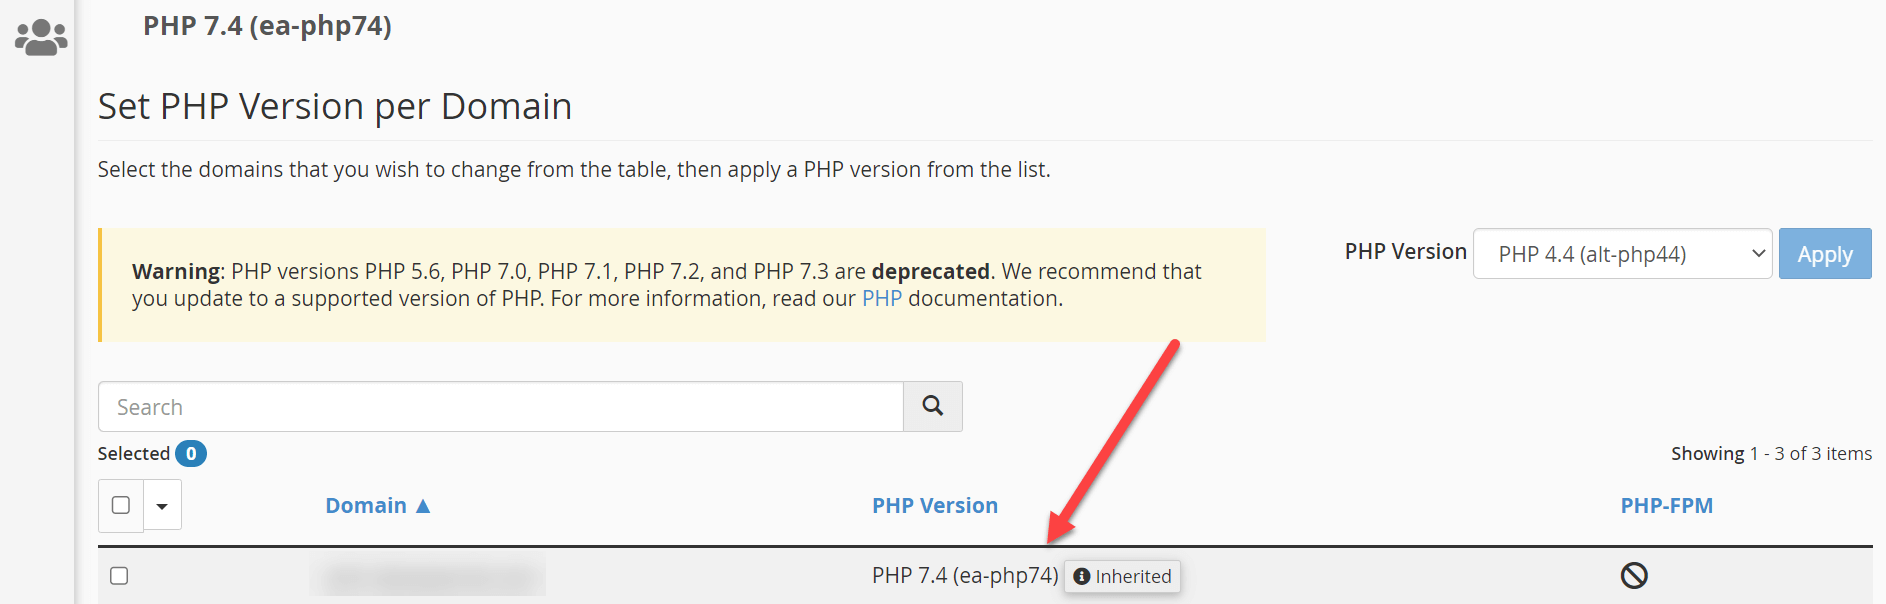
A Pro Tip: On the PHP version selection page, you’ll see a dropdown menu displaying your website’s current PHP version. Take note of the current version.
Step 10: To change the PHP version, click on the dropdown menu and select the desired PHP version from the available options. For example, if you want to use PHP 8.1, choose it from the dropdown menu.
Now that you’ve explored three different methods for updating your PHP version in WordPress, you have the flexibility to choose the approach that best suits your needs and skill level.
Whether you prefer the simplicity of cPanel, the control of editing the “.htaccess file, or the convenience of using a plugin, you can confidently update your PHP version and keep your WordPress site running smoothly and securely.
What to Do Before Updating PHP in WordPress
Before you start updating your PHP version in WordPress, it’s super important to do some important stuff first to make sure everything goes smoothly. These steps will help you avoid problems, reduce the chance of things not working right, and keep your website’s data safe.
I will walk you through four main things you need to do before updating your PHP version: checking if everything works with the new PHP, making a backup of your site, updating WordPress core, plugins, and themes, and setting up a staging site.
No 1: Verify PHP Compatibility
The first step in preparing for a PHP version update is to verify compatibility with your current WordPress setup. This involves checking whether your WordPress core, plugins, and themes are compatible with the new PHP version you plan to use.
Fortunately, the “PHP Compatibility Checker” plugin, which we discussed in the previous section, makes this process straightforward. Assuming you have already installed and activated the plugin, follow these steps to verify PHP compatibility:
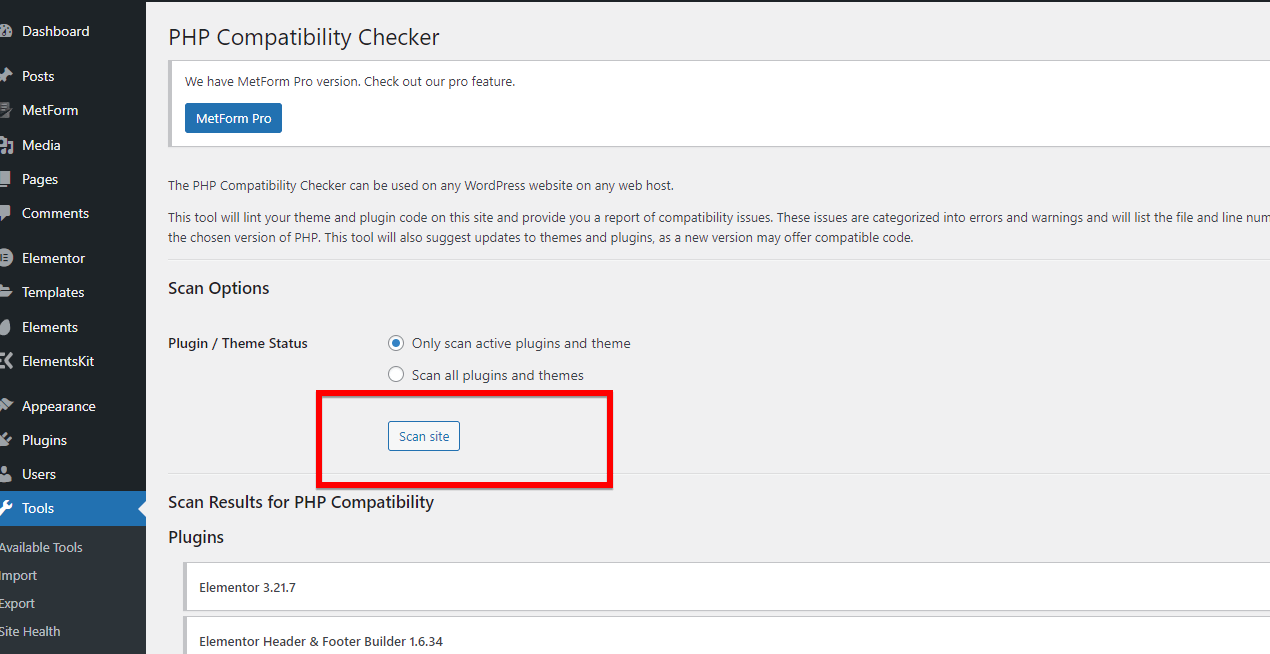
Step 1: In your WordPress dashboard, locate the “Tools” menu in the left sidebar and click on it to expand the submenu. From the submenu, click on “PHP Compatibility” to access the PHP Compatibility Checker plugin’s settings page.
A Pro Tip: On the PHP Compatibility page, you’ll find a dropdown menu that allows you to select the PHP version you want to check your website’s compatibility against. Click on the dropdown menu and choose the desired PHP version from the available options.
Step 2: After selecting the PHP version, click on the “Scan site” button to start the compatibility check process. The plugin will now begin scanning your entire WordPress site, including the core files, installed plugins, and active themes.
Step 3: Once the scan is complete, the PHP Compatibility Checker plugin will generate a comprehensive report detailing any compatibility issues found during the scan. Just click on the “Download Report” on the screen for you to review.
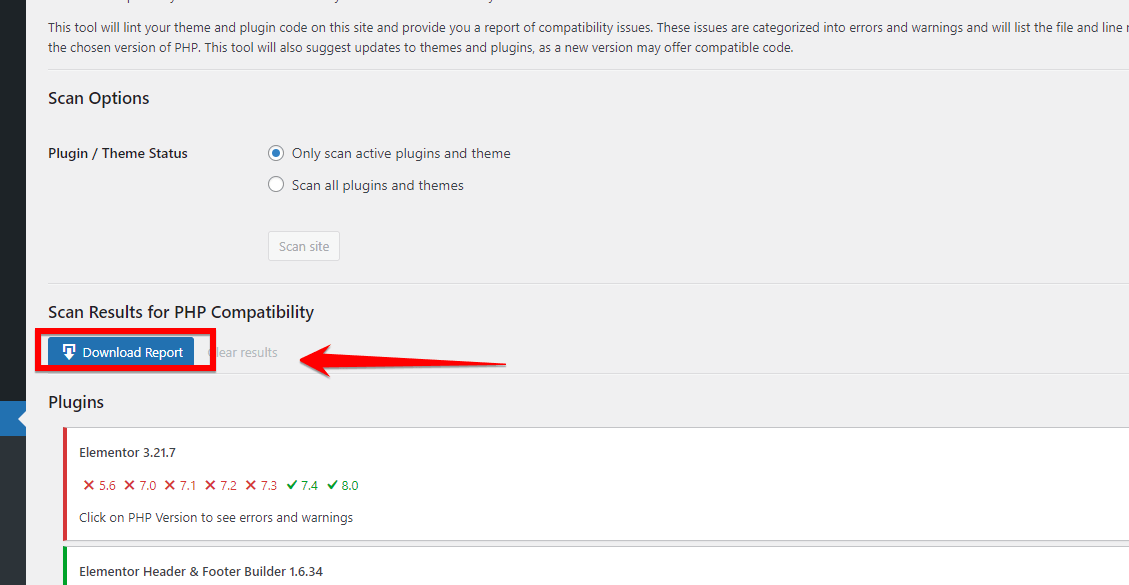
Note: Carefully examine the compatibility report provided by the plugin. Pay close attention to any identified issues, as they indicate potential problems that may arise when updating to the new PHP version. If the compatibility report reveals any issues, make a note of the affected plugins, themes, or custom code.
To ensure a smooth transition to the new PHP version, you’ll need to take appropriate action. This may involve updating the affected components to compatible versions, finding suitable alternatives, or modifying the code to resolve the identified issues.
No 2: Backup Your Site
Before updating your WordPress site’s PHP version, it’s essential to create a backup of your entire website. This backup will help you restore your site if anything goes wrong during the PHP update process.
Step 1: Once you’re in the WordPress dashboard, look for the “Plugins” menu on the left side of the screen. Click on it to go to the Plugins page.
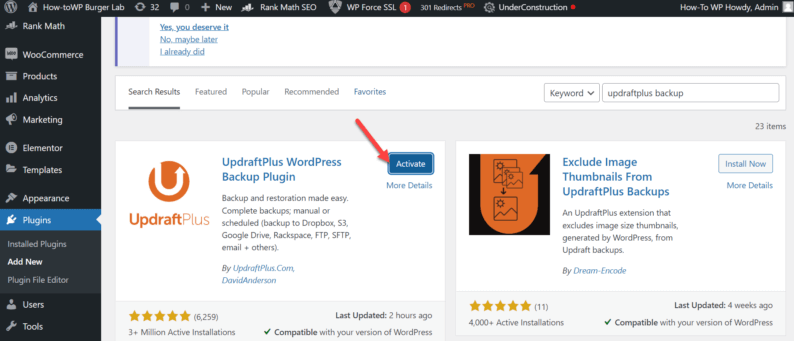
Step 2: On the Plugins page, you’ll see a button that says “Add New” at the top. Click on that button. A search bar will appear. Type “UpdraftPlus” in the search bar and press Enter. Look for the “UpdraftPlus” plugin in the results and click on the “Install Now” button next to it. After the installation is done, click on “Activate” to turn on the plugin.
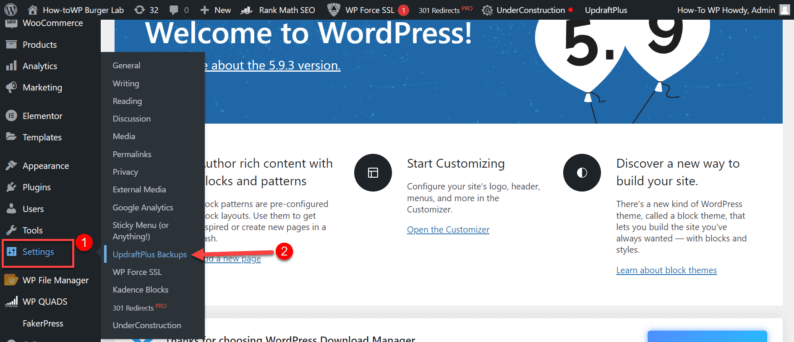
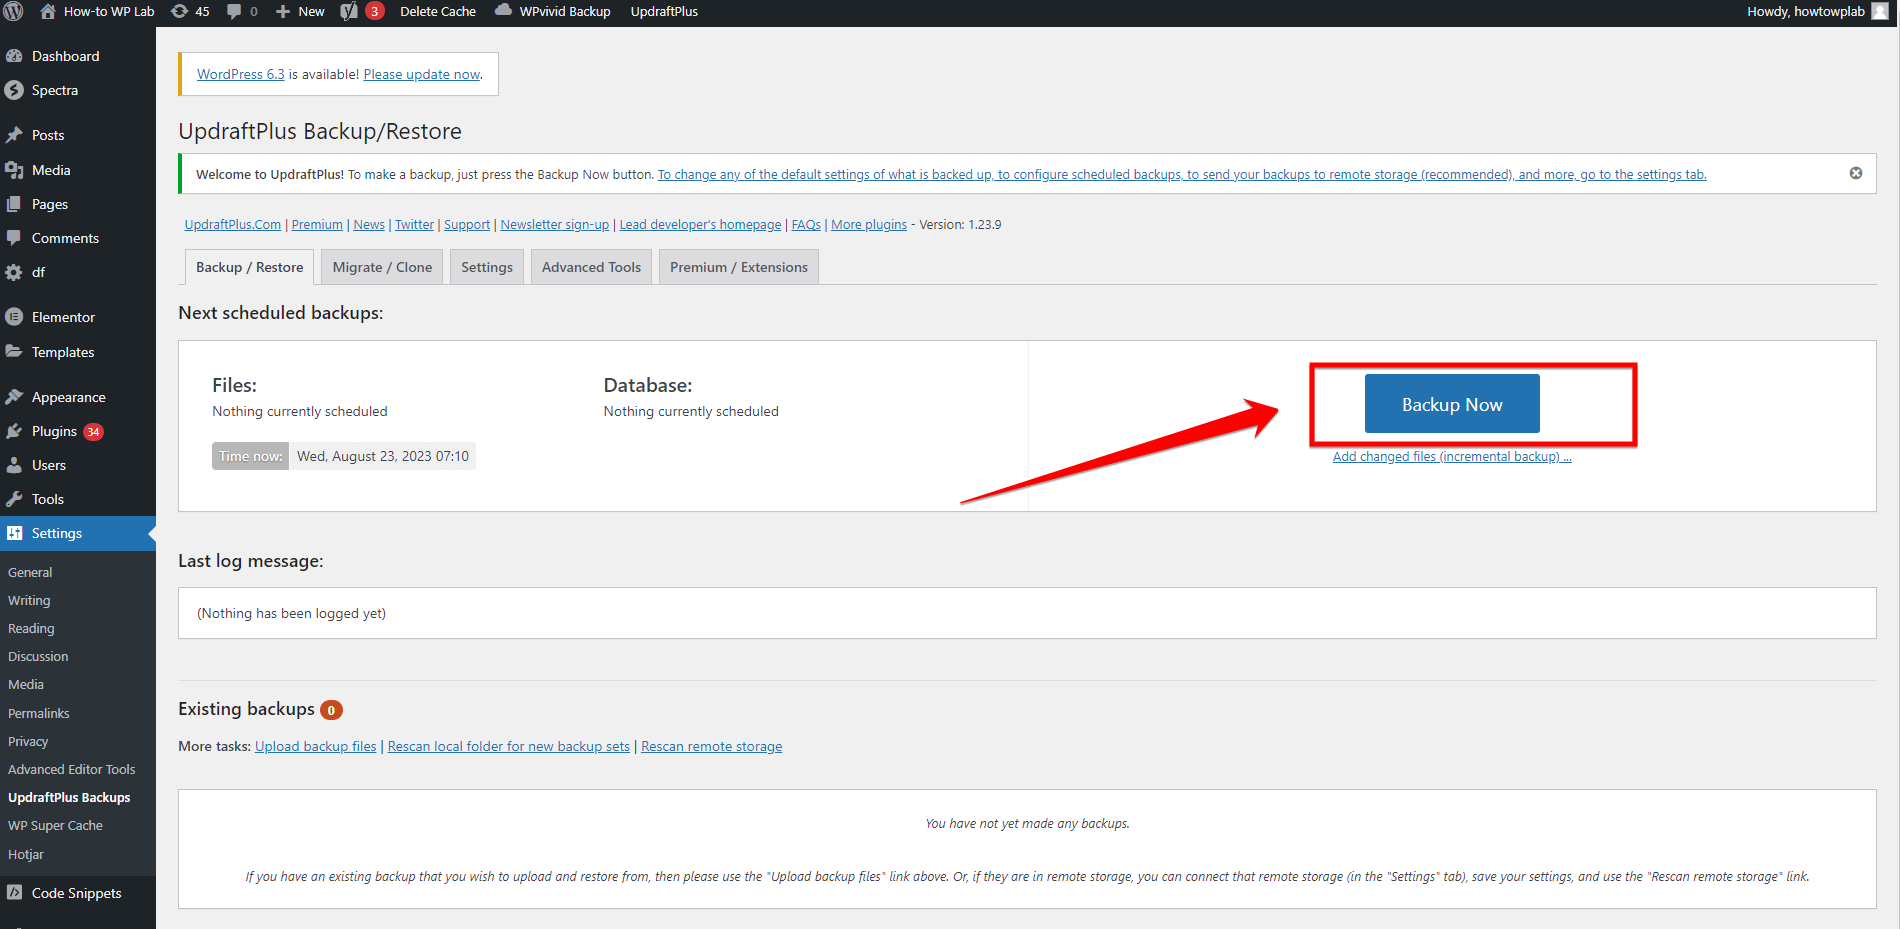
Step 3: After you’ve activated UpdraftPlus, go back to your WordPress dashboard. You’ll now see a new menu item called “UpdraftPlus Backups” on the left side. Click on it to go to the UpdraftPlus settings.
Step 4: On the page, look for a big blue button that says “Backup Now.” Click on that button to start the backup process.
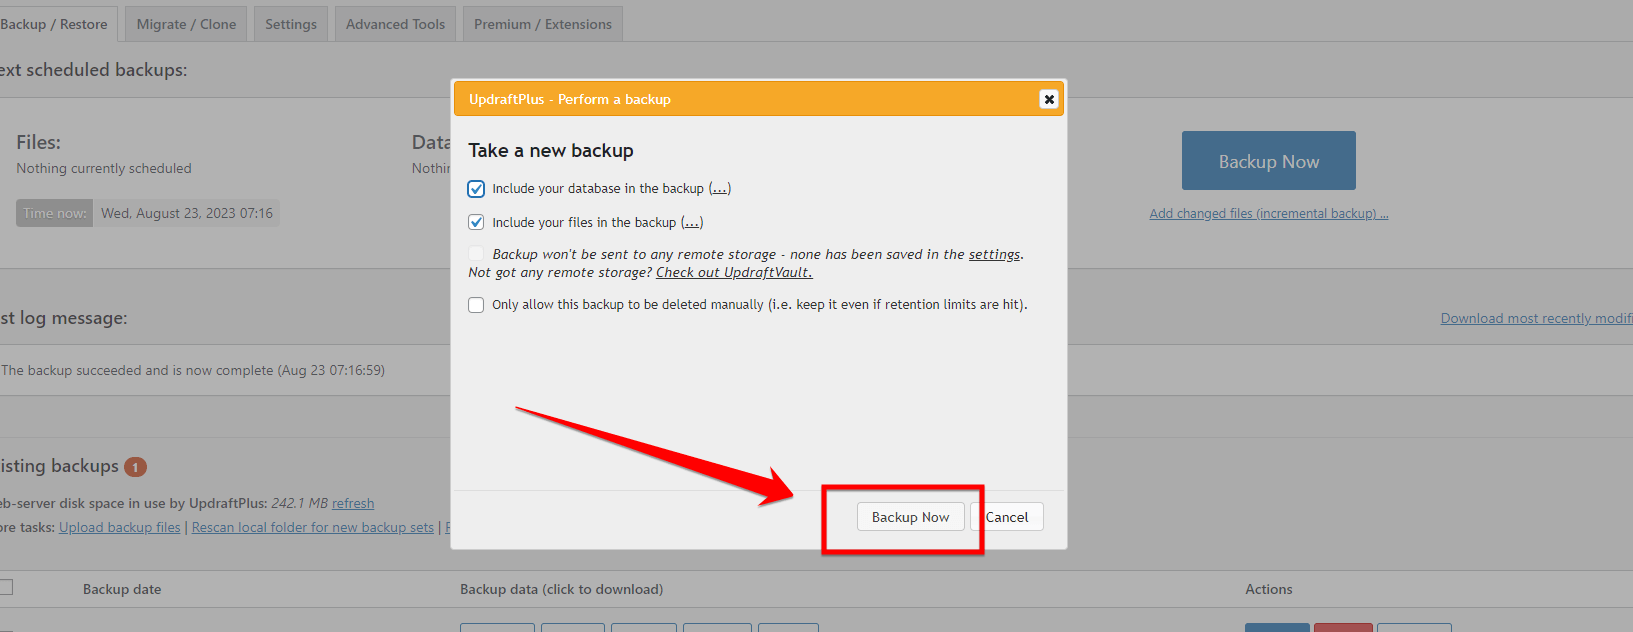
Step 5: A new window will pop up, asking you what you want to include in your backup. Make sure the boxes for “Include your database” and “Include your files” are checked, based on what you want to backup.
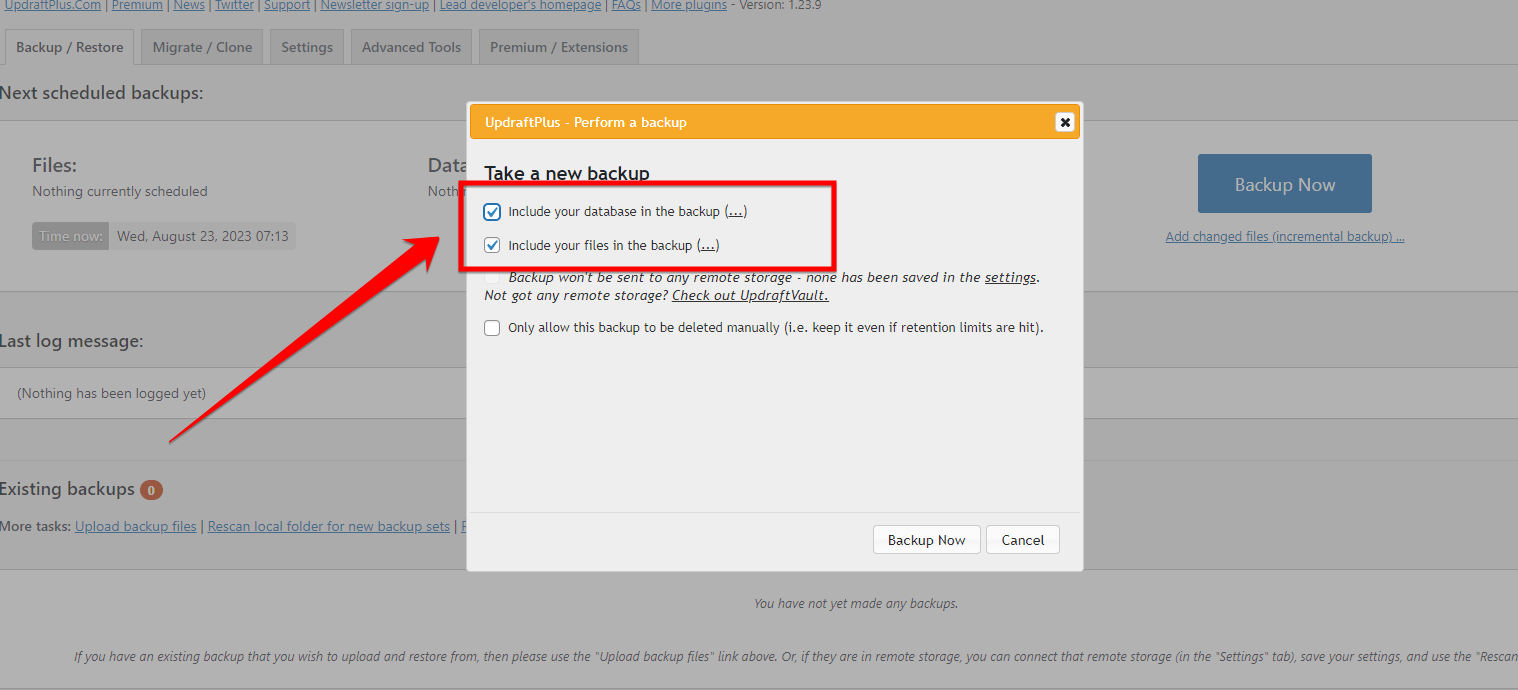
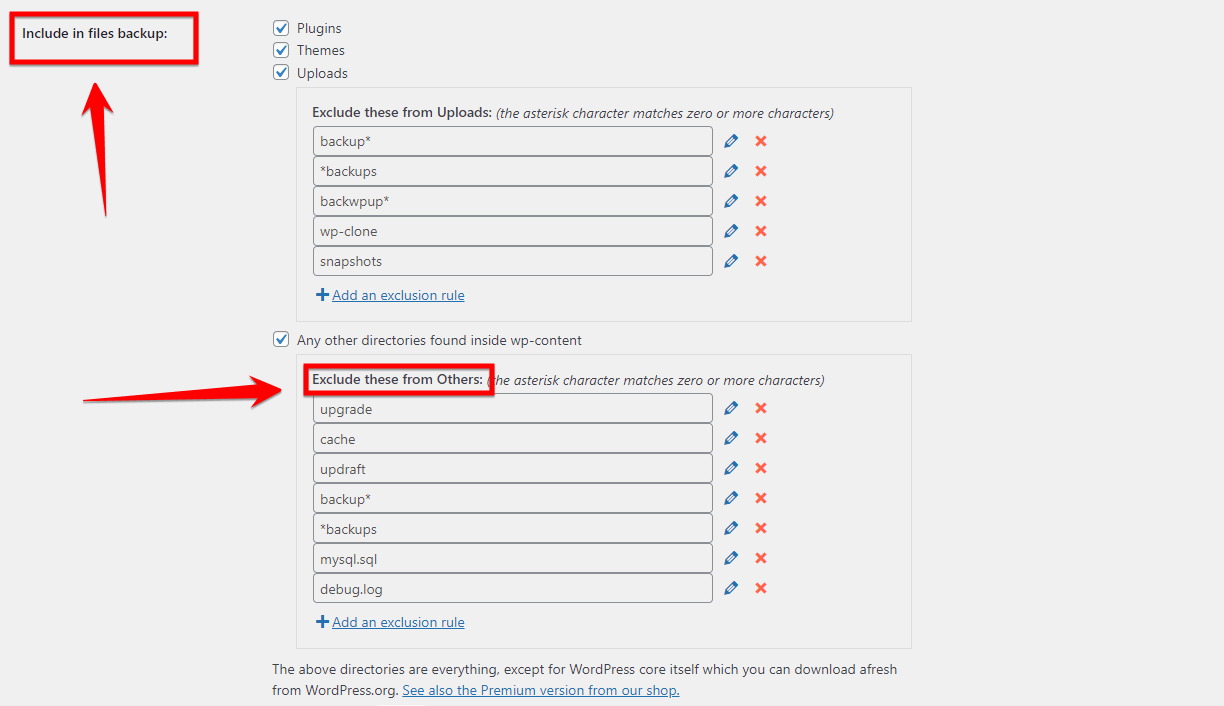
Note: You can also choose to include or exclude specific files, like plugins, themes, or uploads.
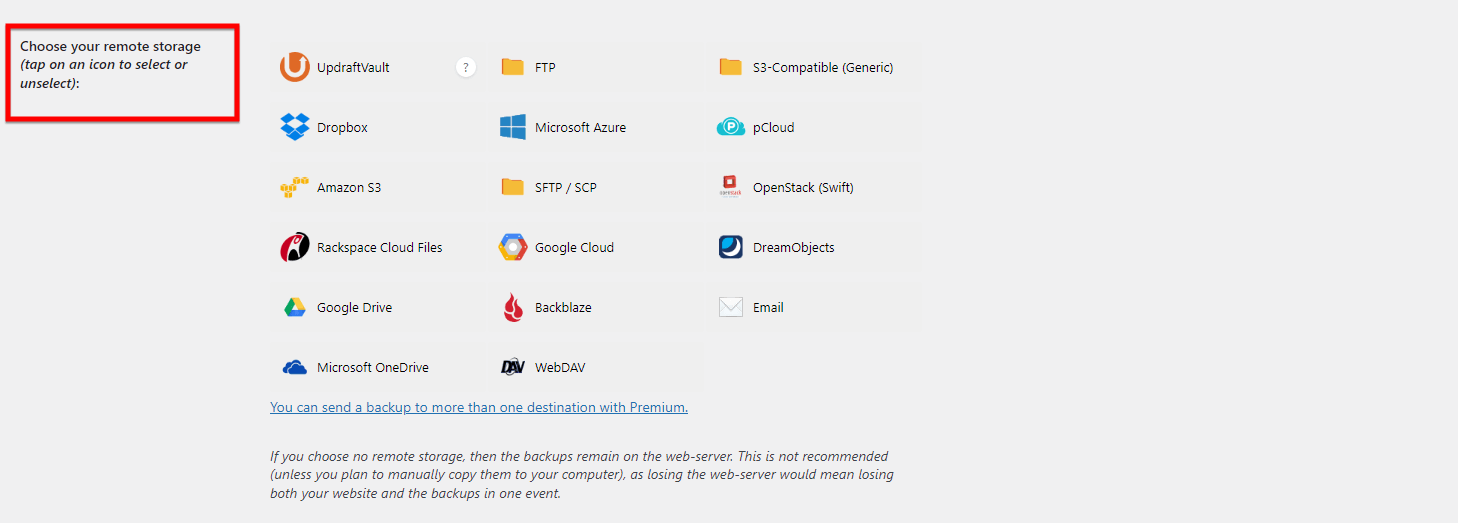
Step 6: UpdraftPlus lets you store your backups on other storage services for extra safety. If you want to use another storage service, go to the “Settings” tab in UpdraftPlus and choose the storage location you want.
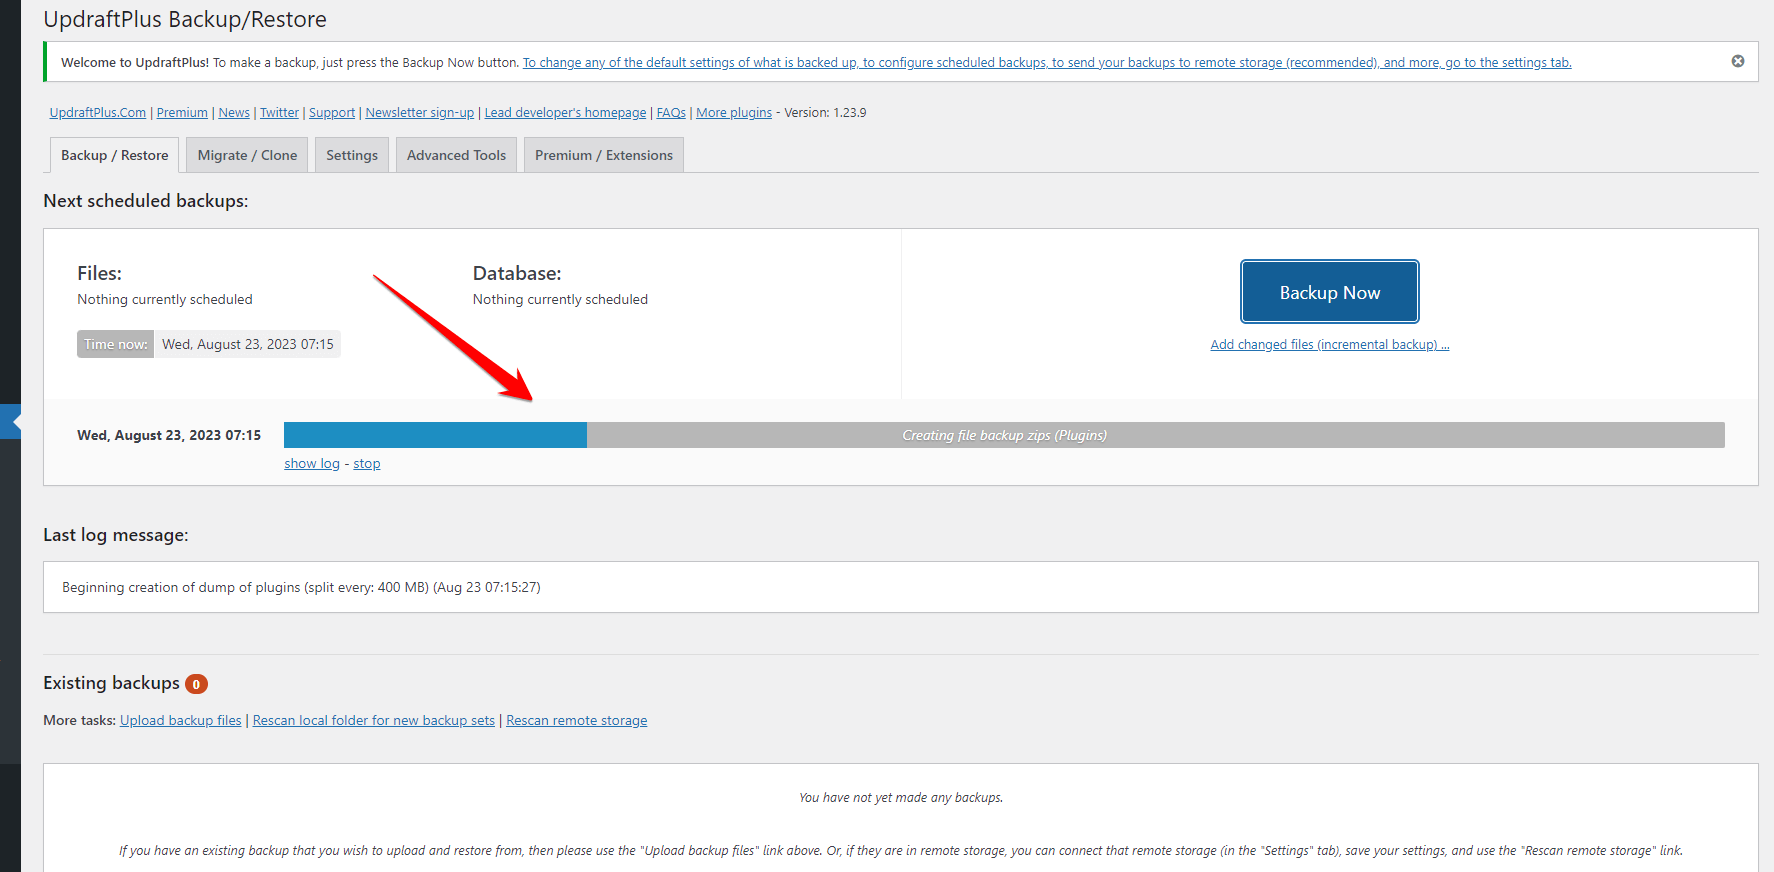
Step 7: After choosing what to backup and where to store it, click the “Backup Now” button in the popup window to start the backup.
Step 8: UpdraftPlus will show you a progress bar so you can see how the backup is going. Wait patiently for the backup to finish. It might take some time depending on how big your website is.
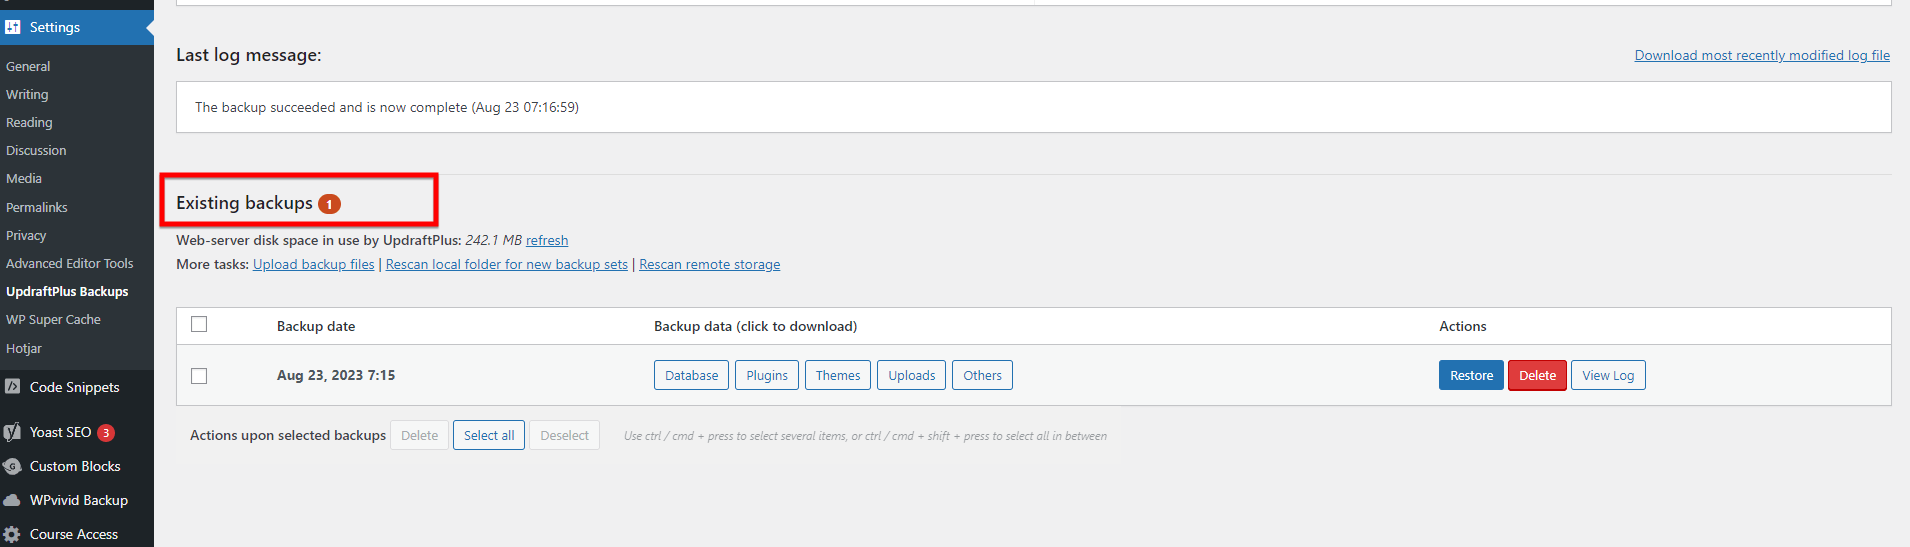
Step 9: When the backup is done, you can check that your backup files are created properly by looking in the “Existing Backups” section on the UpdraftPlus page.
Pro Tip: Consider setting up automatic backups to ensure your website is regularly backed up without manual intervention. In the UpdraftPlus “Settings” tab, you can configure the frequency of your backups for both files and the database, ranging from daily to monthly intervals.
By following these steps, you can easily create a comprehensive backup of your WordPress website using UpdraftPlus, providing you with peace of mind and a reliable restore point in case of any unforeseen issues.
No 3: Update WordPress, Plugins, and Themes
Before updating your PHP version, it’s crucial to ensure that your WordPress core, plugins, and themes are up to date. Newer versions of these components are often optimized for compatibility with the latest PHP versions, and updating them can help prevent conflicts and errors.
Follow these steps to update your WordPress core, plugins, and themes:
Step 1: Log in to your WordPress dashboard and navigate to the “Updates” section.
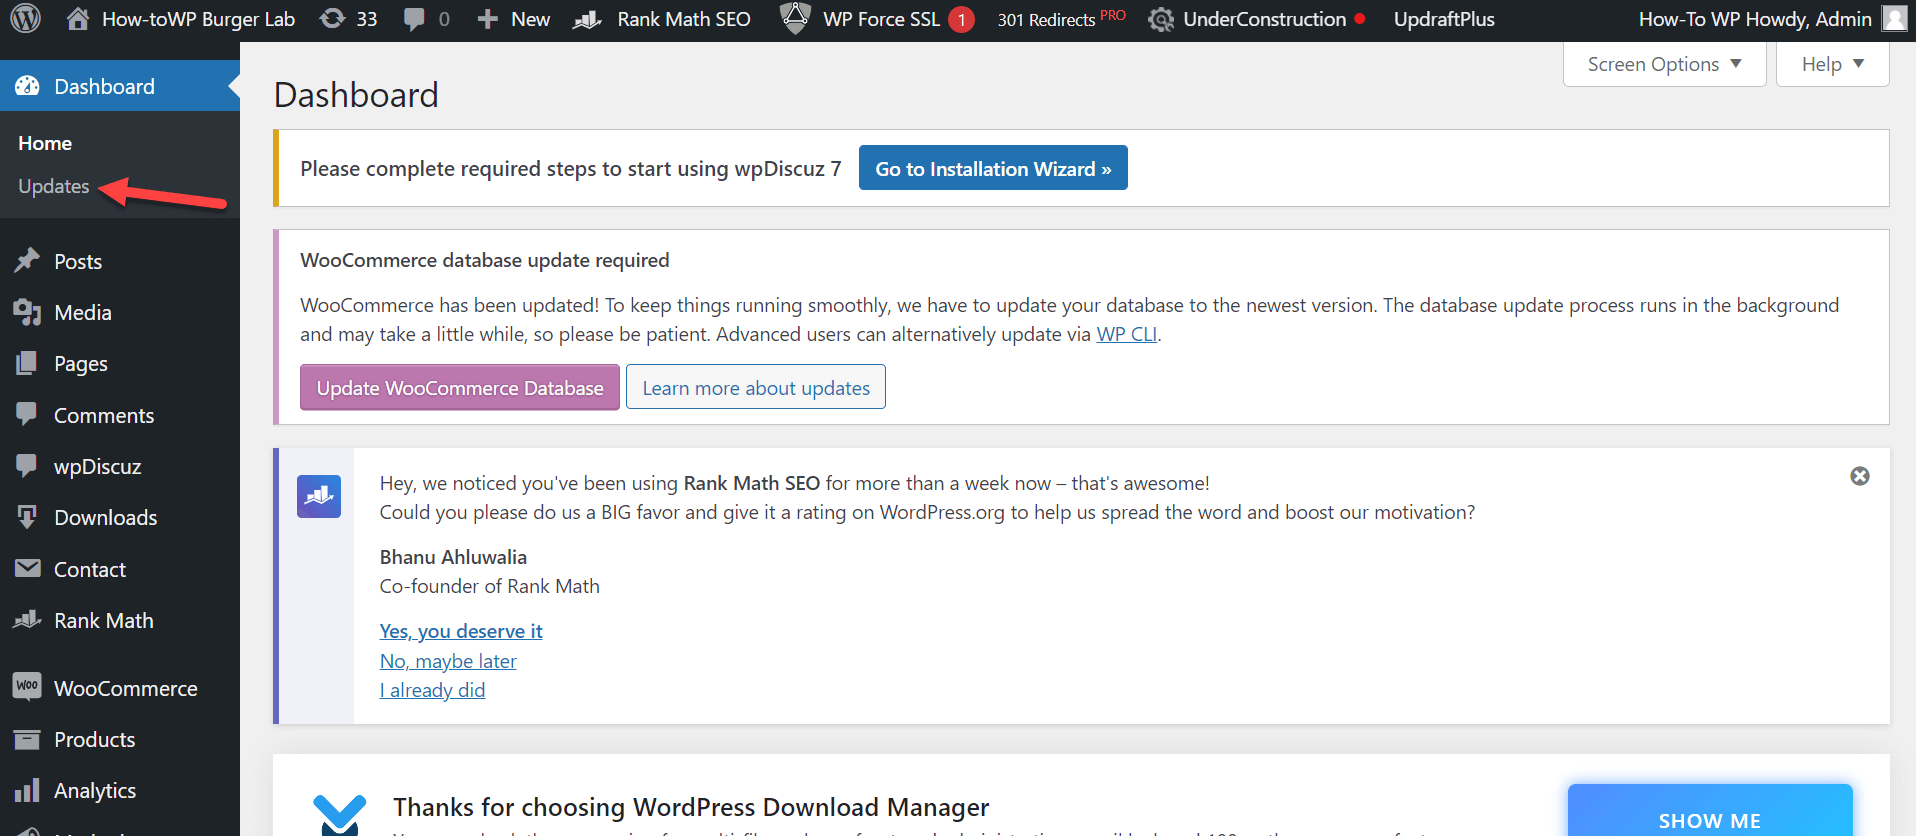
Step 2: On the Updates page, you’ll see separate sections for WordPress core, plugins, and themes that have available updates.
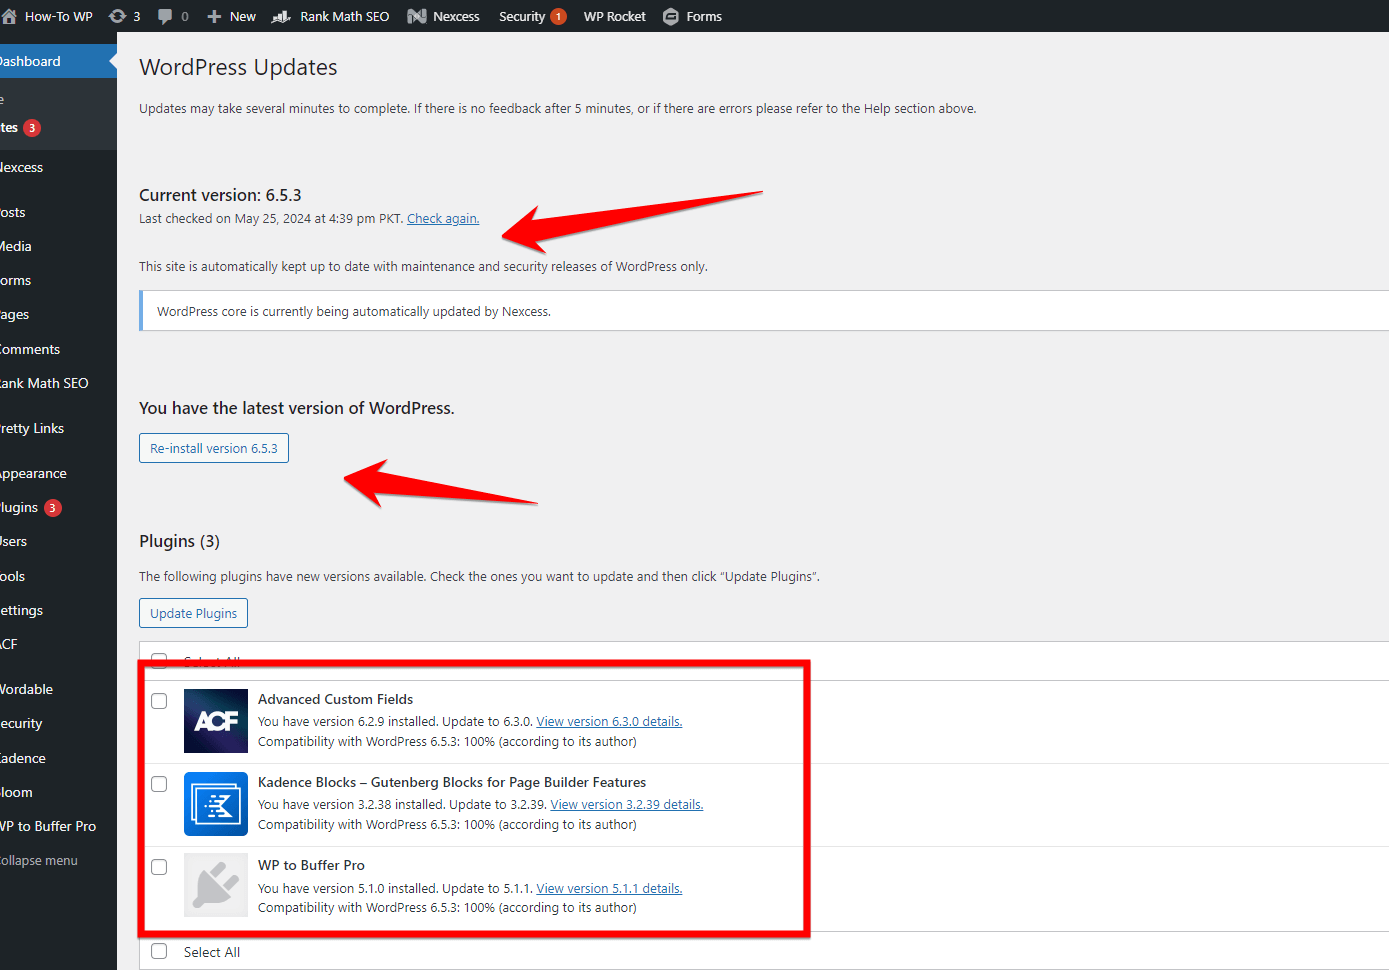
Step 3: Start by updating your WordPress core. Click on the “Update Now” button next to the core update notice.
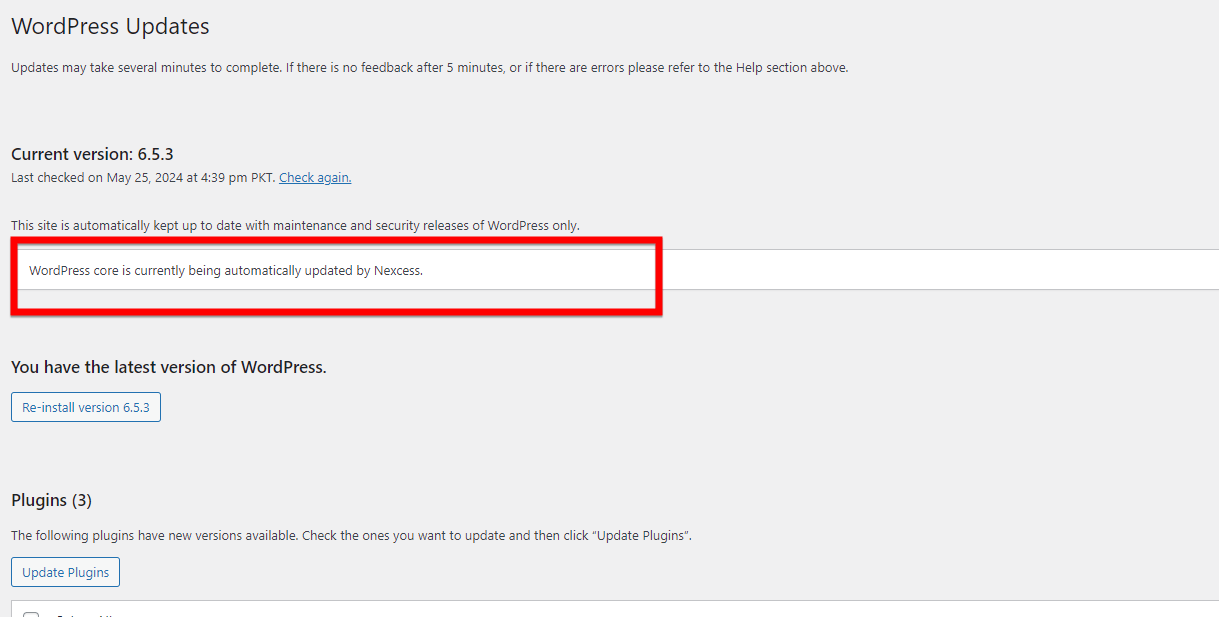
Note: In my case, the WordPress core has already been updated. Hence, there is no necessity to redo this step. Let’s progress to the following task in the sequence.
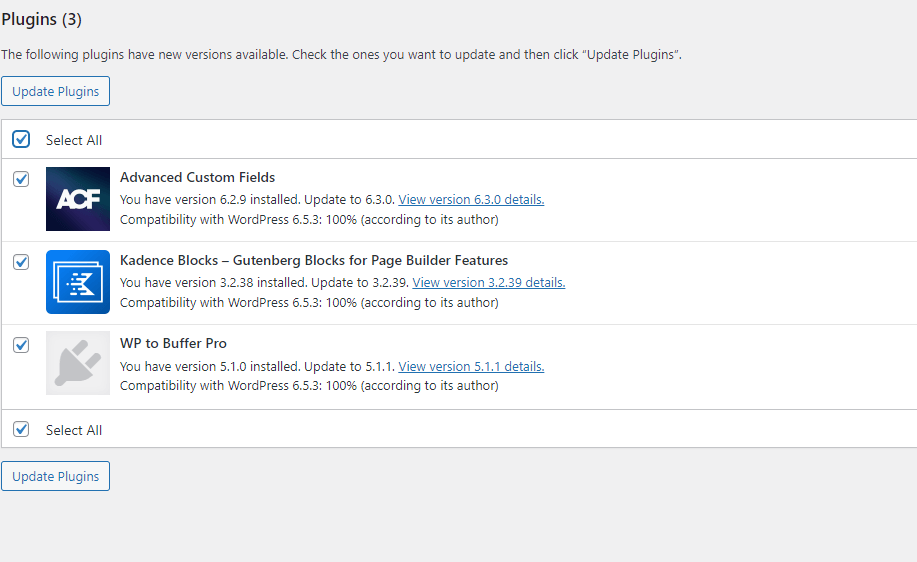
Step 4: After the core update is complete, proceed to update your plugins. Select the plugins you want to update and choose “Update Plugins” to initiate the plugin updates.
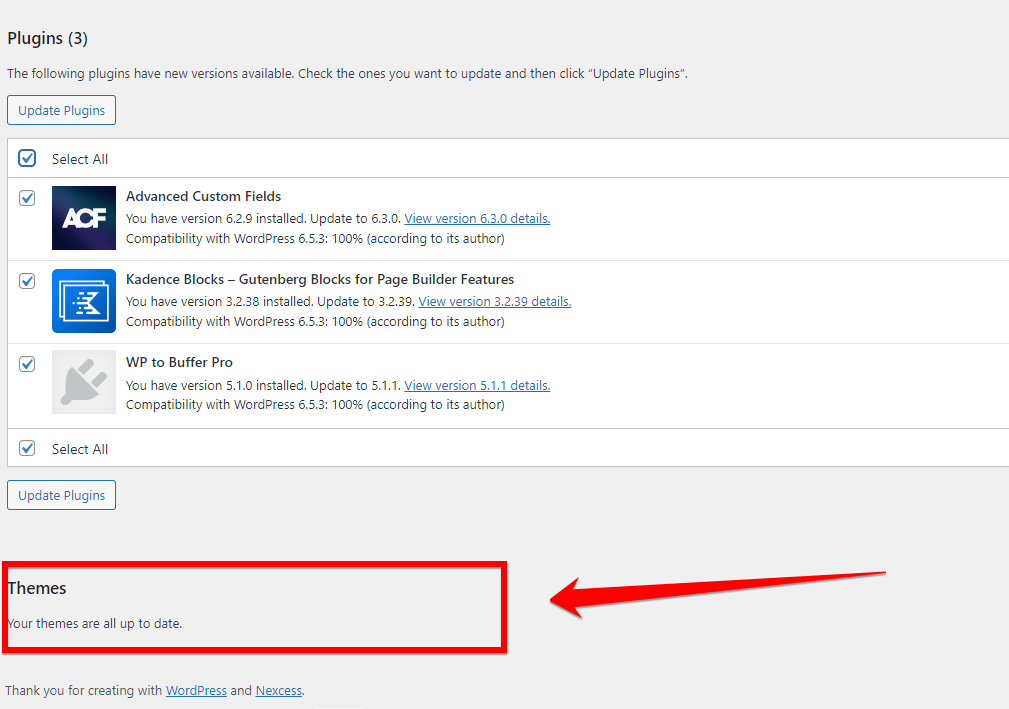
Step 5: Finally, update your themes by selecting the ones you want to update and choosing “Update Themes” from the “Bulk Actions” dropdown menu. Click “Apply” to start the theme updates.
Note: In my case, the WordPress core has already been updated. Similarly, when it comes to themes, I have ensured that all themes are up to date.
Step 6: Once all the updates are complete, visit your website’s front-end and perform a thorough check to ensure everything is functioning correctly.
Keeping your WordPress core, plugins, and themes up to date not only enhances security but also improves compatibility with newer PHP versions.
No 4: Create a Staging Site
Creating a staging site is a best practice when making significant changes to your WordPress website, such as updating your PHP version. A staging site is an exact replica of your live website in a separate environment, allowing you to test and verify the PHP update without affecting your production site.
Many web hosting providers offer staging environments as part of their hosting plans. If your hosting provider supports staging, follow their specific instructions to create a staging site. However, if staging is not available through your hosting provider, you can use a plugin like “WP Staging” to create a staging site directly from your WordPress dashboard.
Here’s how to create a staging site using WP Staging:
Step 1: Log in to your WordPress dashboard using your username and password.
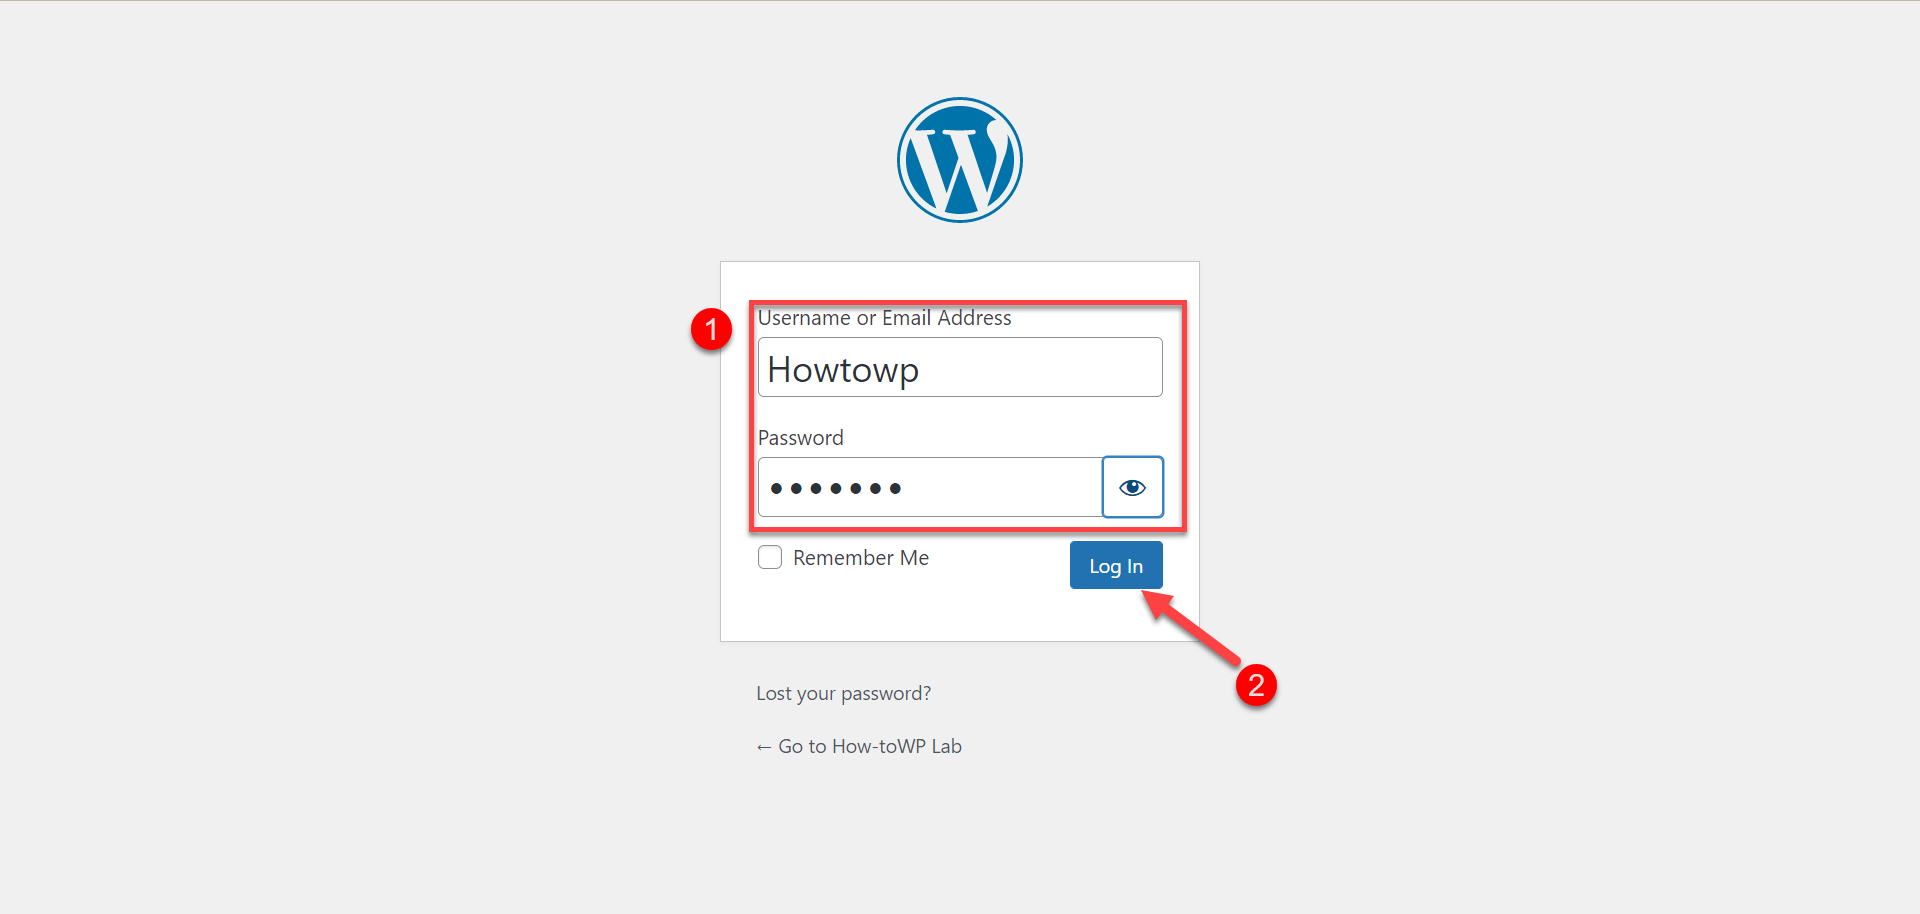
Step 2: Look on the left side of your dashboard and find the “Plugins” option. Click on it to see everything related to plugins.
Step 3: From the plugin options, click on “Add New” to start adding a new plugin to your site.
Step 4: Look for the search bar at the top right corner. Type “WP Staging” in the search bar to find this plugin from the WordPress plugin store.
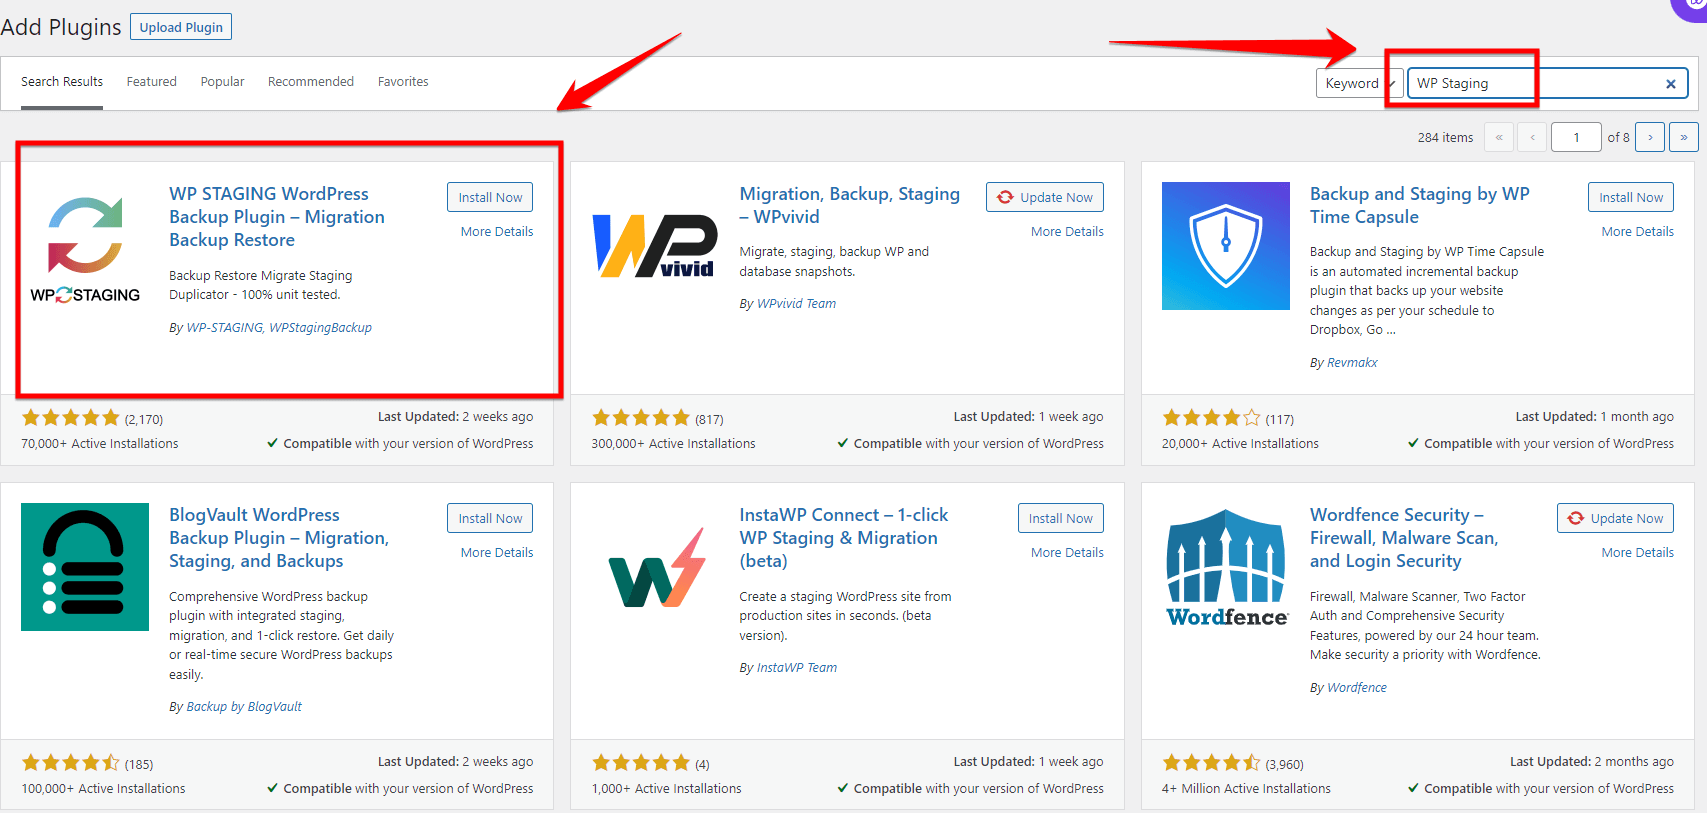
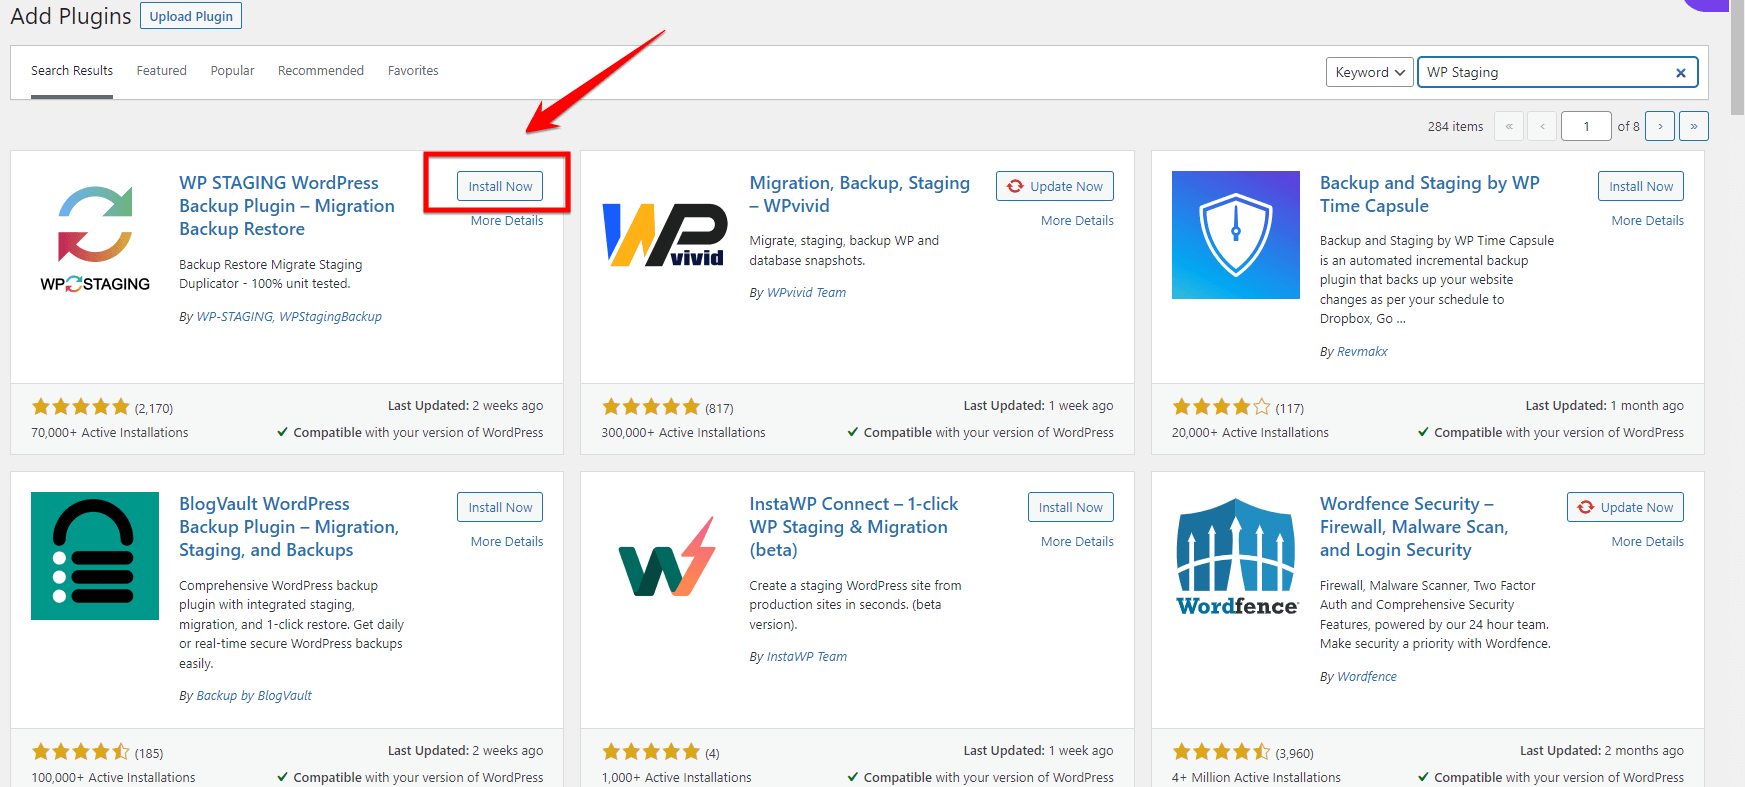
Step 5: When you find the “WP Staging” plugin in the search results, click on the “Install” button to add it to your website.
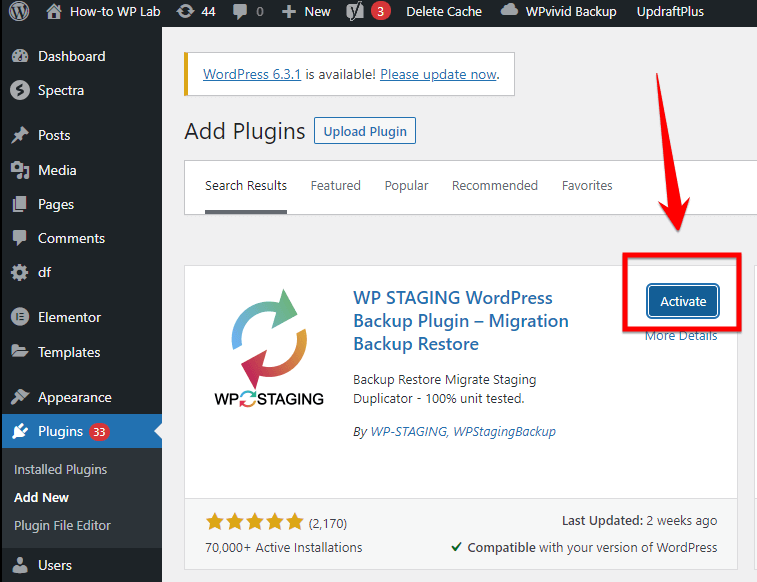
Step 6: After the plugin is installed, you’ll see an “Activate” button instead of the “Install” button. Click on “Activate” to turn the plugin on.
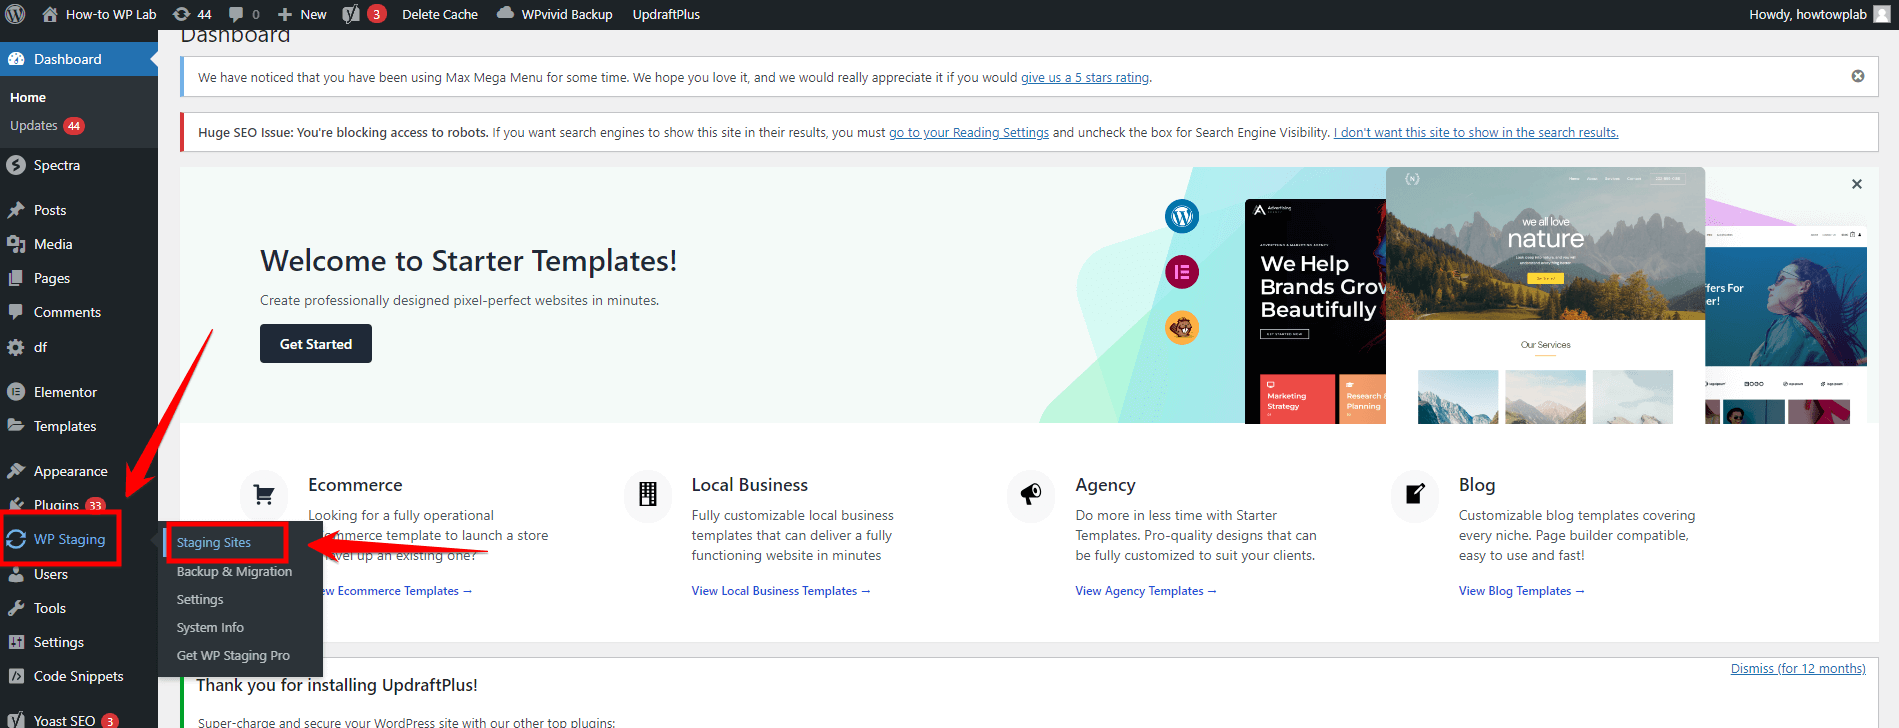
Step 7: Now, look on the left side of your dashboard again. You should see a new option called “WP Staging”. This means the plugin is active. To explore the plugin’s features, click on “WP Staging” and then choose “Staging Sites” from the options that appear.
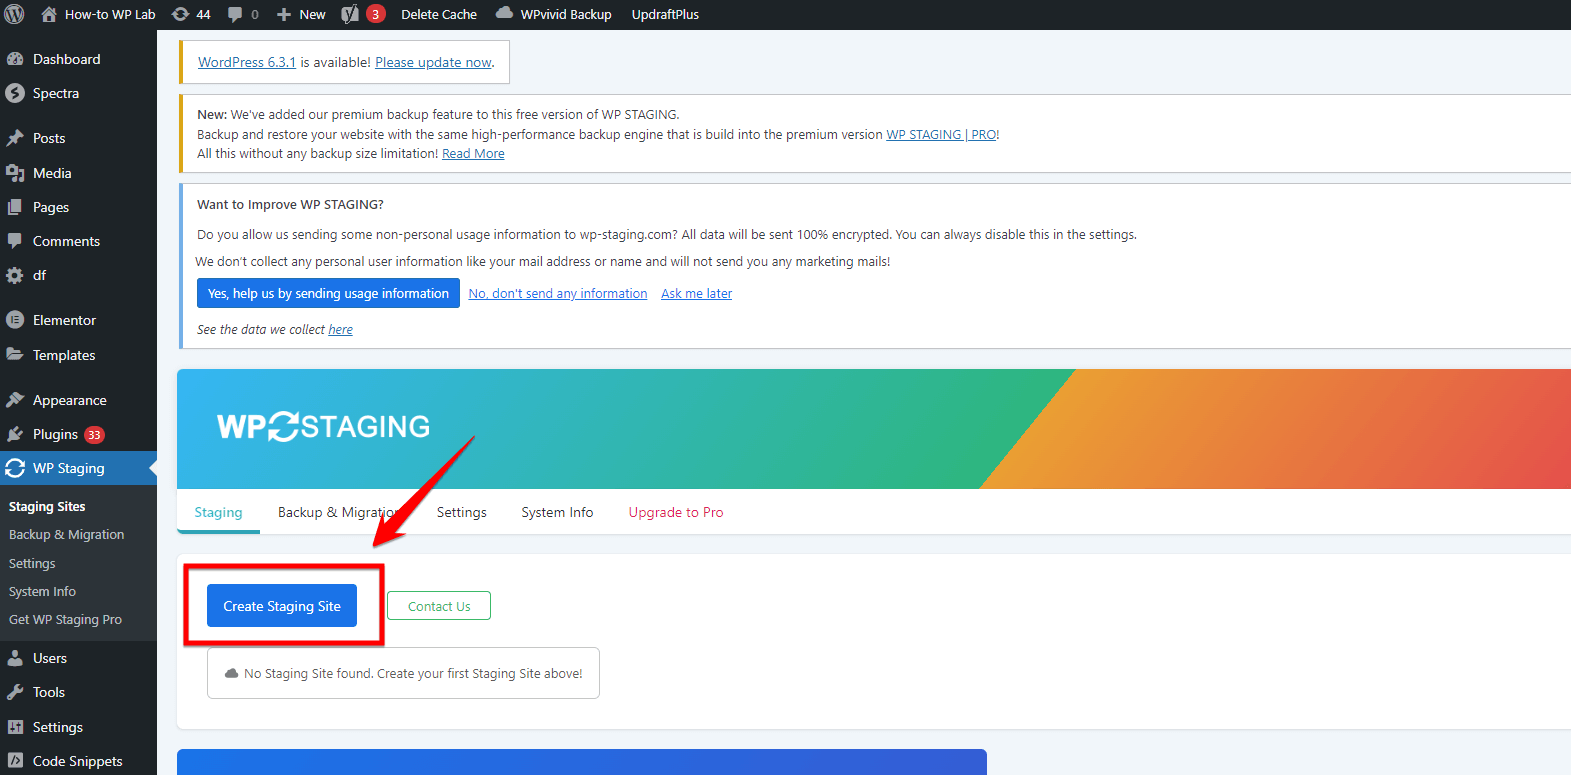
Step 8: To create a staging site, click on the “Create New Staging Site” button.
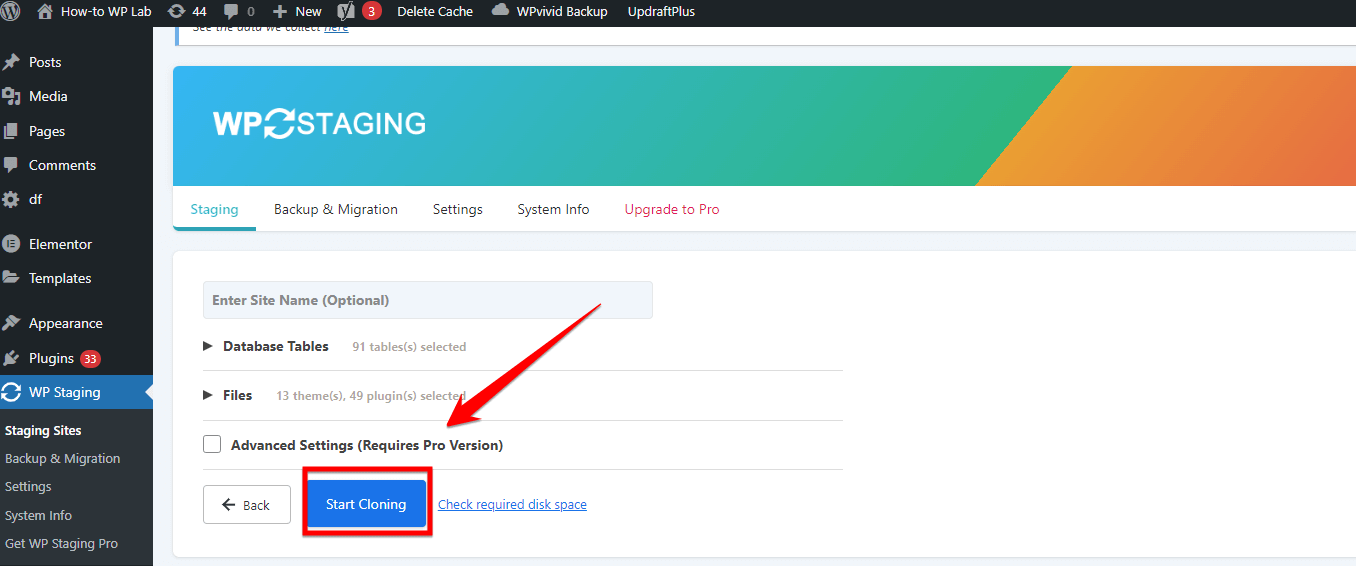
Step 9: Give your staging site a name that you’ll remember easily. Then, click on the “Start Cloning” button to finish creating the staging site.
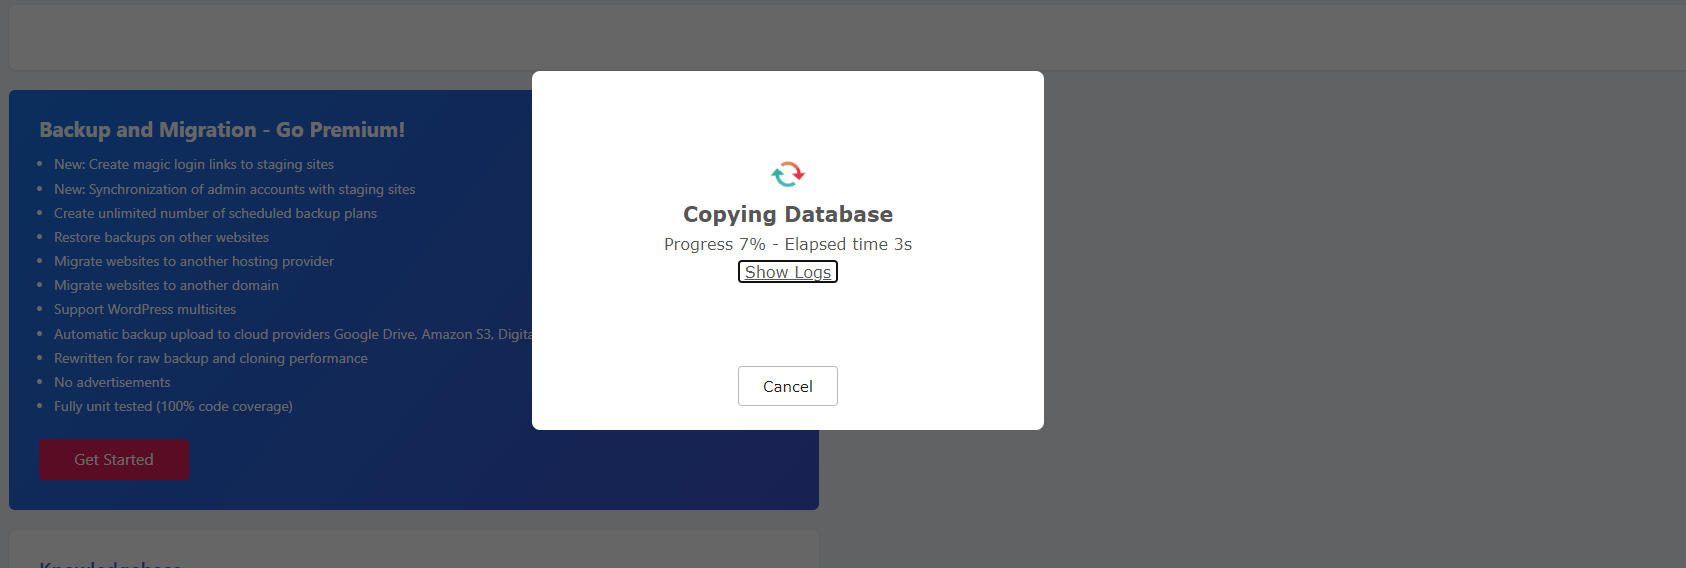
Note: After you complete these steps, a popup will appear showing the progress made on creating your staging site. Wait until it’s done.
Step 11: Once the staging site is created, a new popup will tell you that it was successful. You can visit the staging site by clicking on the link provided or simply close the popup.
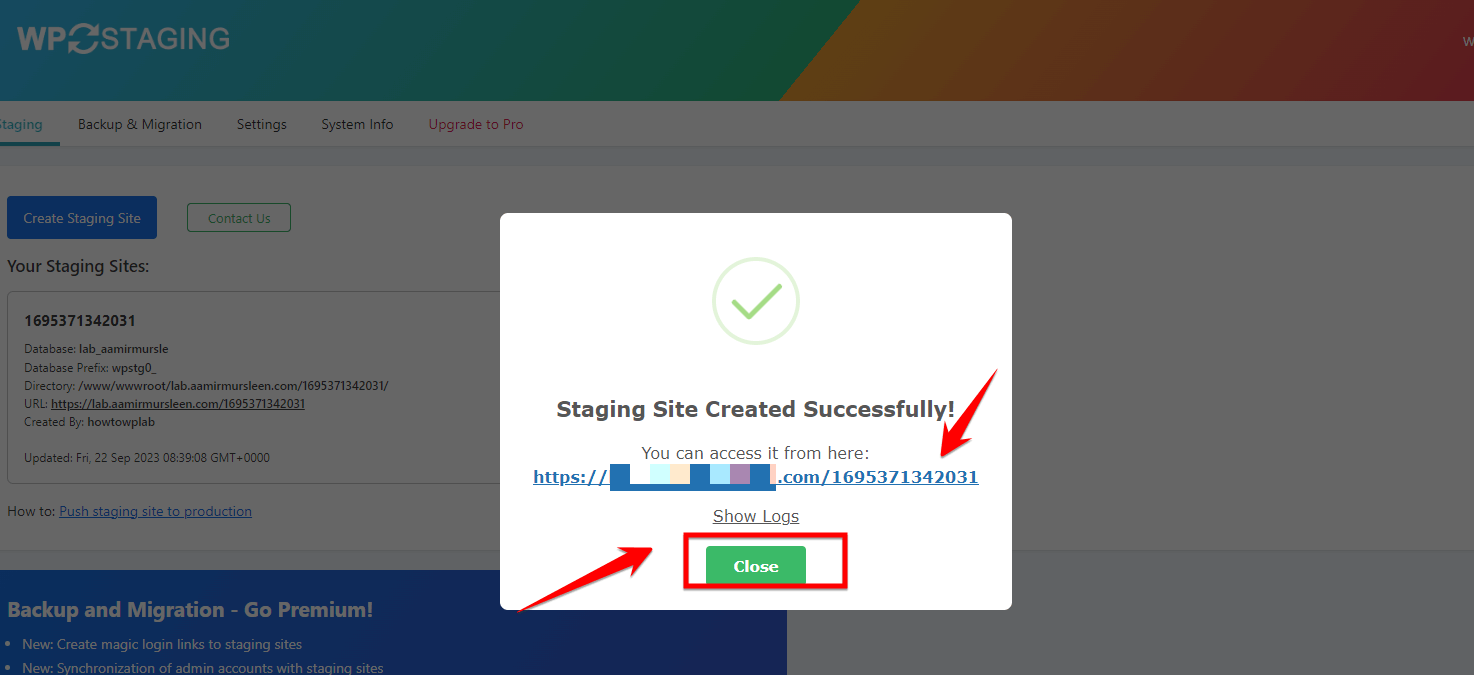
With a staging site in place, you can proceed with updating your PHP version and thoroughly test your website without any risk to your live site. This allows you to identify and resolve any potential issues before applying the changes to your production environment.
How to Check Your Current PHP Version in WordPress
Now that you’ve taken the necessary precautions and prepared your WordPress site for the PHP version update, it’s time to check your current PHP version. This step is crucial to determine whether an update is needed and to ensure compatibility with your existing WordPress setup.
With all these preparatory measures in place, you’re now ready to check your current PHP version and proceed with the update process. Now I will walk you through with three methods to determine your PHP version in WordPress: using the WordPress Site Health tool, checking via your website’s cPanel, and using the command line.
Method 1: Using WordPress’ Site Health Tool
The WordPress Site Health tool, introduced in version 5.2, provides valuable insights into your website’s performance, security, and configuration. Since you’ve already familiarized yourself with this tool during the compatibility check process, using it to determine your PHP version will be a simple task.
Step 1: Log in to your WordPress dashboard and navigate to “Tools” in the left sidebar.
Step 2: Click on “Site Health” to access the Site Health dashboard.
Step 3: Click on the “Info” tab to view more detailed information about your WordPress configuration, including the PHP version, memory limit, and other relevant details.
Step 4: On this page, scroll down till you reach “Server” option. In the “Server” part, find the line that says “PHP Version.” It will tell you which PHP version your website is currently running on.
Using the WordPress Site Health tool is a quick and easy way to check your PHP version without the need for any additional plugins or technical knowledge.
Method 2: Using Your Website cPanel
If your WordPress website is hosted on a server with cPanel, you can quickly check your PHP version using cPanel. Since you’re already using cPanel to back up your site, finding the PHP version info will be easy.
Step 1: Log in to your cPanel account using the credentials provided by your hosting provider.
Step 2: Click on “Select PHP Version” or a similar option, depending on your hosting provider’s cPanel layout.
Step 3: On the PHP configuration page, you will see your current PHP version displayed at the top.
Checking your PHP version through cPanel is straightforward and allows you to confirm the version currently active on your server.
What to Do After PHP Update
Congratulations on updating your PHP version in WordPress! Now, it’s important to take some steps to make sure everything is working properly and your website runs smoothly. First, test your website thoroughly. Go through all the important pages, features, and functions. Fill out forms, check your e-commerce checkout, and look for any errors or unexpected issues.
Next, log in to your WordPress dashboard and check for any error messages or warnings. Review your plugins and themes to make sure they are all working fine. It’s also a good idea to check your website’s performance using tools like Google PageSpeed Insights, GTmetrix, or Pingdom. These tools will help you see how fast your website loads after the PHP update. If it’s slow, you may need to optimize it further.
Watch your website’s traffic and user engagement using tools like Google Analytics. If you see any big changes or drops in traffic, find out why and fix it. If you face any issues that you can’t solve on your own, ask for help from your hosting provider, WordPress support forums, or a professional developer.
What if the PHP Update Breaks My Site?
Sometimes, updating your PHP version can cause issues or conflicts that break your WordPress site. If this happens, don’t worry! First, restore your website using the backup you made before updating your PHP version. This will bring your site back to its previous working state.
After restoring your site, try to find out what caused the issue. Deactivate your plugins one by one and check if the problem is fixed. If deactivating a specific plugin fixes the issue, you might need to find a different plugin or contact the plugin developer for help.
If you can’t find the cause or if many things are affected, you might need to go back to the old PHP version for now. Contact your hosting provider for help, or use the tools in your hosting control panel to switch back to the previous PHP version.
If you can’t fix the issue yourself, think about hiring a professional WordPress developer to help you. They can find and fix the problem, making sure your website works smoothly again. Remember, always make a backup and test updates on a staging site first to avoid breaking your live website.
Why You Should Update the PHP Version in WordPress
If you’re still on the fence about updating your PHP version in WordPress, let me give you a few compelling reasons why it’s absolutely essential.
- Performance Boost: Newer PHP versions come with a host of performance improvements and optimizations. By updating your PHP version, you’re giving your WordPress site a turbo boost, helping it run faster and more efficiently. This means a better user experience for your visitors and potential improvements in search engine rankings. Who doesn’t want a speedier site?
- Enhanced Security: Each new PHP version is like a knight in shining armor, armed with security fixes and patches for known vulnerabilities. By running an outdated PHP version, you’re essentially leaving the drawbridge down and inviting potential security risks into your website’s castle. Updating your PHP version helps keep your site secure and protects it from potential attacks or breaches.
- Improved Compatibility: As WordPress and its plugins and themes continue to evolve, they often require newer PHP versions to function properly. By updating your PHP version, you ensure that your site remains compatible with the latest WordPress features and extensions. This means you’ll have access to all the shiny new functionality and improvements that come with each update.
By keeping your PHP version up to date, you’re also future-proofing your WordPress site. You’re preparing it for future updates and ensuring that it can take advantage of the latest web technologies and best practices. This is essential for the long-term health and success of your website.
Finally, running a supported PHP version means you have access to a larger community of developers and users who can provide assistance, resources, and tutorials when needed. This can be invaluable when troubleshooting issues or looking for ways to improve your site.
Subscribe to our Monthly Newsletter
Get monthly updates of WordPress tips, tricks, and tutorials in your email.
Thanks. You have successfully subscribed.


