With each new post that you publish in WordPress, the author name shows up by default. Although this feature increases transparency with your readers, you may want to remove the author names from your blog postsA post is a type of content in WordPress, a popular open-source content management system used for creating an… More. For example, there could be multiple writers for one post, or you may have freelancers who want their names omitted.
Fortunately, there are ways to hide the author name or replace it with a custom display name in WordPress. By removing this title, you can correct consistency problems across your site and protect your writers’ identities.
You can remove the author name in WordPress by using custom CSS or a pluginA plugin is a software component that adds specific features and functionality to your WordPress website. Esse… More. Alternatively, you can set a display author name in your WordPress settings and add multiple writer aliases to your website.
This article will discuss why you might consider removing the author name from WordPress posts. We’ll then explain four methods to do it. Let’s dive in!
Why You Might Want to Remove the Author Name From Your WordPress Posts
In WordPress, blog post titles are typically accompanied by some metadata. This information may include the name of the author, the date the post was written, and more:

There are some advantages to using author names with your posts. These titles can lend legitimacy to your content and credit your writers.
However, there can be some downsides to utilizing author names. For example, you might have multiple writers working on a single blog post. In this case, you may want to give credit to more than one person for the article.
Furthermore, some of your writers might prefer to work under pseudonyms. This could be especially true if your blog post deals with sensitive or controversial topics.
Finally, you might want to omit the author’s name to maintain consistency across your entire website. Instead, you can present content under your brand’s banner.
How to Remove the Author Name from Your WordPress Posts (4 Methods)
We’ve just discussed the reasons for removing or changing the author name in your WordPress posts. Now, let’s look at four different methods to accomplish this goal!
Method 1: Add Custom CSS
This method involves manually adding CSS to make the author name disappear from your blog posts. If editing code is outside your comfort level, we recommend trying the other techniques later in this article.
Before you get started, it’s wise to create a backup of your files so that if something goes wrong, you can quickly correct it. We also recommend making a child theme. Then, the changes you make to your code will carry over if your current themeA WordPress theme is a set of files that determine the design and layout of a website. It controls everything … More goes through an automatic update.
Start by visiting one of your blog posts in a web browser. We’re using Chrome here.
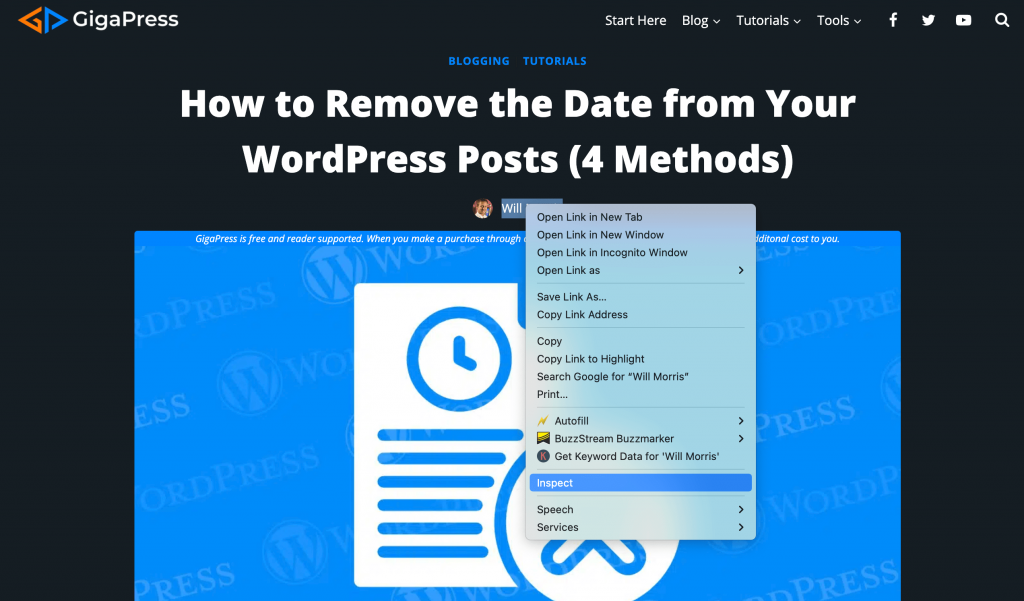
Right-click on the author name and select Inspect:
This will open up an Elements tab showing the CSS class attributed to the author name and other metadata:
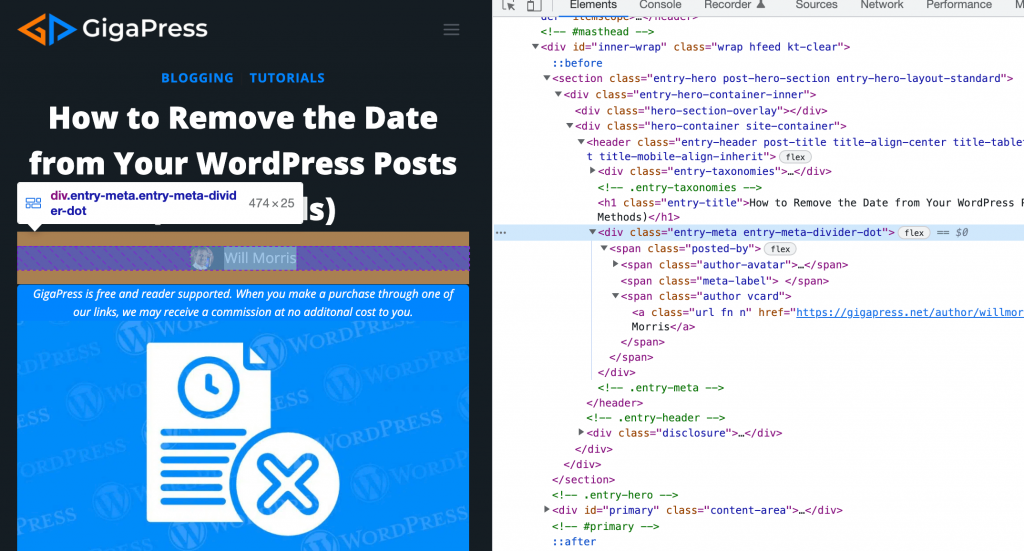
For example, the class here is div.entry-meta.entry-meta-divider-dot. Next, navigate to Appearance > Customize in your WordPress DashboardIn WordPress, the Dashboard is a central hub for managing a website’s content and settings. It is the first sc… More. Then, under Additional CSS, add this code (using our example):
div.entry-meta.entry-meta-divider-dot{
display:none;
}
Here you can see our code in action:
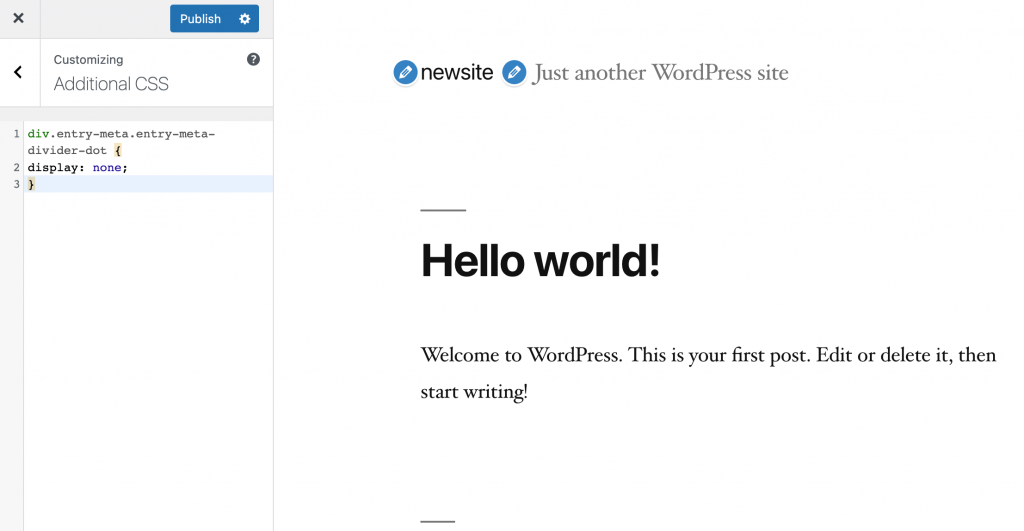
Save your changes and open the blog post in your browser again. The author’s name should have disappeared.
Method 2: Use a Plugin
Installing a plugin is a more straightforward method that doesn’t involve coding knowledge. We recommend using Hide/Remove Metadata. It provides a quick yet effective solution:

Start by downloading, installing, and activating the plugin in your WordPress dashboard. Then, head to Tools > Hide/Remove Metadata to access the plugin’s settings.
Here, you can hide the metadata using CSS or PHP. Additionally, you can choose to conceal either the author and publishing date or both:
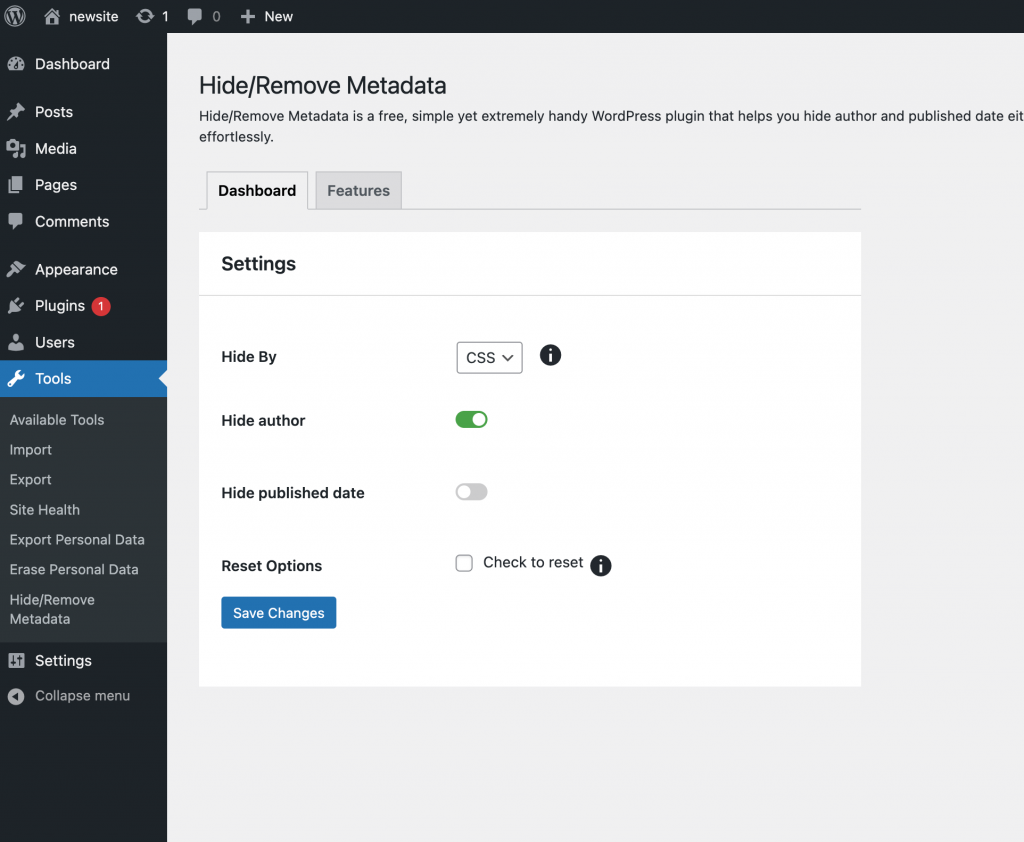
Save your changes once you’re done. Then, open your blog post again to see if the author’s name has disappeared.
Method 3: Set a Display Author Name
This method does not remove the author’s name from your WordPress posts. Instead, it enables you to set a generic display name for your content. If you’re working with pseudonyms or brand names, you might like to use this approach.
To get started, navigate to Users > Add New in your WordPress dashboard. Create a new user, complete with a username, email, and the name you want to use:
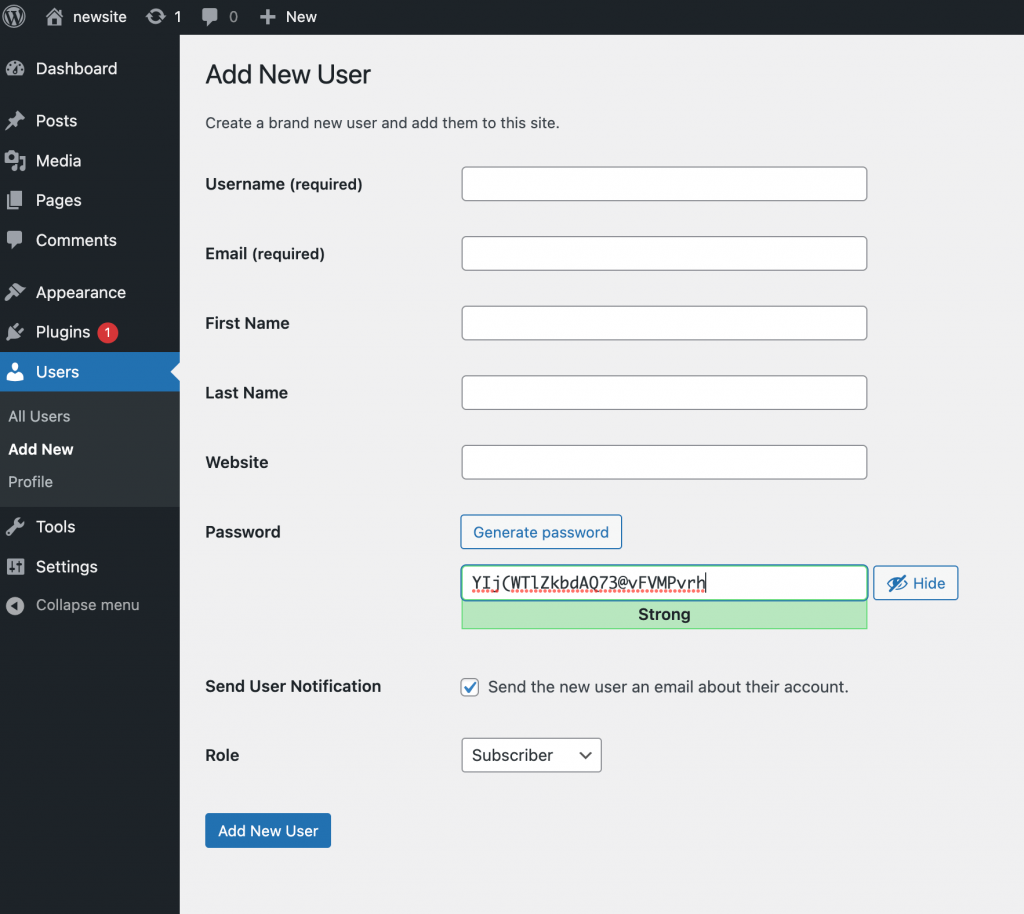
Save this user by clicking on Add New User. Next, navigate to Users > All Users and click on Edit below the username you created. Scroll down to Nickname and enter a display name. Then, select the nickname from the dropdown menuIn WordPress, a menu is a collection of links that are displayed as a navigation menu on a website. Menus are … More under Display name publicly as:
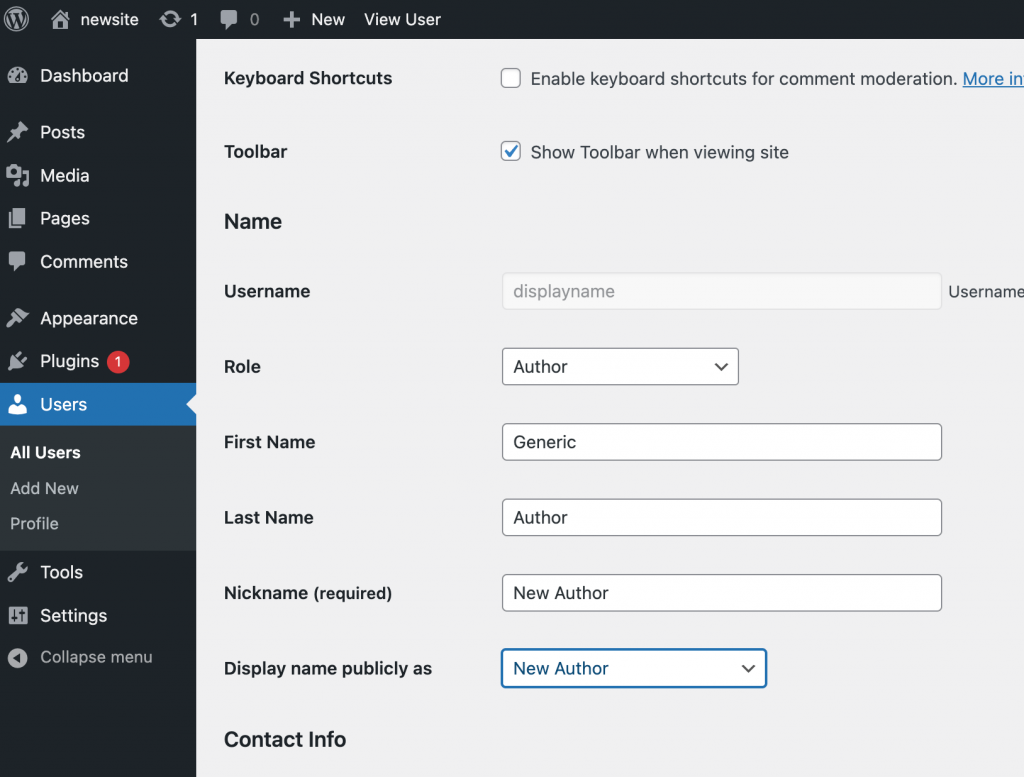
Next, navigate to Posts > All Posts and open the screen options menu at the top. For Number of items per page, enter “999”. This number lets you make bulk edits and change the author name for multiple posts simultaneously:

Select all the posts by clicking on the checkbox next to Title, and choose Edit from the Bulk Actions dropdown menu. This will open a new window of options where you can bulk edit your posts:
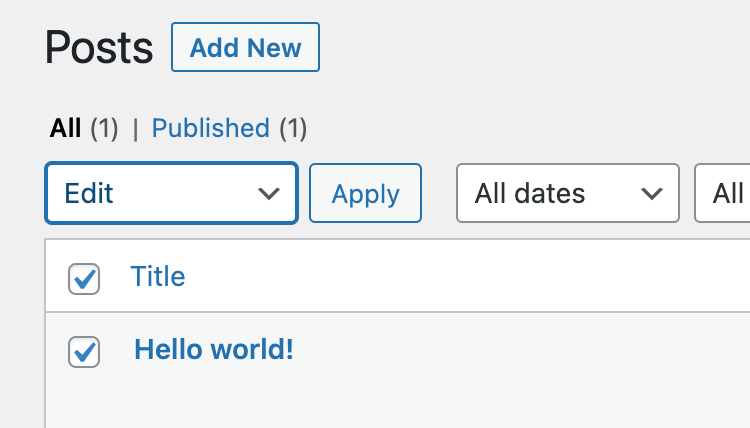
Next to Author, select the new display name you just created. WordPress will then update all your posts with the new author name:
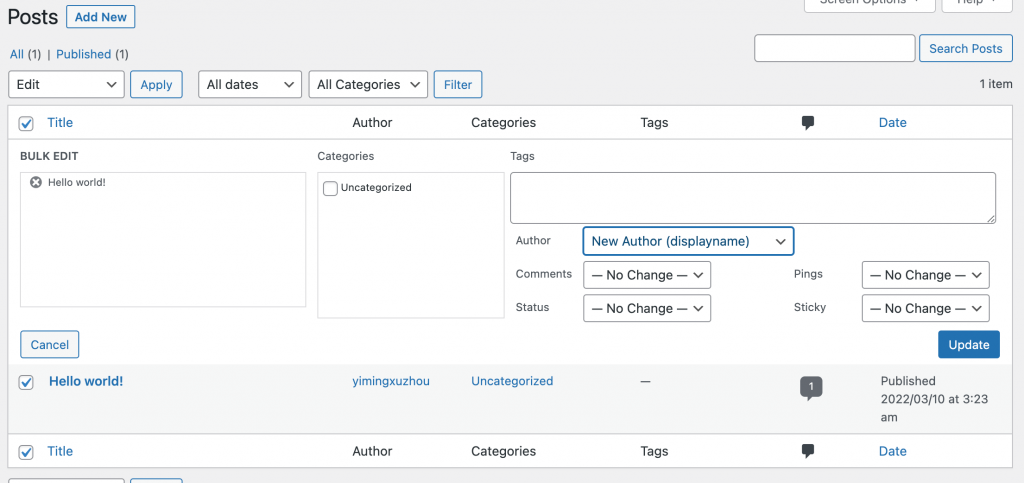
Finally, hit Update to see the changes live on your website.
Method 4: Add New Authors
Another option is to create new authors using the same method we just covered. Then, you can assign each post to the respective writer or pseudonym.
To use this method, simply follow the same steps we discussed in Method 3 to add new authors. Then, navigate to Posts > All Posts and hit Edit for each post that you want to adjust:
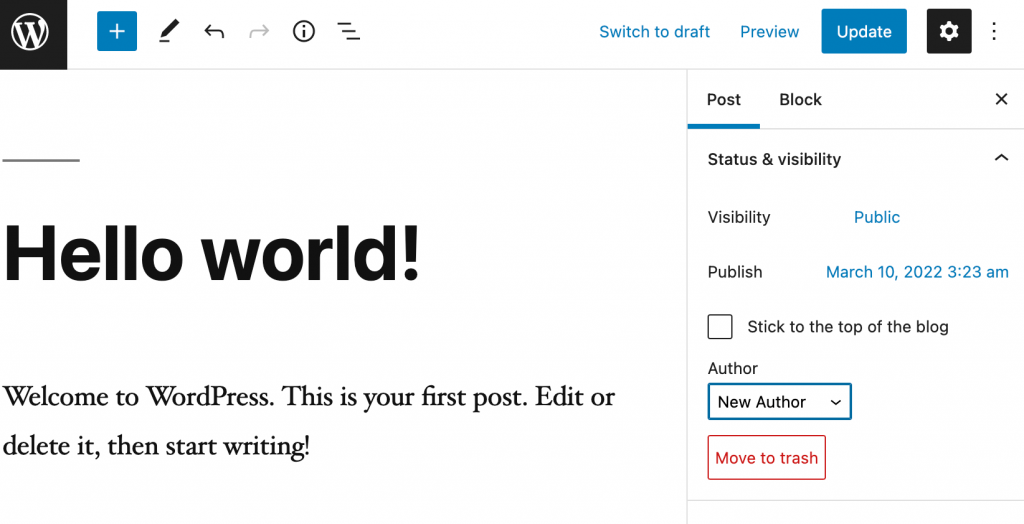
Now simply select a writer’s name from the Author dropdown menu. This method gives the proper author credit for a post or assigns a pseudonym for a writer.
Conclusion
Removing the author name from your WordPress posts can create a consistent and simple aesthetic for your website. It can also be helpful when working with multiple writers or dealing with controversial content.
To recap, here are four easy ways to remove or edit the author name for WordPress posts:
- Insert custom CSS.
- Install a user-friendly plugin such as Hide/Remove Metadata.
- Set a display author name across your blog.
- Add new authors and assign them to posts they’ve written.
Do you have any questions about removing the author name from WordPress posts? Let us know in the commentsComments are a feature of WordPress that allow users to engage in discussions about the content of a website. … More section below!


![How to Delete a Theme in WordPress [3 Effective Ways]](https://codingheros.com/wp-content/uploads/2024/06/how-to-delete-a-theme-in-wordpress-3-effective-ways-768x362.png)
![How to Add Image in WordPress Footer [A Visual Guide]](https://codingheros.com/wp-content/uploads/2024/06/how-to-add-image-in-wordpress-footer-a-visual-guide-768x329.png)
![How to Remove index.php from URL in WordPress [An In-Depth Guide]](https://codingheros.com/wp-content/uploads/2024/06/how-to-remove-index-php-from-url-in-wordpress-an-in-depth-guide-768x425.png)