If you run a WordPress website, you will eventually run into errors. One of the most common issues you may face is “The uploaded file could not be moved to wp-content/uploads/”. However, as a beginner, you might not know how to fix it.
Fortunately, there are various troubleshooting methods you can try in order to resolve this image upload issue. If it’s a single image causing the problem, you may need to resize or rename the file. Or, you might have to access your site files and change the file permissions or memory limits.
In this postA post is a type of content in WordPress, a popular open-source content management system used for creating an… More, we’ll discuss some of the main causes of “The uploaded file could not be moved to wp-content/uploads/” error. Then, we’ll show you six ways to fix it. Let’s get started!
Main Causes of “The uploaded file could not be moved to wp-content/uploads/” Error
Typically, you’ll see “The uploaded file could not be moved to wp-content/uploads/” error when you try to upload an image in WordPress. The error prevents you from sending data to your website’s files which are stored on your web hosting server.
The main cause of the error is incorrect file and directory permissions. This is especially common on shared hosting servers since your web host may run an update that alters the file permissions.
But besides incorrect file permissions, there are some other common causes. For example, there may be a conflict between core software or code in your plugins and themesA WordPress theme is a set of files that determine the design and layout of a website. It controls everything … More.
Additionally, you may run out of storage space. Meanwhile, if the error presents with a single image upload, that image may be too large or have an unreadable file name.
How to Fix “The uploaded file could not be moved to wp-content/uploads/” Error (6 Ways)
Now that you know the main causes of this image upload error, let’s take a look at six ways to fix it.
1. Change File Permissions
The most common reason you’ll see “The uploaded file could not be moved to wp-content/uploads/” error is incorrect file permissions. To change file permissions, you can access your website files through your web hosting account (via File Manager).
Or, if you don’t have access to File Manager, you can use an FTP client like FileZilla to edit your site files remotely. You’ll find your FTP credentials in your web hosting account.
Once you connect your site to FileZilla, click on the root folder (usually labeled public). Then, open the wp-content folder and locate the uploads directory:
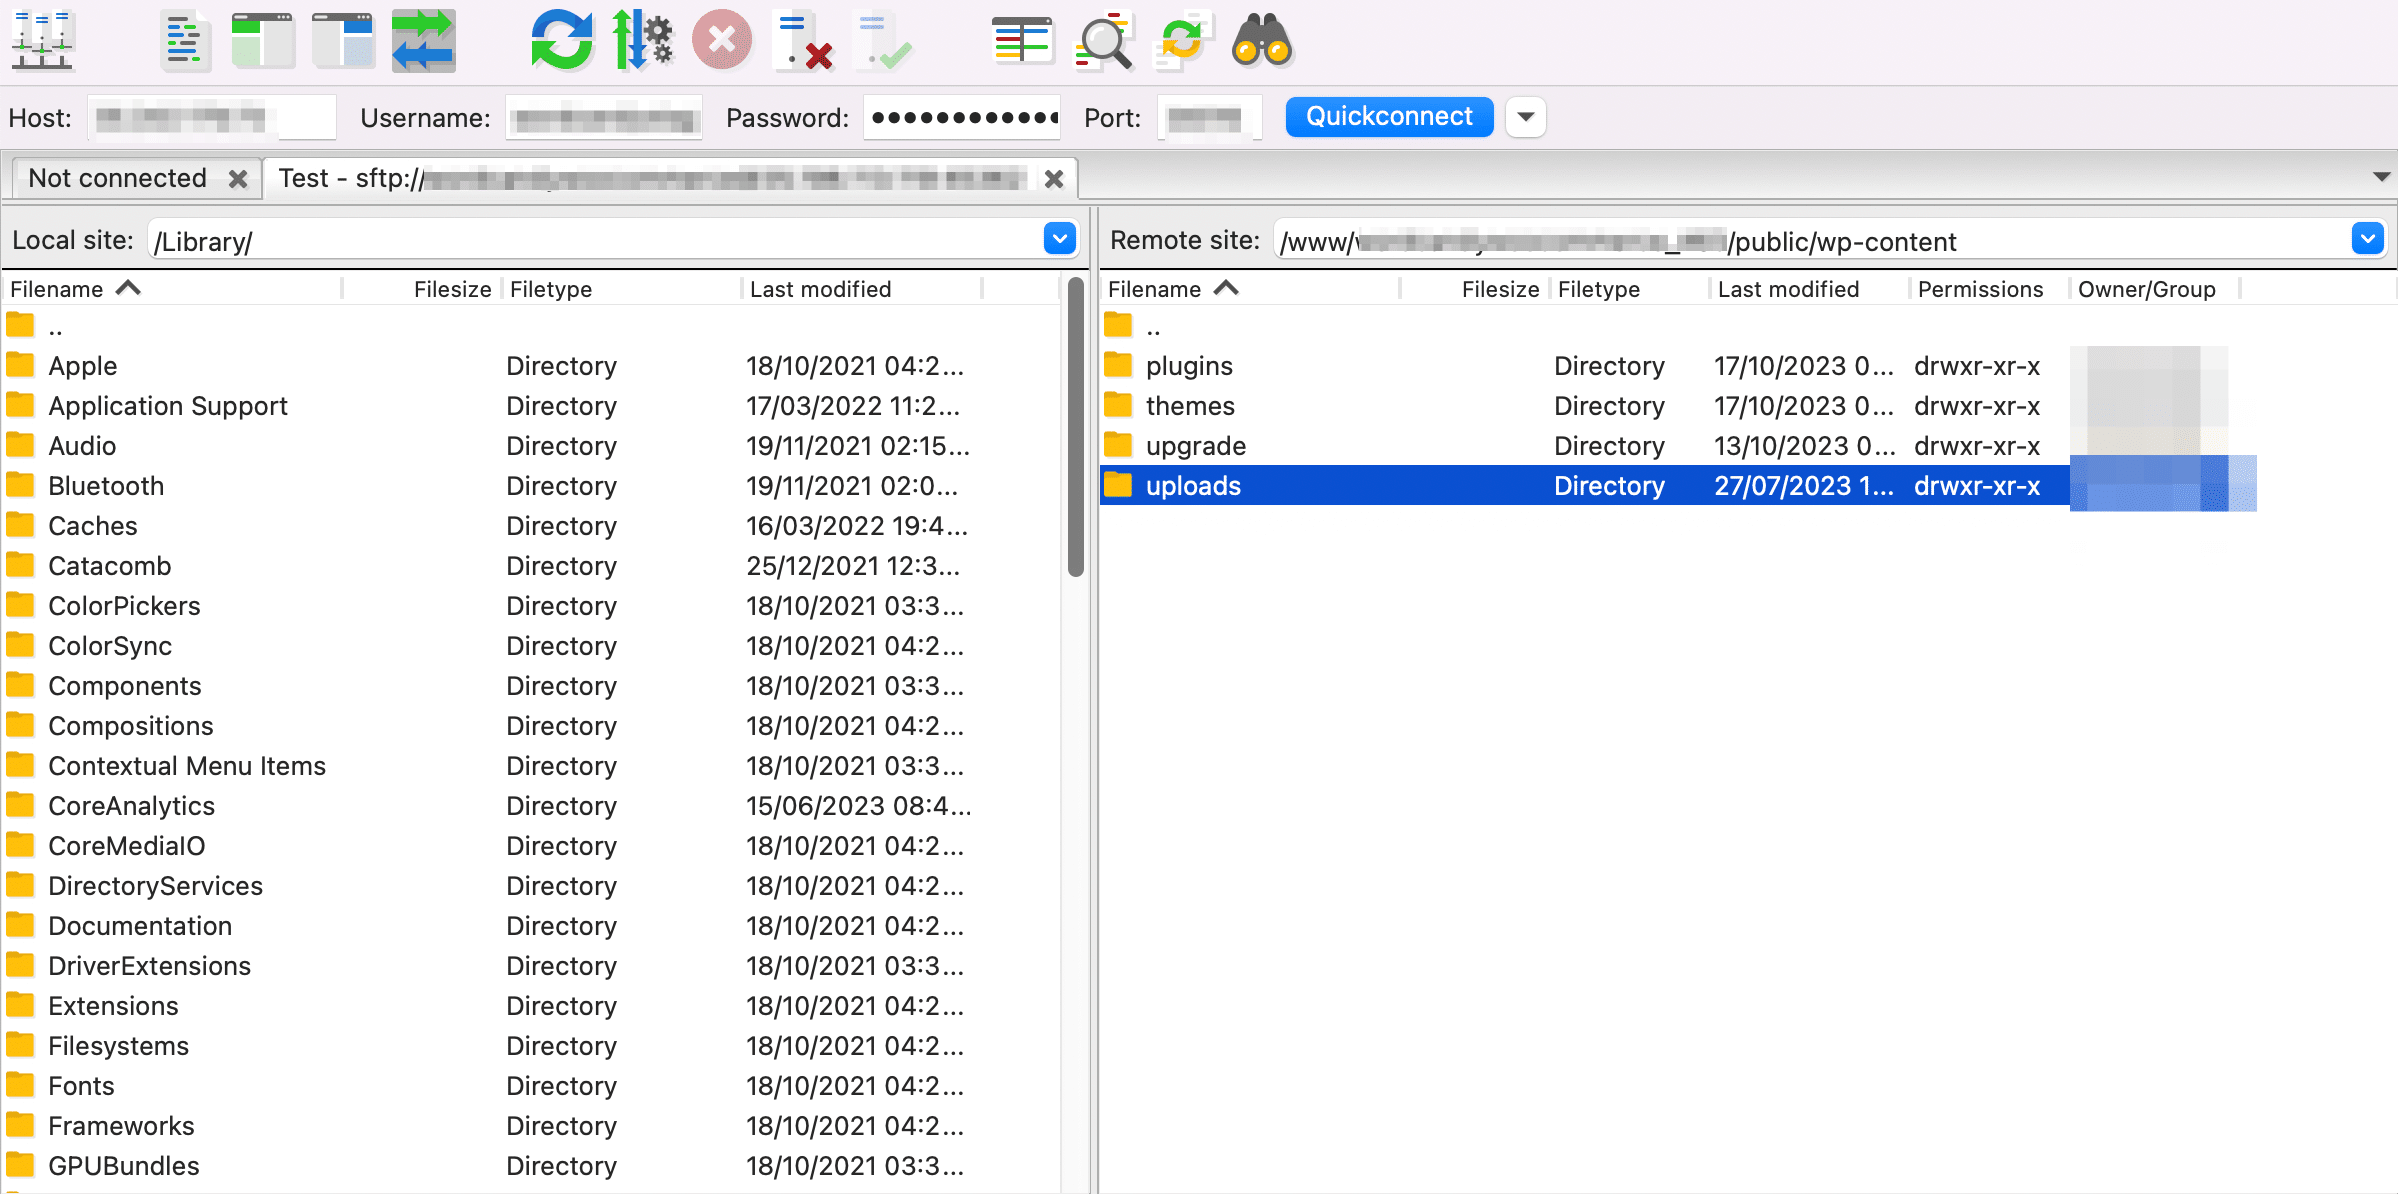
This is where WordPress stores your media files. Now, right-click on the uploads folder and select File permissions:
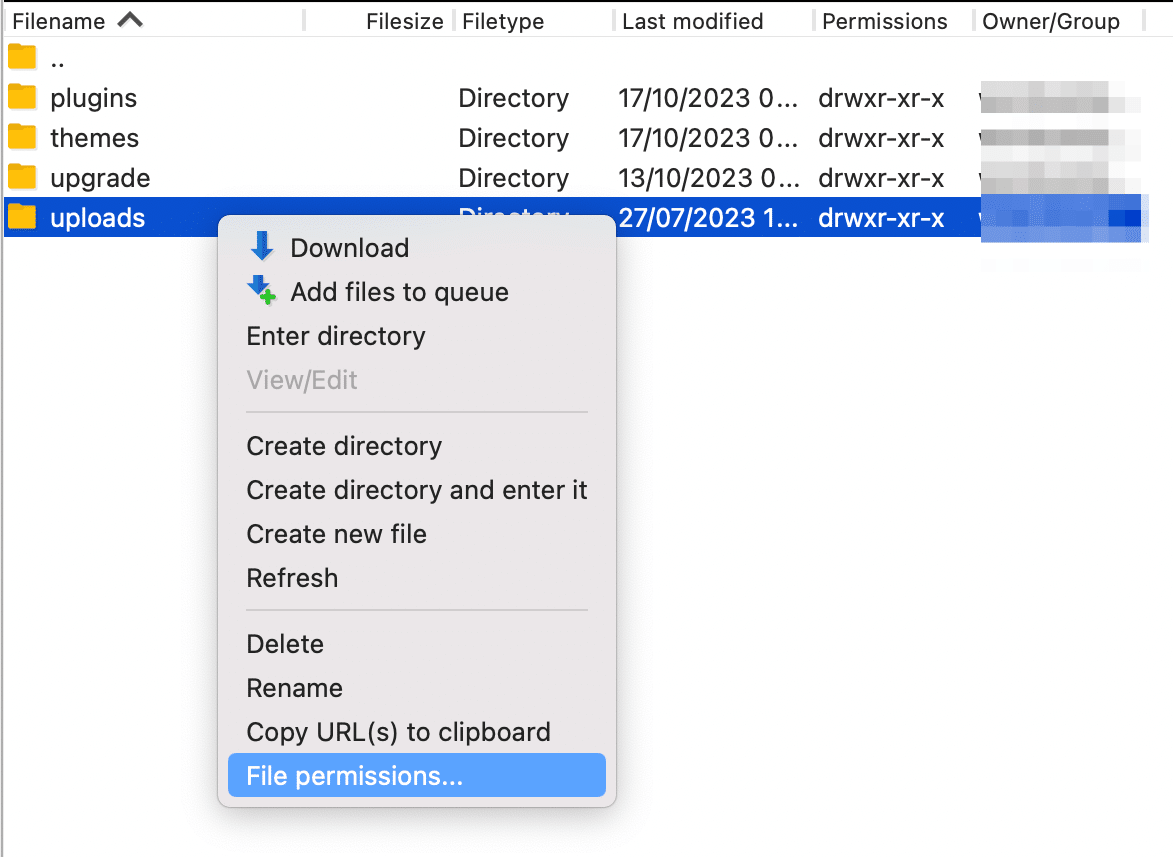
Set the numeric value to “744” and apply the change to directories and subdirectories using the checkboxes:
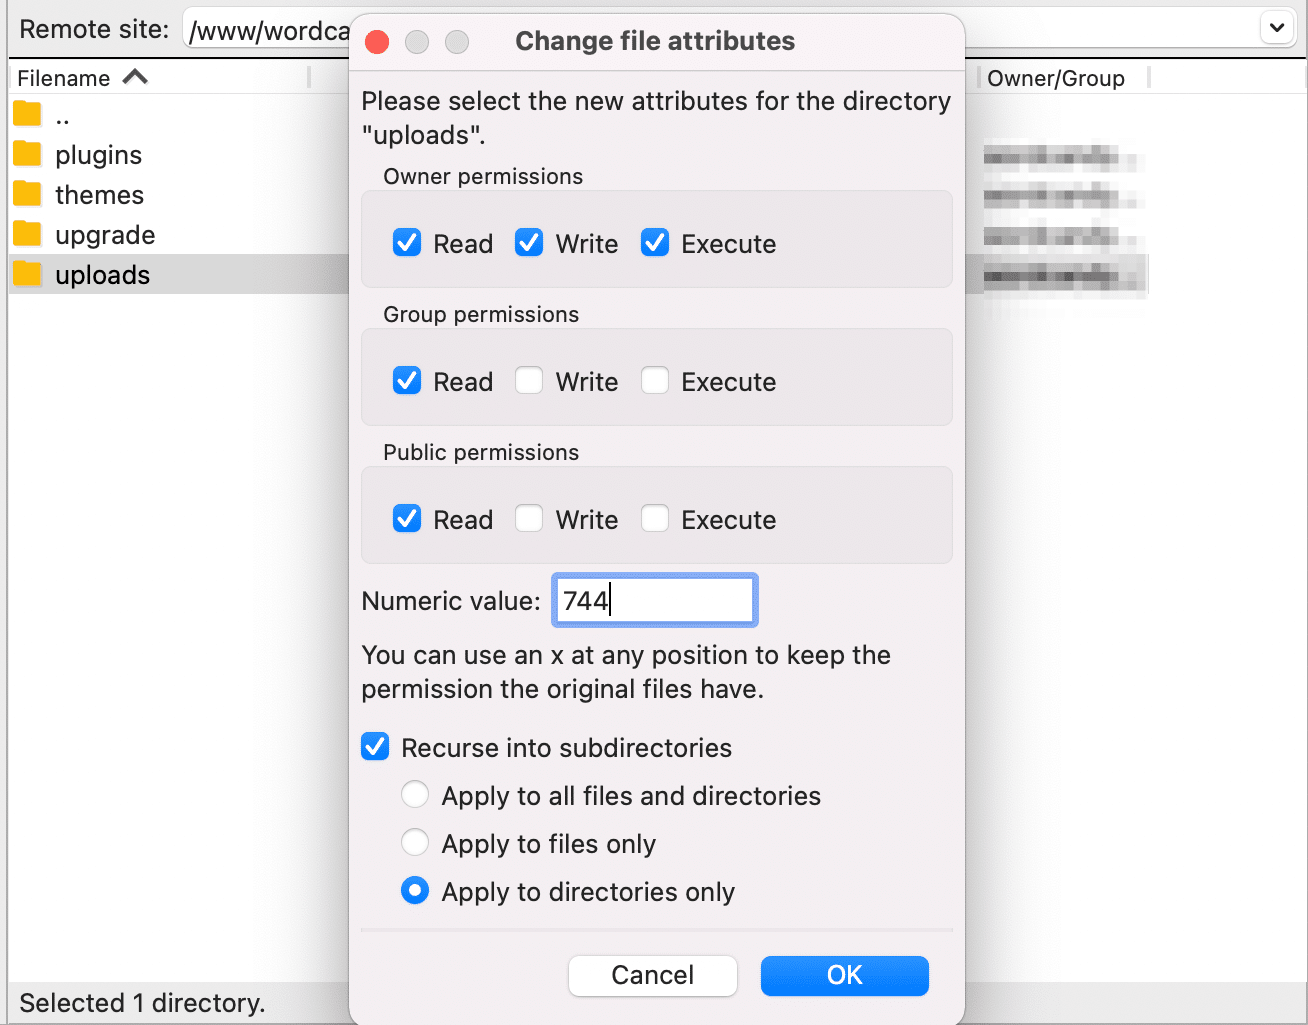
Click on OK to save the changes.
You’ll also need to change the permissions for files within the directory. To do this, right-click on the uploads directory and select File permissions.
In the box, enter “644” as the numeric value. Also, check the box next to Recurse into subdirectories and click on Apply to files only:
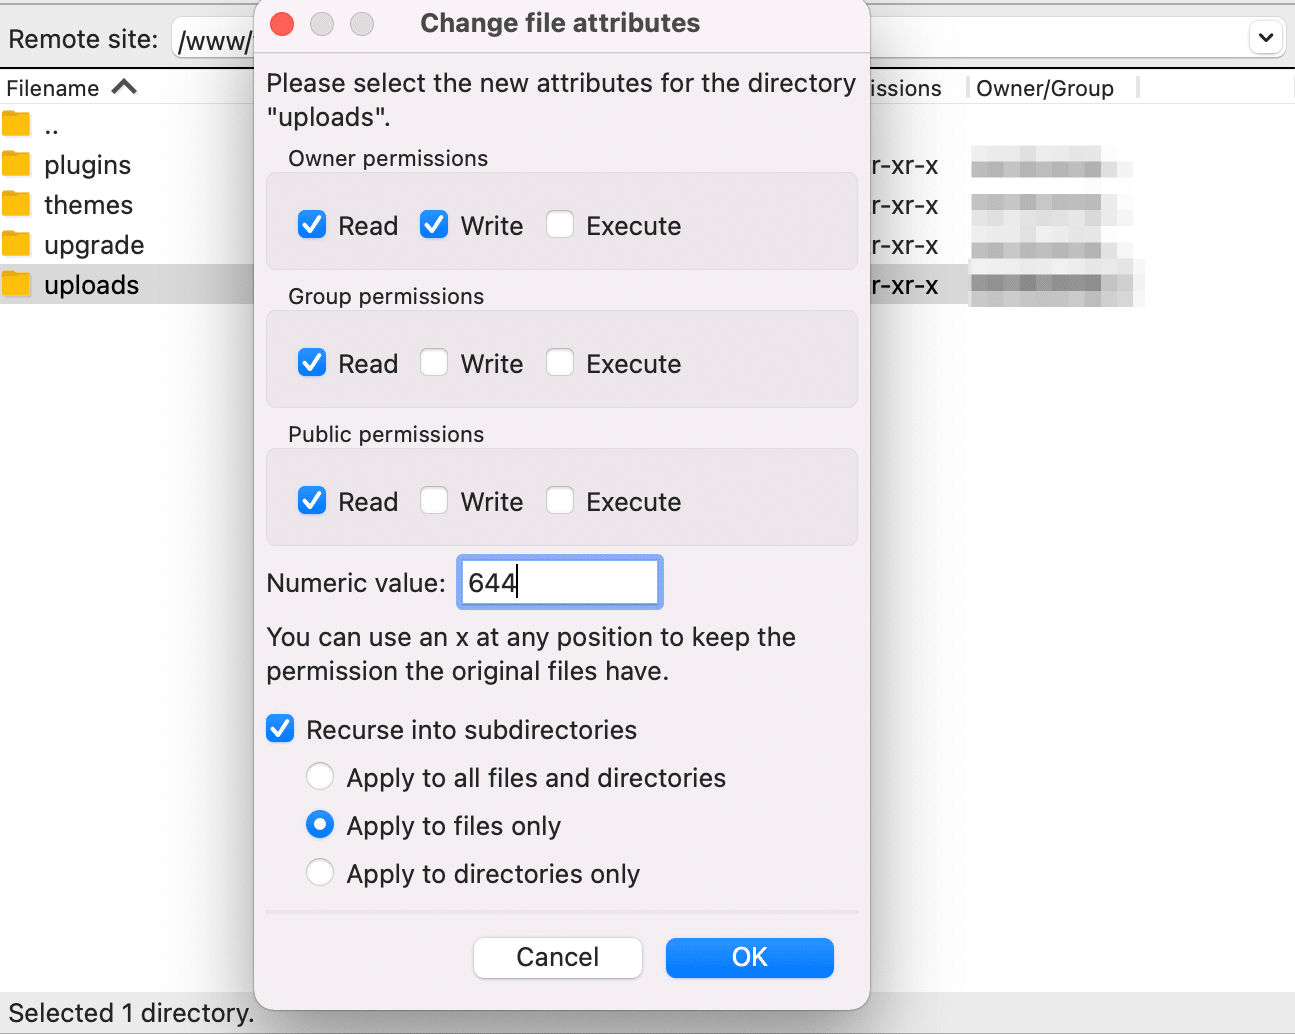
Then, select OK. Now, your FTP client will change the permissions for files inside the uploads directory. So, you can return to WordPress and upload images as usual.
2. Increase the WordPress Memory Limit
Another common cause of “The uploaded file could not be moved to wp-content/uploads/” error is insufficient storage space. This means that you won’t have enough room to add any more images.
In this instance, you can increase the WordPress memory limit to resolve the issue. However, if you’re on a shared hosting server, you’ll need to ask your web host to do this for you.
Otherwise, you can increase the memory limit through File Manager or FTP. To get started, open the root folder that contains all your website files.
Then, right-click on the wp-config.php file and select View/Edit:
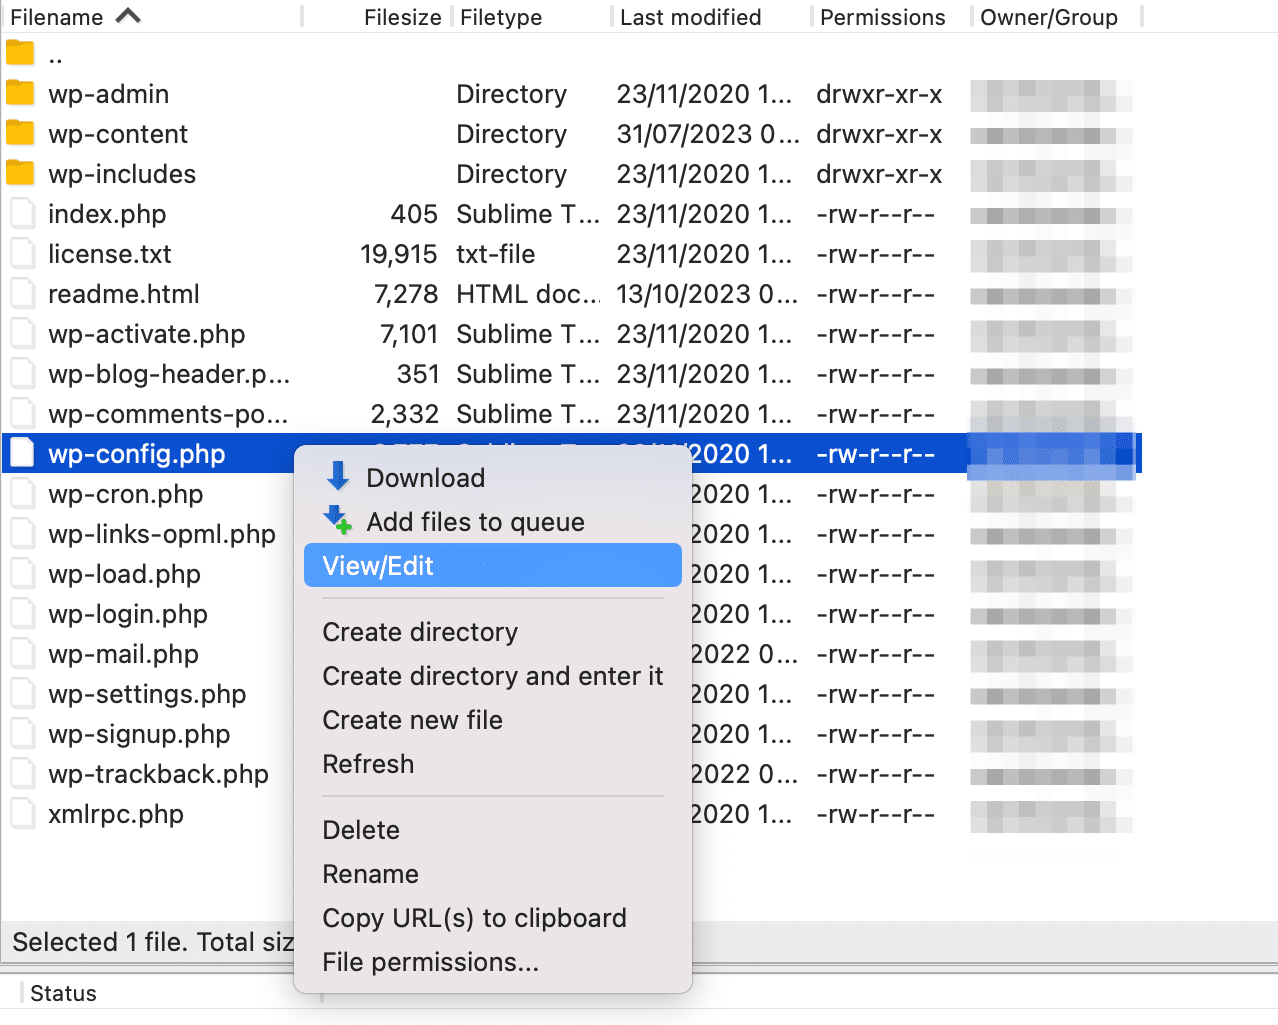
Inside the file, locate WP_MEMORY_LIMIT. If this line of code exists in the file, all you need to do is increase the value. So, if it’s set to 32M, you might want to double this to 64M.
If you don’t see this code in the file, find the line that says: That's all, stop editing! Happy publishing. Just above this line, add the following code: define( 'WP_MEMORY_LIMIT', '64M' );
Make sure to save your changes. Then, visit your WordPress site to see if the error has been resolved.
3. Try the Browser Uploader
Usually, you’ll add images using the WordPress image uploader. However, if this isn’t working due to “The uploaded file could not be moved to wp-content/uploads/” error, you can try using the built-in file uploader in your browser.
To access the browser importer, go to Media > Add New from your WordPress dashboardIn WordPress, the Dashboard is a central hub for managing a website’s content and settings. It is the first sc… More. Beneath the image importer, you should see the browser uploader link:

Click on the link and select Choose File.
Now, upload your images as normal. If this works, test the default image uploader to make sure the error has been properly resolved.
4. Deactivate Plugins
All software on your site can cause problems (especially when conflicts occur). That’s why it can be a good idea to deactivate your plugins to see if one of them is interfering with other software on your site.
To do this, head to Plugins > Installed Plugins in your dashboard. Then, deactivate a pluginA plugin is a software component that adds specific features and functionality to your WordPress website. Esse… More using the Deactivate link beneath the plugin name:
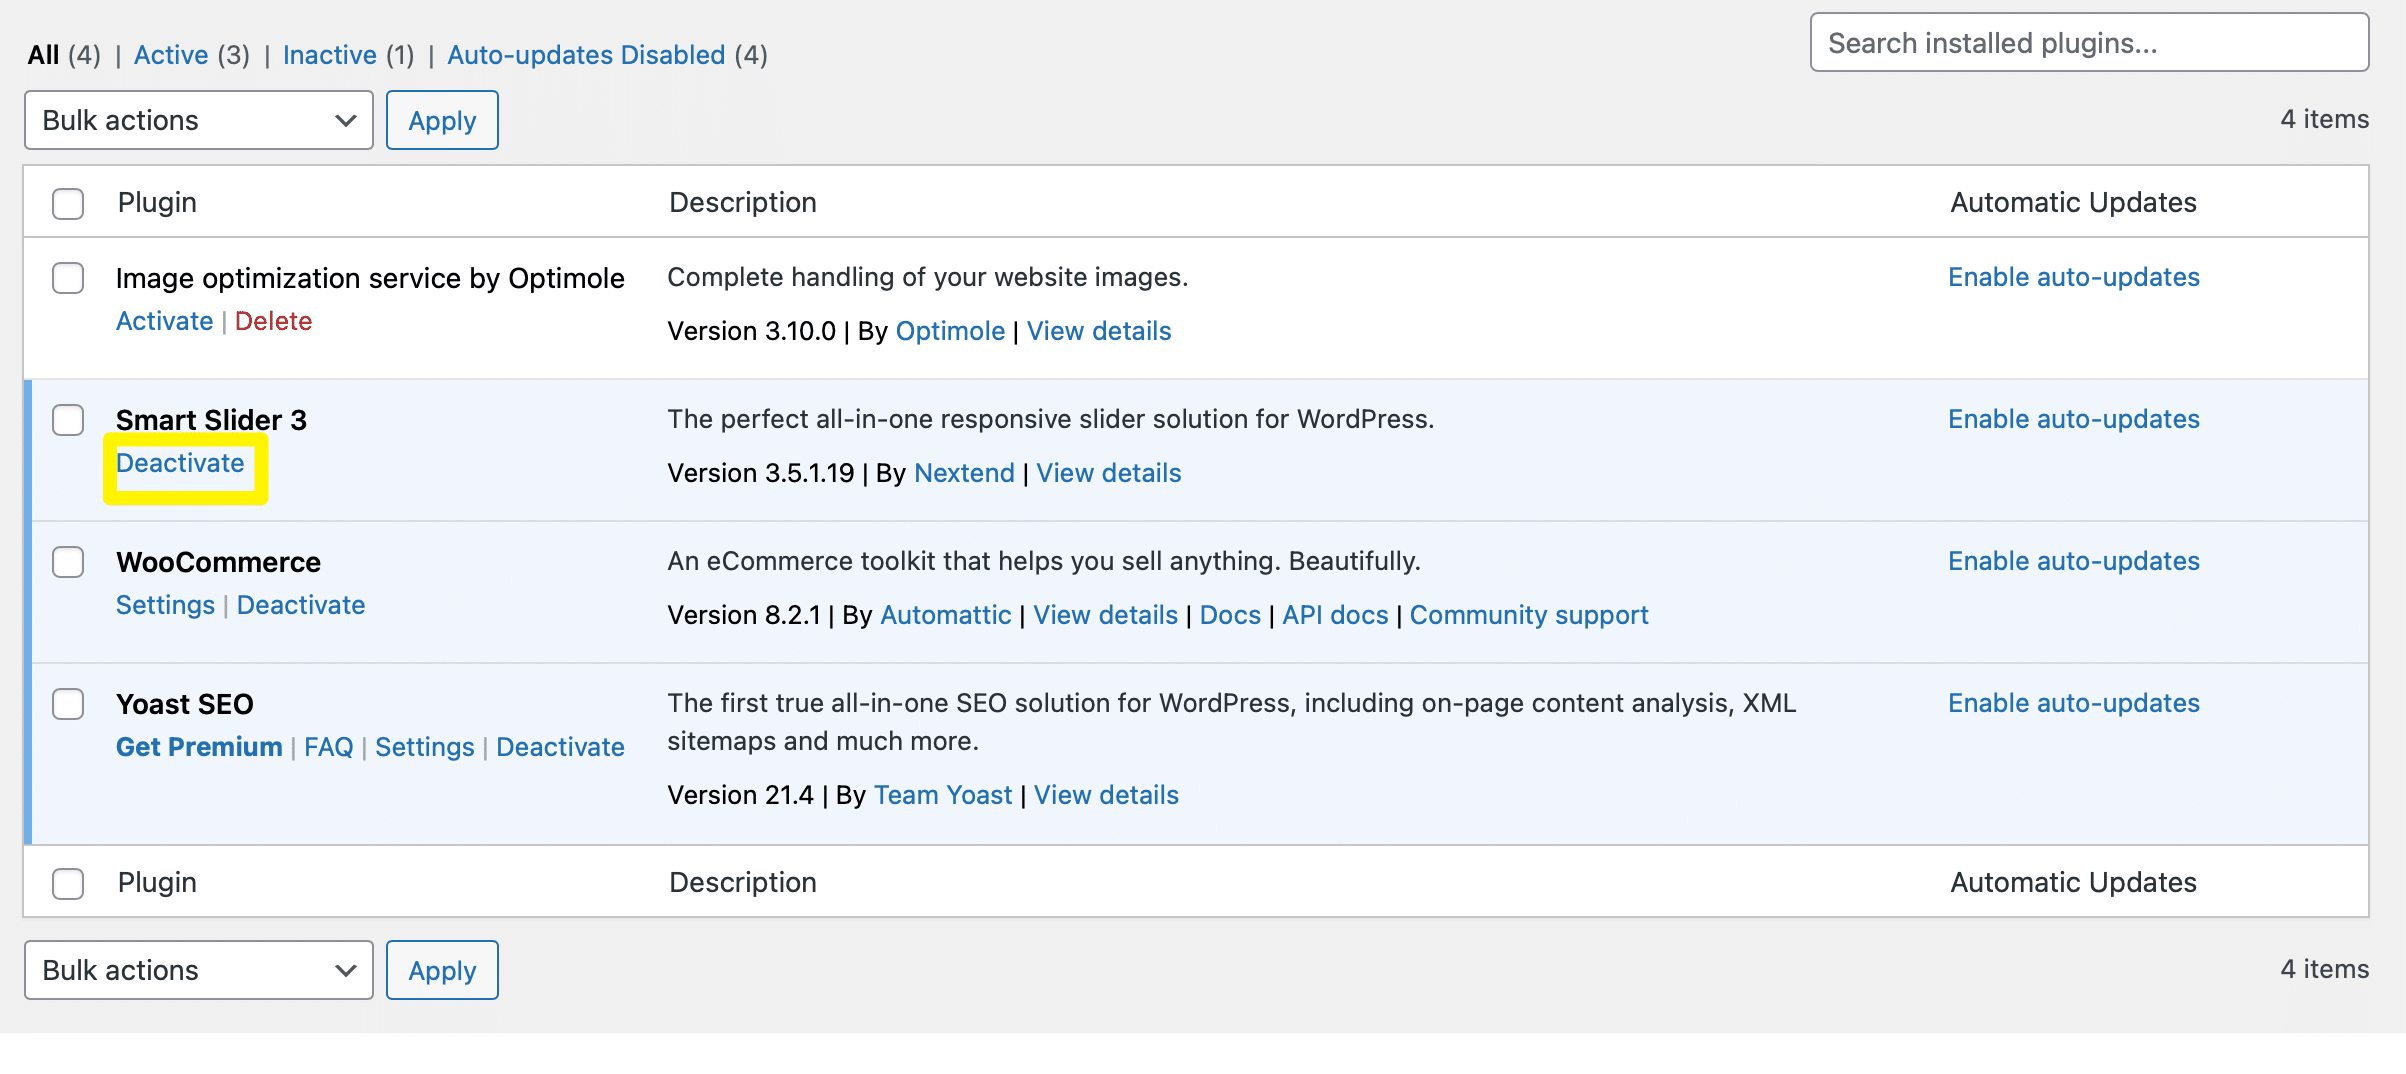
Alternatively, it can be more useful to deactivate all plugins and then reactivate them one-by-one. In this case, you’ll need to check the box beside each of your plugins.
Then, use the Bulk actions dropdown to select Deactivate and click on Apply:
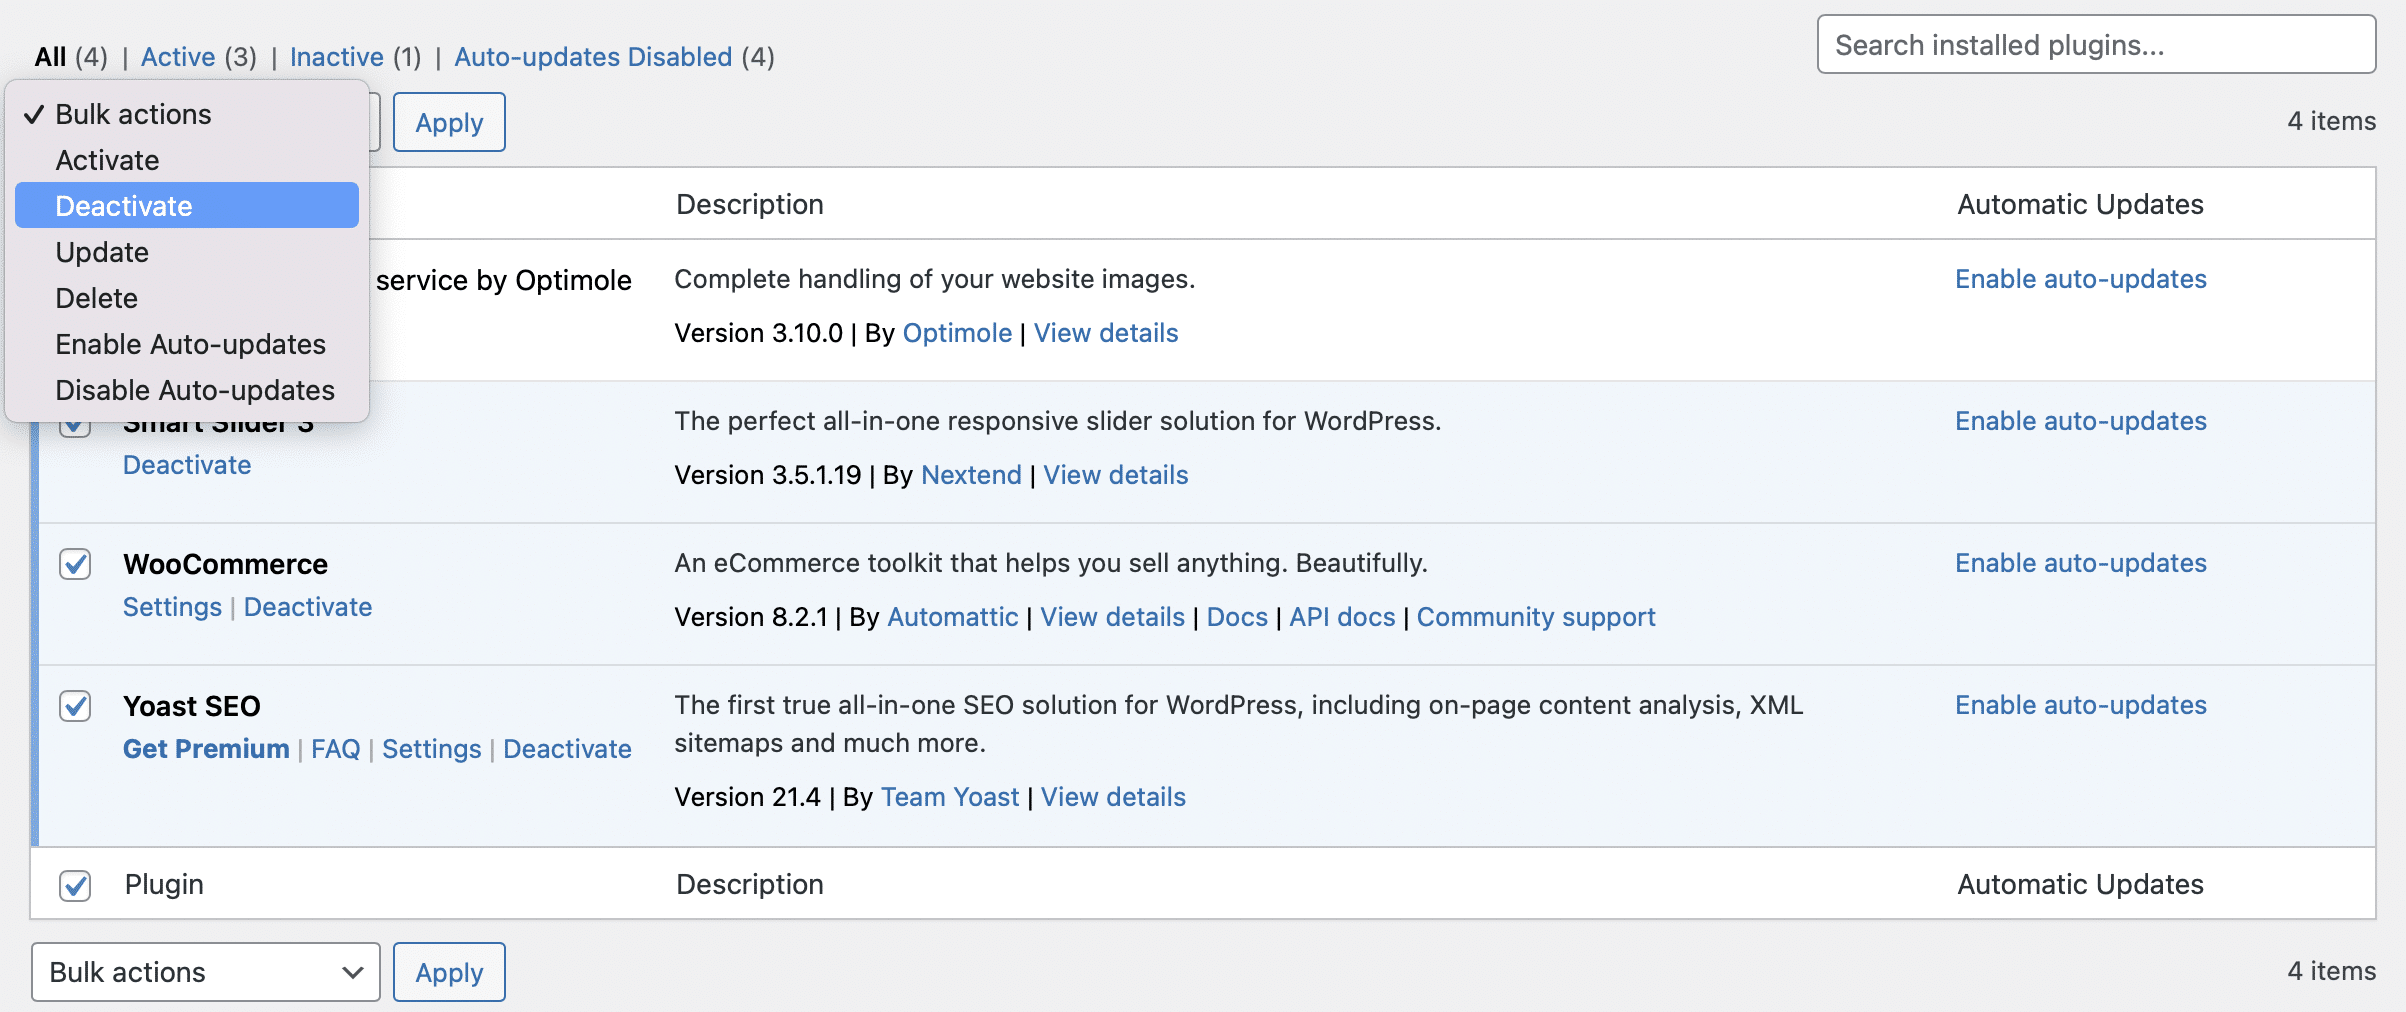
Now, reactivate each plugin, but after each activation, return to the Media tab to see if the error has cleared. If it has, you’ll know exactly which plugin caused the issue.
5. Rename and Resize the Image
If you’re only seeing “The uploaded file could not be moved to wp-content/uploads/” with a single image, there are some quick fixes you can try. First off, it’s a good idea to rename the image.
The WordPress image uploader can encounter upload problems if you use special characters (like exclamation marks and asterisks) or accent letters (like umlauts or tildes). Therefore, it’s best to give your image a new file name using only standard letters, numbers, and hyphens.
Additionally, it might be the case that your image is too large. So, you can try adjusting the image dimensions manually before attempting to upload it to your site again.
You can do this with most image editing software like Photoshop. However, you’re also able to do this using native features on most operating systems. For instance, in the Apple Photo app, you can select your image and click on Edit.
Then, select Crop and enter new dimensions:

You can also compress your image to reduce the overall file size. The easiest way to do this is to use a simple online tool like TinyPNG before you upload images to WordPress.
6. Delete the Current Month Folder in the Uploads Directory
If you’ve tried all the solutions above and you’re still seeing “The uploaded file could not be moved to wp-content/uploads/“, you might need to delete a folder in the uploads directory. As a result, any new and hidden conflicts can be resolved.
Just in case you have important files stored in the folder, it’s a good idea to make a backup of your site before you try this method. This way, you’ll have a fresh copy of your site if deleting the folder impacts its functionality.
Once that’s done, go ahead and access your uploads directory through File Manager or FTP. Then, select the root folder of your site, open the wp-content folder, and click on uploads.
This next step may look different depending on the format of your uploads directory. However, you want to locate the current year/month folder, so that might be 23 followed by 10. Then, right-click on the folder and select Delete:
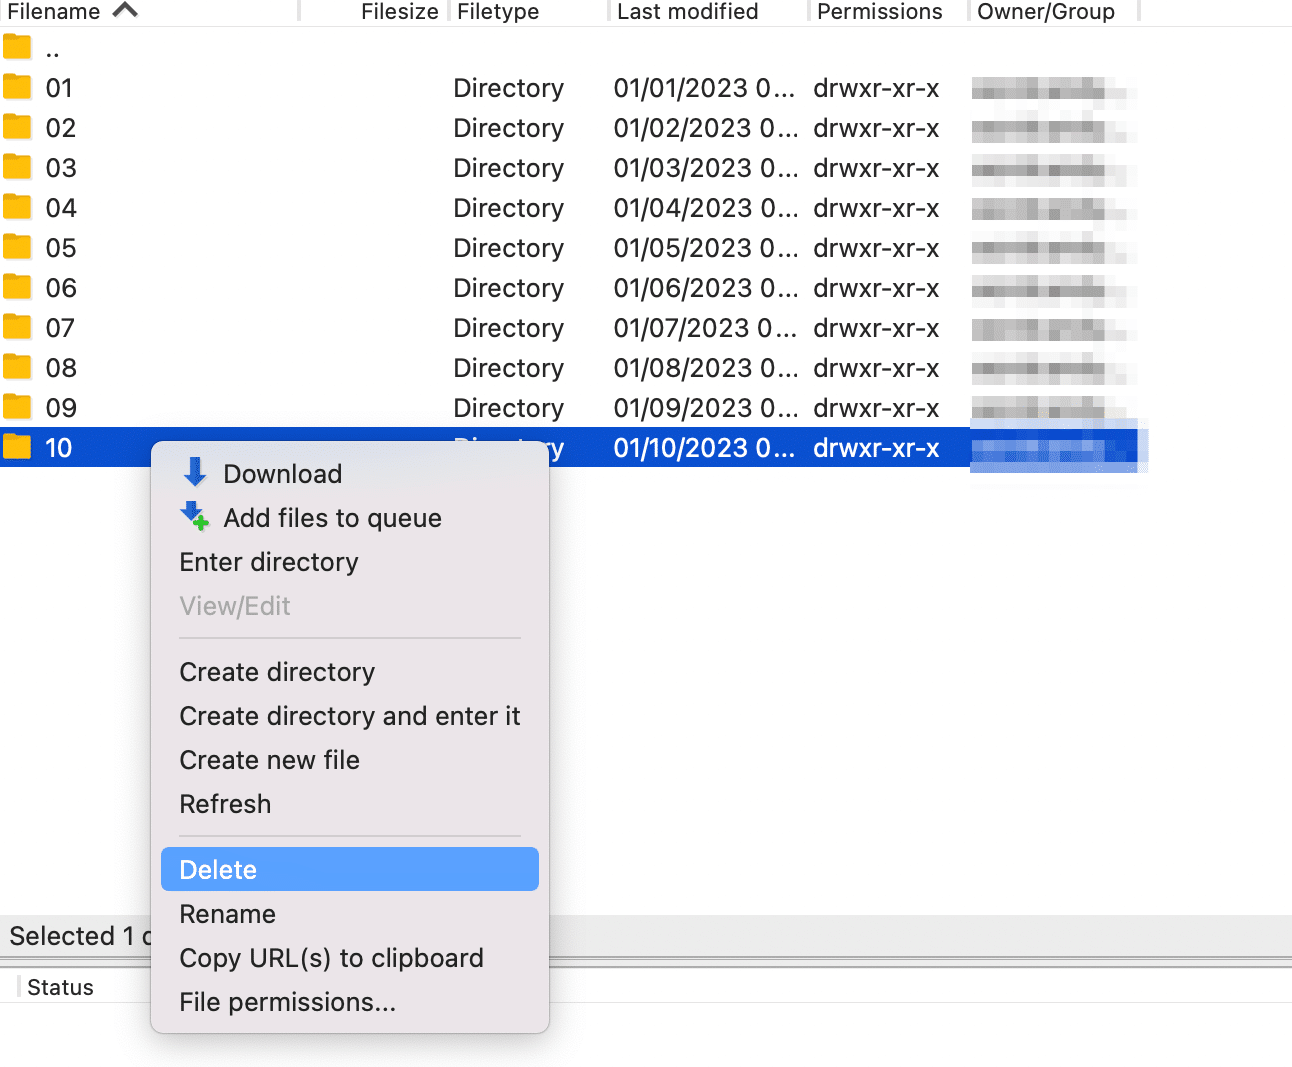
Now, return to your WordPress site to upload the image. If the upload is successful, WordPress will generate a new 10 folder in the uploads directory.
Conclusion
WordPress errors can be frustrating, especially when they prevent you from creating new content. One of the most common image errors is “The uploaded file could not be moved to wp-content/uploads/” which can be tricky to resolve.
To recap, here are six ways to fix “The uploaded file could not be moved to wp-content/uploads/” error:
- Change file permissions.
- Increase the WordPress memory limit.
- Try the browser uploader.
- Deactivate plugins.
- Resize and rename image files.
- Delete the latest month folder in the
Uploadsdirectory.
Do you have any questions about how to fix “The uploaded file could not be moved to wp-content/uploads/” error? Let us know in the commentsComments are a feature of WordPress that allow users to engage in discussions about the content of a website. … More section below!


