Popups are one of the most powerful ways to grow your email list, promote offers, and share key updates. Many WordPress users assume that adding a popup requires a pluginA plugin is a software component that adds specific features and functionality to your WordPress website. Esse… More, but you can create a pop-up WordPress without a plugin—saving speed, avoiding extra complexity, and keeping full control over your website.
The good news is you can create a pop-up in WordPress without a plugin. This approach gives you full control over design, functionality, and performance, all while keeping your site lightweight. In this guide, we’ll walk you through everything—from the HTML structure to styling and JavaScript functionality—so you can have a fully functional, customized pop-up ready to use on your WordPress site.
Why You Should Create a Popup Without a Plugin
Many WordPress beginners think using a plugin is the only way to implement a pop-up. However, there are several benefits to creating a pop-up manually:
- Faster Website Speed – Plugins often load extra scripts and styles, which can slow your site. A manual pop-up only loads what you need.
- Full Design Control – You can style your pop-up exactly how you want, without being restricted by plugin templates.
- Improved Security – Fewer plugins mean fewer security vulnerabilities. Every plugin is another potential target for hackers.
- No Constant Updates – Plugins require updates to maintain compatibility with WordPress. Manual code doesn’t need that.
By creating a manual pop-up in WordPress, you’ll enjoy a leaner, safer, and faster site while still achieving your marketing goals.
What You Need Before You Start
Before diving into code, make sure you have the following:
- Basic knowledge of HTML, CSS, and JavaScript
- Access to the WordPress admin dashboardIn WordPress, the Dashboard is a central hub for managing a website’s content and settings. It is the first sc… More and themeA WordPress theme is a set of files that determine the design and layout of a website. It controls everything … More editor
- A backup of your website (always a good idea before editing code!)

Having these ready ensures a smooth process and protects your site from accidental issues.
Step 1: Create the Popup HTML Structure
The first step is adding the HTML code for your popup. Think of HTML as the skeleton of your popup—it defines what content shows up and how it’s organized.
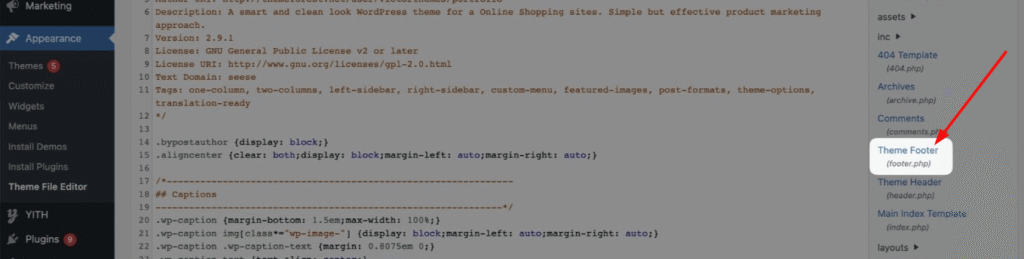
You can add this HTML to your footer.php file or, better yet, a child themeA child theme is a WordPress theme that inherits the functionality and styling of another theme, referred to a… More to avoid losing changes when updating your theme. Here’s a simple example:
<!-- Popup Structure -->
<div id="custom-popup" class="popup-overlay">
<div class="popup-content">
<span class="popup-close">×</span>
<h2>Subscribe to Our Newsletter</h2>
<p>Get exclusive updates directly to your inbox.</p>
<form>
<input type="email" placeholder="Enter your email" required>
<button type="submit">Subscribe</button>
</form>
</div>
</div>Explanation:
- popup-overlay: The darkened background that covers the pageIn WordPress, a page is a content type that is used to create non-dynamic pages on a website. Pages are typica… More when the popup is active
- popup-content: The main popup box with your message
- popup-close: The button users click to close the popup
This HTML is simple yet functional, and you can customize it to fit your site’s style.
Step 2: Style Your Popup with CSS
Now that the structure is ready, it’s time to make it look good. CSS will handle your popup’s design, positioning, and animations. Add this CSS either in your theme’s style.css file or through the WordPress Customizer under Additional CSS:
/* Popup Overlay */
.popup-overlay {
  display: none; /* Hide popup by default */
  position: fixed;
  top: 0;
  left: 0;
  width: 100%;
  height: 100%;
  background: rgba(0, 0, 0, 0.7);
  z-index: 9999;
  justify-content: center;
  align-items: center;
}

/* Popup Content */
.popup-content {
  background: #fff;
  padding: 30px;
  border-radius: 8px;
  text-align: center;
  max-width: 400px;
  width: 90%;
  box-shadow: 0 5px 15px rgba(0, 0, 0, 0.3);
  position: relative;
}

/* Close Button */
.popup-close {
  position: absolute;
  top: 10px;
  right: 15px;
  font-size: 25px;
  cursor: pointer;
}
Pro Tips:
- Keep the design simple for faster load times
- Make the pop-up responsive using percentages instead of fixed widths
- Use animations (fade in/out) for a smoother user experience
Step 3: Make Your Popup Functional with JavaScript
HTML and CSS make your pop-up look good, but JavaScript brings it to life. It allows the pop-up to appear based on triggers and to close when the user clicks the X button.
Here’s a simple JavaScript snippet:
// Show popup after 5 seconds
window.onload = function() {
  setTimeout(function() {
    document.getElementById('custom-popup').style.display = 'flex';
  }, 5000);
};

// Close popup when 'X' is clicked
document.querySelector('.popup-close').addEventListener('click', function() {
  document.getElementById('custom-popup').style.display = 'none';
});
Explanation:
- setTimeout: Waits 5 seconds after the page loads to display the popup
- document.querySelector(‘.popup-close’): Detects when the close button is clicked
- style.display = ‘none’: Hides the popup
Optional enhancements:
- Trigger popup on scroll or exit intent
- Add smooth animations for fade-in/fade-out effects
Step 4: Add the Popup to WordPress
Now that your code is ready, it’s time to integrate it into your WordPress site. You have multiple options:
- Directly in Theme Files – Add the HTML to footer.php so it appears on every page.
- Using a Child Theme – Safest option, prevents your code from being lost during theme updates.
- Custom HTML WidgetA widget is a small block of content that performs a specific function and can be added to certain areas of a … More – Perfect if you want the pop-up on specific pagesIn WordPress, a page is a content type that is used to create non-dynamic pages on a website. Pages are typica… More only.
After adding the code, test your popup on desktop and mobile to ensure it looks and works as expected.
Step 5: Optimize Your Popup for Performance
Even a simple popup can affect site speed if not optimized. Here’s how to ensure smooth performance:
- Limit the popup usage – Don’t show it on every page load.
- Optimize images and scripts – Compress any images included in the popup.
- Use caching and minification plugins – These improve load times even for manual scripts.
- Test responsiveness – Make sure it works on mobile, tablets, and desktops.

Common Mistakes to Avoid
Creating a popup manually is straightforward, but beginners often make mistakes:
- Overusing popups – Too many popups annoy users and increase bounce rates.
- Ignoring mobile optimization – Mobile users are the majority; your popup must be responsive.
- Skipping backups – Always back up your theme files before editing.
- Not validating code – A single missing bracket can break your site layout.
Conclusion: Key Takeaways on Popup WordPress Without Plugin
Creating a popup in WordPress without a plugin is not only possible, but it’s also efficient, secure, and customizable. By following these steps—adding HTML structure, styling with CSS, implementing functionality with JavaScript, integrating it into WordPress, and optimizing performance—you can have a fully functional popup tailored to your website’s needs.
If you want a fast, lightweight solution for lead generation or promotions without relying on plugins, this manual approach is the perfect choice. Start today and see the difference in speed, security, and control on your WordPress site.
FAQs About Popup WordPress Without Plugin
Q: Can I create a pop-up in WordPress without coding? A: Yes, but you’ll need a plugin like Popup Maker, OptinMonster, or Elementor Popup Builder to design and launch popups without writing code.. The manual approach requires basic HTML, CSS, and JavaScript.
Q: Will this method slow down my website? A: No. Manual popups are lightweight compared to most plugins, which often load extra scripts.
Q: Can I trigger the popup on scroll or exit intent? A: Absolutely! With a small JavaScript tweak, you can trigger the popup when a user scrolls or moves to leave the page.
Want to create a pop-up WordPress without a plugin quickly and hassle-free? If you’re also looking for fast WordPress hosting and done-for-you updates, check out our hosting packages by clicking the button below!