Straight out of the box,, WordPress is configured to provide a solid level of security and performance. However, the default options aren’t one-size-fits-all, especially when it comes to fine-tuning your WordPress .htaccess file. Customizing these settings can enhance security and optimize performance tailored to your website’s unique requirements.
Fortunately, the WordPress team makes this easy by providing a single file where you can modify your site’s configuration. Once you know how to access and edit the WordPress .htaccess file, you’ll have more control over your site’s behavior.
In this postA post is a type of content in WordPress, a popular open-source content management system used for creating an… More, we’ll discuss what .htaccess is, and cover a few of the reasons you may want to tweak its contents. We’ll then share three ways to access and edit this powerful file. Let’s get started!
An Introduction to the WordPress .htaccess File

Short for ‘hypertext access’, .htaccess is an important configuration file that’s created automatically when you install WordPress. You can use it to communicate specific instructions to your server without having to edit configuration files, which is particularly useful if you don’t have root access.
There are many scenarios where you might benefit from modifying the .htaccess file, including implementing redirects. Broken links can damage the User Experience (UX) and hurt your Search Engine Optimization (SEO). Therefore, if you ever need to change a page’s URL, it’s vital that you set up an appropriate redirect.
Your .htaccess file can also be an essential tool for helping improve your site’s security. For example, you might use the file to password-protect sensitive directories or prevent PHP code execution. If you always access your site from the same location, you might even make your login page inaccessible to all IP addresses except yours.
Many website owners also use the .htaccess file to prevent image hotlinking. Also known as ‘inline linking’, this phenomenon occurs when a third party links to an image hosted on your server.
Every time someone views this image on the external website, it impacts your bandwidth. To help protect against bandwidth theft, many website owners modify their .htaccess files to either block hotlinking or display alternative content whenever hotlinking is detected.
How to Find and Edit Your WordPress .htaccess File (3 Methods)

The .htaccess file is the key to tweaking WordPress’ default settings. This gives you the freedom to create a more secure, high-performing website.
Before making any changes at the code level, it’s smart to create a backup. This ensures that you’ll have something to restore in the unlikely event that you encounter any issues after modifying .htaccess.
With this backup in place, it’s time to take control of your website’s configuration. Here are three ways to access and edit the WordPress .htaccess file.
1. Use the cPanel Dashboard
Many providers offer hosting control panels. This is a web-based interface where you can manage your server from anywhere in the world, as long as you have a stable internet connection.
There are various control panels on the market, but with over three million known installations, cPanel is one of the most popular. If your hosting package includes cPanel, you can edit .htaccess directly from its User Interface (UI).
Each hosting provider is slightly different. If you’re unsure how to access your cPanel dashboard, it’s always worth logging into your provider’s account and searching for any options labeled “cPanel”.
Alternatively, you can refer to your host’s documentation or contact them directly for assistance. Once you have access to cPanel, you can launch its File Manager tool:
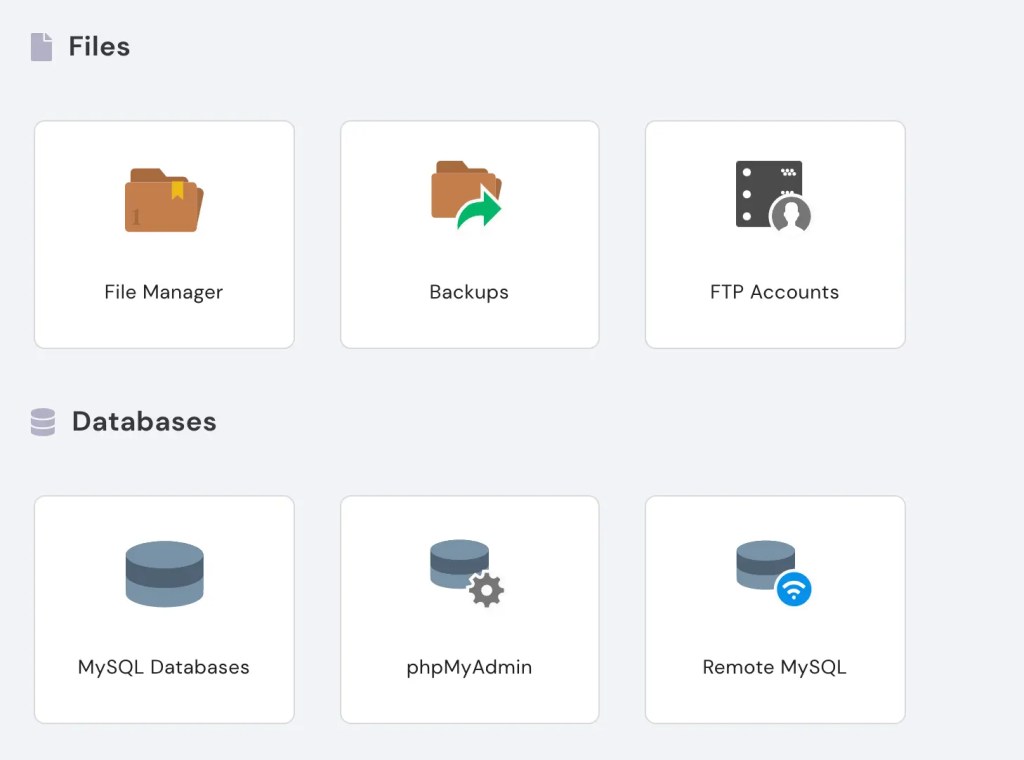
Next, open the public_html folder. The .htaccess file is located within this directory:

Control-click the WordPress .htaccess file and select Edit, which opens the file in cPanel’s built-in editor. You can then make your changes. When you’re happy with your modifications, it’s time to apply them to your site and server by clicking on Save.
2. Connect Over File Transfer Protocol (FTP)
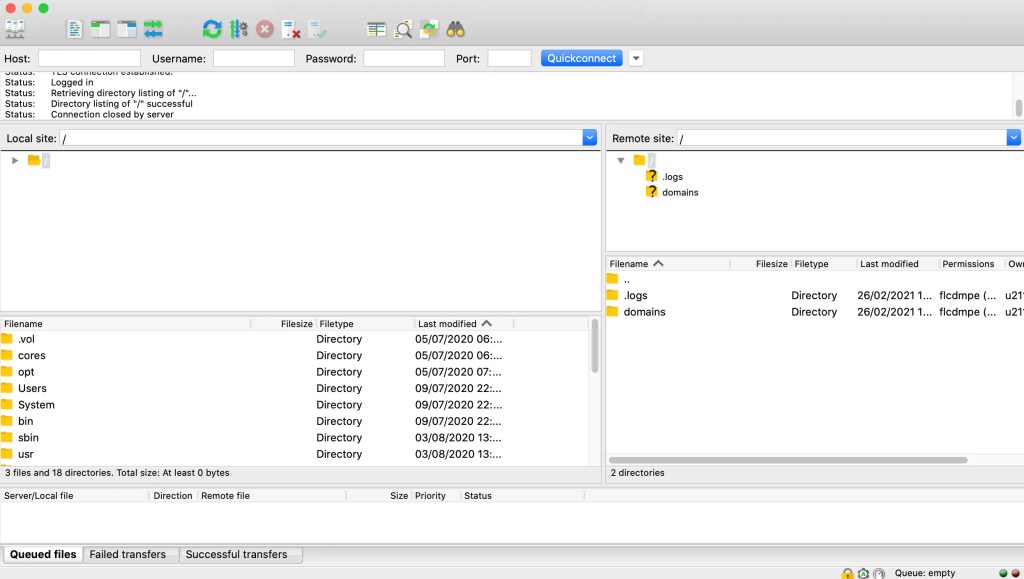
You can communicate with your server directly via FTP. There are various ways to connect over FTP, but one of the most popular is using a client such as FileZilla:
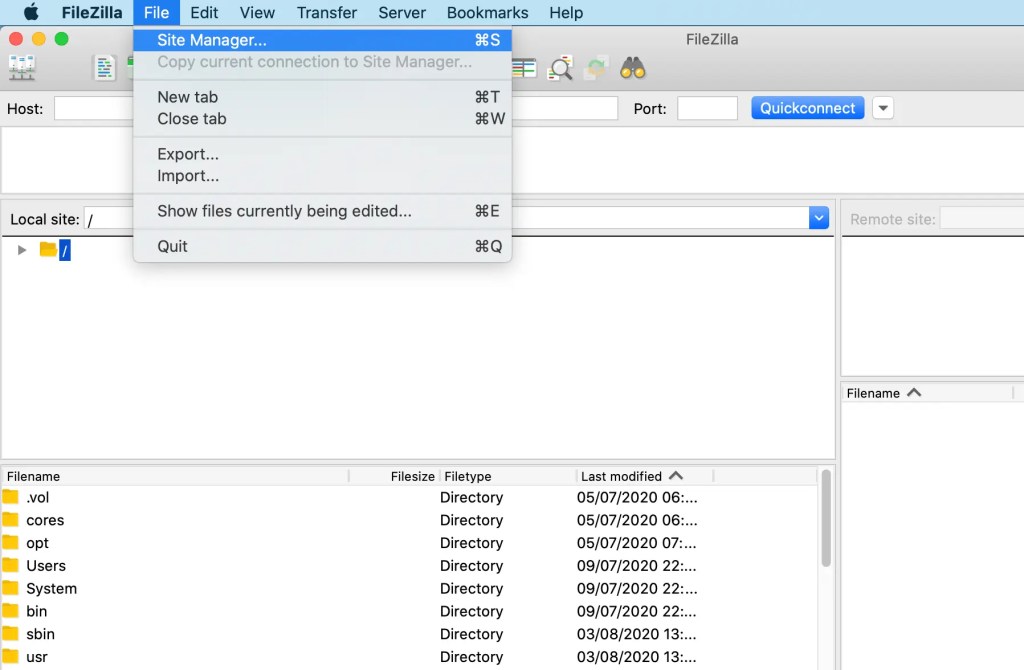
If you haven’t already, you can start by installing and launching the FileZilla client. Next, navigate to File > Site Manager:
Assuming that you’re connecting to this site for the first time, select New Site. You can then assign a name to this connection:
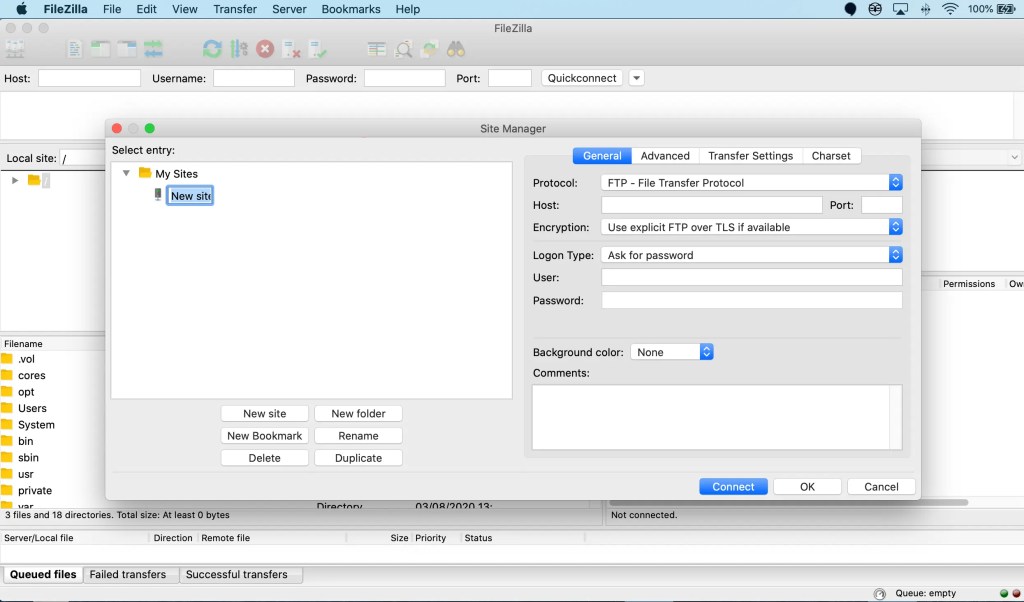
In the Host field, enter your website’s FTP address. For example, if your site’s URL is http://www.mywebsite.com, its FTP address will either be ftp://ftp.mywebsite.com or ftp://mywebsite.com.
For Port value, enter “21”. You can then open the Logon Type box and select Ask for password. Next, enter your FTP username and password, and then click on the Connect button.
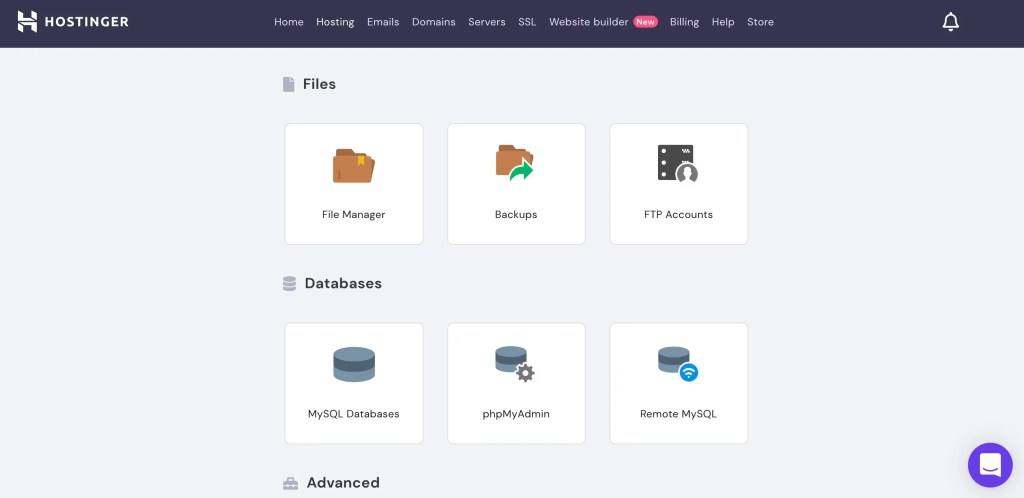
If you don’t know your FTP credentials, you can typically retrieve this information via the administration tool supplied by your hosting provider, such as cPanel:
If the connection is a success, after a few moments, your website’s files should appear in FileZilla’s right-hand window. In this panel, navigate to your site’s public_html directory:
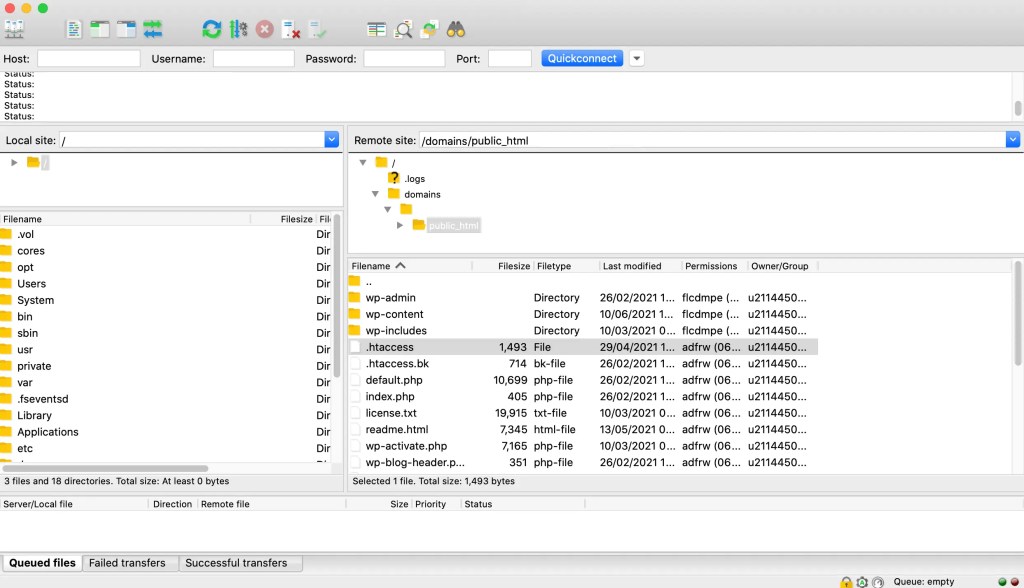
You can control-click the .htaccess file and select View/Edit. In the subsequent popup, choose the program that you want to use to edit your .htaccess file, such as a text editor. You now have free reign to edit this important configuration file.
Note: If you can’t find the .htaccess file, try going to Server > Force showing hidden files. Selecting this option should make it visible.
3. Use the Htaccess Editor PluginA plugin is a software component that adds specific features and functionality to your WordPress website. Esse… More
Alternatively, you can modify your .htaccess file using a WordPress plugin such as Htaccess Editor. This plugin makes it easy to edit the file, and can even test your changes for syntax errors. This makes Htaccess Editor a solid option if you want to edit WordPress’ default settings but are unfamiliar with FTP.
After installing and activating this plugin, navigate to Settings > WP Htaccess Editor. This plugin will now display a disclaimer. If you’re happy to proceed, click through to the editor:
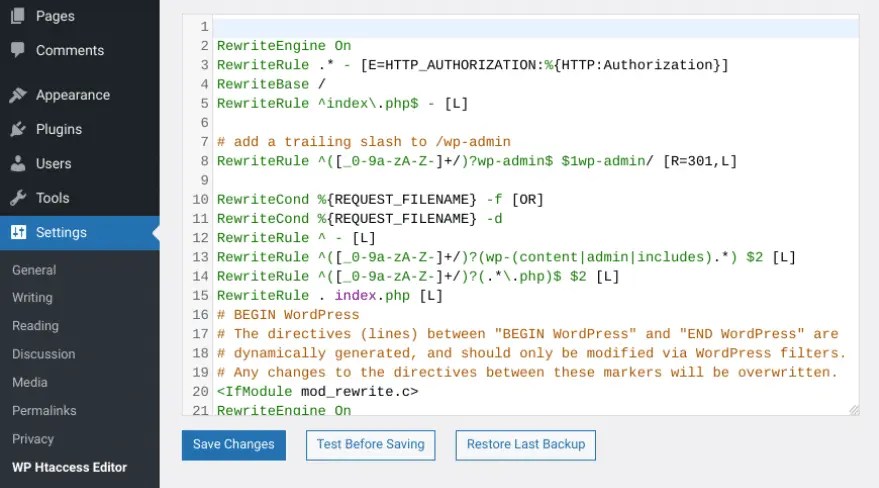
You now have access to your site’s configuration file. Once you’ve finished editing, we highly recommend testing your changes by clicking on the Test Before Saving button. If no errors are detected, you can go ahead and save your changes.
Be aware that this feature tests for syntax errors and cannot check the logic of your WordPress .htaccess file. Even if your edits pass with flying colors, there’s no guarantee you’ll get the desired results.
Why is the .htaccess file missing?
If you discover that the .htaccess file is missing from your WordPress site, it could stem from various causes. One common reason is that your web server settings might be configured to restrict the creation or alteration of this essential file, necessary for WordPress configurations. Moreover, clashes with specific plugins might hinder access to or removal of the .htaccess file. If you’ve attempted basic troubleshooting without success, it’s advisable to seek assistance from the support team of your WordPress hosting provider for further guidance and resolution.
Why can’t I find the .htaccess file on my WordPress site?
Are you having trouble finding the .htaccess file in your WordPress site? You’re not alone! It’s a common roadblock, especially for those new to WordPress. There are two main reasons why you might be struggling to locate it:
Firstly, it might be hidden. By default, the .htaccess file is tucked away in your website’s root directory, making it invisible. To make it visible, you’ll need to adjust your file manager or FTP client settings to display hidden files (dotfiles).
Secondly, it’s possible that the file doesn’t exist yet. If you haven’t set up pretty permalinksIn WordPress, a permalink is a permanent URL that points to a specific post or page on a website. It is the we… More or never had a reason to modify the file before, WordPress might not have created the .htaccess file automatically. In this case, it simply hasn’t been generated in your directory.
To overcome these hurdles, it’s essential to enable the visibility of hidden files in your file manager. Additionally, if the file is missing, saving your permalink settings in WordPress can prompt its creation. This not only solves the visibility issue but also ensures the file is available for modification or use, whether for troubleshooting or optimization purposes.
Where is my .htaccess file in WordPress?
The .htaccess file, though small, holds significant sway over your server’s behavior in tandem with your website. If you’re scratching your head trying to find it, here’s what you need to know:
Definition: Essentially, the .htaccess file serves as your server’s configuration guide, directing how it handles various functions on your site, like URL rewriting and redirection.
Location: You’ll typically spot the .htaccess file snugly nestled in the root directory of your WordPress installation, alongside other pivotal files like wp-config.php and index.php.
Accessing It: To lay eyes on it, you’ll need to journey into your site via FTP using a client like FileZilla or through your hosting account’s cPanel file manager.
Visibility Matters: The .htaccess file often lurks in the shadows as a hidden file by default, so don’t forget to unmask it by enabling the display of hidden files (dotfiles) in your FTP client or cPanel settings.
Crafting Your Own: If it’s nowhere to be found, fret not; you can forge one yourself by creating a new file christened ‘.htaccess’ in your root directory. Just ensure it’s formatted correctly to stave off any site snafus.
Remember, tampering with the .htaccess file sans proper knowledge can spell trouble, so always safeguard your site with a backup before diving into modifications.
Can We Use The .htaccess Plugin By Aubrey Poortwood for WordPress?
Delving into the potential of the .htaccess Plugin by Aubrey Poortwood for your WordPress site warrants a closer look at its features and usability:
Key Highlights:
- Fortified Security: The plugin fortifies your site’s defenses with a slew of security enhancements.
- Tailored Tweaks: Enjoy the freedom to fine-tune your .htaccess file directly from your WordPress admin panel, no coding acrobatics required.
- User-Friendly Interface: Designed with simplicity in mind, even those less tech-savvy can navigate it with ease.
User Insights: User feedback, exemplified by Miello’s positive experience, underscores the plugin’s efficacy in troubleshooting and streamlining site management tasks.
From the features highlighted and user testimonials, it seems the .htaccess Plugin by Aubrey Poortwood presents a compelling option for fortifying your WordPress site’s security and functionality. However, exercise caution and ensure compatibility with your current WordPress version and other plugins. Regular updates and reliable support are non-negotiables when integrating any plugin into your WordPress ecosystem.
Why Might The Web.config File Be Missing In A WordPress Site?
Wondering why the web.config file might be nowhere to be found in your WordPress site? Let’s unravel this mystery. It’s essential to grasp the context to understand why this happens. Typically, WordPress thrives on Linux servers with Apache as the web server, where the .htaccess file reigns supreme, managing everything from permalinks to site configurations. However, if you’ve opted for a Windows server with Internet Information Services (IIS), the playbook changes a bit—the web.config file takes the lead instead of .htaccess.
Here’s why that web.config might be playing hide-and-seek:
- Server Environment Differences: WordPress cozying up on a Windows server? It’s a whole new ball game. While the trusty .htaccess is a given in the Apache world, Windows servers demand a web.config file to dance to WordPress’s tune. It’s not bundled with the standard WordPress package because, well, it’s mostly expecting Apache as its wingman.
- Manual Configuration Required: Imagine migrating your WordPress site from Apache to IIS territory—suddenly, the web.config file vanishes into thin air. WordPress isn’t in the habit of conjuring up this file on its own when it’s hosted on an IIS-based server. You’ll have to take matters into your own hands and whip up one manually.
- Permalink Setup Issues: Messing with permalink structures sans the web.config file tailored for IIS can lead to a nightmare of 404 errors haunting your site. It’s the digital equivalent of losing your way in a maze because the signposts aren’t where they should be on a Windows server.
So, what’s the plan of action?
- Manually Add a web.config File: When you’re setting up camp on an IIS playground, don’t forget to bring your own web.config file. Whether it’s a migration or a fresh installation, this manual addition ensures that your URL rewrite rules are in order, just like .htaccess does for Apache.
- Verify Server Requirements: Before diving headfirst into the WordPress pool, do a quick server check. Make sure your setup aligns with the requirements of either Apache or IIS. It’s like checking your gear before embarking on an adventure—ensuring everything’s in place from the get-go.
In a nutshell, the absence of the web.config file in your WordPress setup boils down to server specifics. Understanding and catering to these nuances from the outset can save you from potential headaches down the road, ensuring your WordPress site thrives regardless of the server landscape it calls home.
How To Resolve Issues With The .htaccess File Affecting Website Elements?
Encountering problems with your website elements due to issues with the .htaccess file can be frustrating. However, with a systematic approach, you can resolve these issues and ensure that all your web pagesIn WordPress, a page is a content type that is used to create non-dynamic pages on a website. Pages are typica… More function smoothly.
Step 1: Confirm the Existence of Your .htaccess File
Firstly, verify if the .htaccess file exists on your server. This file is typically hidden and resides in the root directory of your website alongside your web files. If you’re using an FTP client like FileZilla, adjust the settings to display hidden files.
Step 2: Correct File Permissions
Incorrect file permissions can often be the culprit. Ensure that the .htaccess file permissions are set to 644, allowing the server to read and write to the file while keeping it inaccessible to the public. You can adjust this via an FTP client or using a command-line interface.
Step 3: Review and Edit Your .htaccess File
If issues persist, there may be errors or missing directives in your .htaccess file. Open the file with a plain text editor and ensure that it contains the correct configuration directives. Here are some common examples:
For enforcing SSL on all pages:

For WordPress sites:
Step 4: Debugging
If issues persist, consider temporarily removing other custom codes from the .htaccess file and testing with only the necessary directives. Reintroduce additional codes one at a time to identify any problematic code.
Step 5: Consult with Hosting Support
For users on hosting environments like Windows or Nginx, remember that the .htaccess file is specific to Apache servers and may not be applicable. In such cases, consult your hosting provider for alternative solutions.
Step 6: Clear Browser and Server Caches
After making changes, clear your browser cache and, if possible, your server cache to ensure that old cached data doesn’t interfere with your changes.
By following these steps diligently, you can effectively address most issues related to the .htaccess file affecting your website elements. Remember, careful editing and seeking guidance from documentation or support can help you navigate through common pitfalls associated with .htaccess configurations.
Do All WordPress Redirection Plugins Require Modifications To The .htaccess File?
When it comes to WordPress redirection plugins, there’s a common misconception that they all demand tweaks to the .htaccess file. But the truth is, it’s not a universal requirement. The necessity for .htaccess alterations hinges on the type of server hosting your WordPress site.
Understanding Server Types and Redirection:
For Apache Servers: Typically, Apache servers utilize .htaccess files, and certain WordPress redirection plugins tailored for this environment might indeed call for adjustments to these files for optimal performance.
For Nginx Servers: Conversely, if your website resides on an Nginx server, .htaccess files aren’t in the equation. Nginx handles redirection and other configurations differently, often through directives directly within the server blocks. Consequently, plugins on Nginx servers won’t involve any .htaccess file modifications simply because there isn’t one to deal with.
Key Insight: It’s important to note that not every WordPress redirection plugin mandates .htaccess file modifications. The need for .htaccess alterations is determined by the specific server type hosting your site. Understanding your hosting environment is crucial for selecting the right plugin and configuring it effectively to meet your site’s requirements.
How To Fix cPanel Login Issues?
Struggling with cPanel login troubles? It’s a common frustration, but fear not! Here’s a user-friendly guide to troubleshoot and fix those pesky cPanel login issues:
- Double-Check Your Credentials: First things first, ensure you’re typing in the correct username and password. Typos happen to the best of us, so take a moment to verify your login details before proceeding.
- Refresh Your Browser Cache: Sometimes, your browser holds onto outdated login information. Give it a refresh by clearing your cache and cookies. Then, give logging in another shot.
- Reset Your Password: If you’ve double-checked your credentials and still can’t get in, it might be time for a password reset. Look for the ‘Forgot your password?’ link on the cPanel login page and follow the prompts to reset.
- Investigate Server Status: Occasionally, login issues stem from server-side hiccups. Check in with your hosting provider or visit their status page to see if there are any reported server issues impacting cPanel access.
- Reach Out for Support: When all else fails, don’t hesitate to lean on your hosting provider’s support team. They’re equipped with the expertise and tools needed to dive deeper into the problem and get you back up and running.
By following these steps, you’ll hopefully breeze through those cPanel login woes and regain access in no time. Remember, your hosting provider’s support team is there to lend a hand whenever you need it, so don’t hesitate to reach out for assistance.
How To Change Permalinks in WordPress?
Are you eager to revamp your WordPress site’s permalink structure for better SEO performance? Look no further! Here’s a simple yet comprehensive guide to walk you through the process step by step.
Step-by-Step Guide to Update Your Permalinks:
- Log into Your WordPress DashboardIn WordPress, the Dashboard is a central hub for managing a website’s content and settings. It is the first sc… More: Kickstart the process by logging into your WordPress admin panel. This is your central hub for managing all aspects of your website.
- Navigate to Settings: Once inside the dashboard, spot the ‘Settings’ option nestled comfortably on the left sidebar. Give it a click to unveil more menuIn WordPress, a menu is a collection of links that are displayed as a navigation menu on a website. Menus are … More choices.
- Select ‘Permalinks’: Among the array of options under ‘Settings,’ locate and click on ‘Permalinks.’ This will lead you to the settings page dedicated to your URL structure.
- Choose Your Ideal Permalink Structure: Here’s where the fun begins! Explore various permalink structures like ‘Plain,’ ‘Day and Name,’ ‘Month and Name,’ ‘Numeric,’ ‘Post Name,’ and ‘Custom Structure.’ Opt for ‘Post Name’ for SEO-friendly URLs.
- Save Your Changes: Once you’ve settled on the perfect permalink structure, seal the deal by hitting the ‘Save Changes’ button at the bottom of the screen. Voilà! Your settings are updated and good to go.
Important Tips:
- Backup Your Site: Before diving into any changes, play it safe by backing up your website. This precaution ensures that you have a safety net to fall back on if things go awry.
- Avoid Excessive Changes: Constantly tinkering with your permalink structure can lead to broken links and wreak havoc on your site’s SEO. Exercise caution and make well-considered decisions about your URL setup.
By updating your permalinks in WordPress, you’re not just tweaking a setting; you’re enhancing how search engines and visitors perceive and interact with your website.
How Can I Handle The “404 Not Found nginx” Error on WordPress?
Dealing with the pesky “404 Not Found nginx” error on your WordPress site? It can be a real headache, but fret not! Here’s a handy guide to help you tackle this issue like a pro.
Step-by-Step Troubleshooting
Confirm .htaccess Presence: First things first, let’s make sure your site’s backbone, the .htaccess file, is in place. Use an FTP client like FileZilla to peek into your website’s root directory (usually public_html). If it’s AWOL, you’ll need to create one.
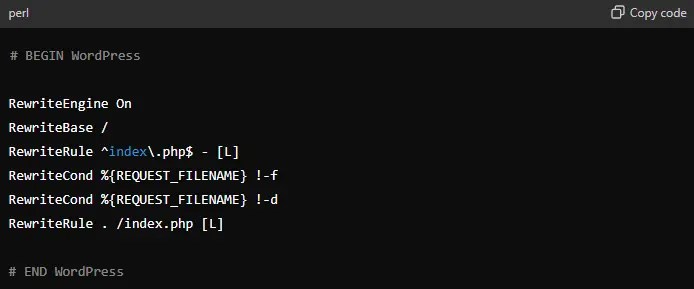
Craft a Fresh .htaccess File: No .htaccess file? No problem! Whip up a new one using a simple text editor (remember, no fancy formatting). Paste in the code snippet below, save it as ‘htaccess.txt’, then upload it to your root directory via FTP. Finally, rename it to ‘.htaccess’ sans any extra extensions like .txt.
Double-Check File Extensions: Ensure your file is named exactly as ‘.htaccess’ with no sneaky extensions like .htaccess.txt. On Mac systems, enabling file extensions in Finder can help confirm this.
Reset Permalinks: Head back to your WordPress admin dashboard, swing by Settings > Permalinks, and hit save without changing a thing. Sometimes, this little nudge can refresh the rules tucked away in the .htaccess file.
Clear Browser Cache: After all the tweaking, give your browser a spring clean by clearing its history and cache. This ensures it fetches the latest version of your site without any old hiccups.
Additional Tips
File Permissions: Peek into .htaccess’ closet and make sure it’s dressed in the right attire – file permissions set to 644. This lets the server read and write to the file while keeping prying eyes at bay.
Server Configuration: Still stuck? Your server might be playing hard to get with .htaccess files. Reach out to your hosting provider to ensure mod_rewrite is cozying up nicely on your server.
By following these steps, you should be able to bid farewell to the ‘404 Not Found nginx’ error on your WordPress site. Should the gremlins persist, don’t hesitate to call in reinforcements like professional web development services or your trusty hosting support team for a deeper dive into the issue.
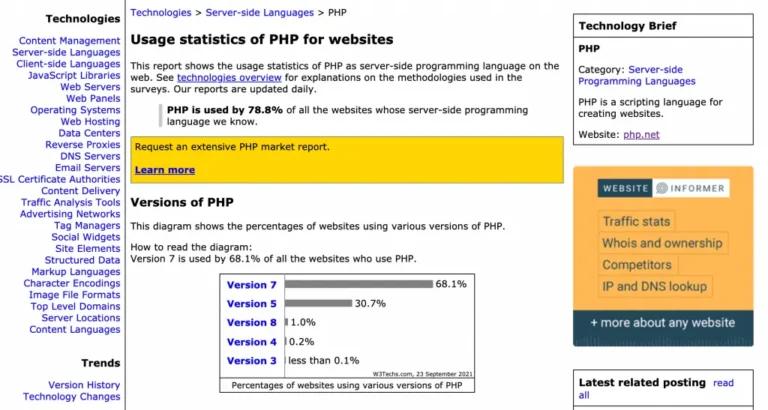
How Can I Resolve Issues After A PHP Version Update That Caused The Site To Go Down?
If your site has gone down unexpectedly after a PHP version update, fret not! There are practical steps you can take to bring it back online. Here’s a structured approach to identify and fix the problem:
- Inspect Error Logs: Begin by examining the error logs provided by your web host. These logs offer valuable insights into what’s gone wrong post-update. Look out for errors related to deprecated functions or incompatible plugins.
- Update Plugins and ThemesA WordPress theme is a set of files that determine the design and layout of a website. It controls everything … More: Outdated plugins or themes can often trigger PHP-related issues. Ensure all components of your site are up to date. Developers frequently release updates to ensure compatibility with the latest PHP versions, resolving many issues in the process.
- Consider Rolling Back PHP: If updating doesn’t resolve the issue, consider temporarily reverting to a previous PHP version. Most hosting control panels offer this option, allowing your site to operate while you delve deeper into troubleshooting.
- Seek Assistance from Your Hosting Provider: Some PHP issues may be unique to your hosting environment. Reach out to your hosting provider’s support team for expert assistance. They can provide valuable insights and potentially resolve server-side issues.
- Adjust Configuration Files: You might need to tweak settings in the ‘php.ini’ file, such as increasing memory limits. Only make changes if you’re comfortable with configuration files or seek assistance from a professional.
- Restore from Backups: As a last resort, restore your website from a backup created before the PHP update. This offers a clean slate to attempt updating PHP again or wait for a more stable release.
By following these steps, you can methodically tackle the challenges posed by a PHP version update and restore your website’s functionality with confidence.
Can I Delete Multiple .htaccess Files In Cpanel?
Wondering about handling multiple .htaccess files in your CPanel? Before you dive into deleting them, it’s important to proceed with caution. These files play a vital role in configuring specific behaviors within your website directories, and while they may seem similar, each could contain crucial configuration settings for different aspects of your site.
Here are some key steps to consider before hitting that delete button:
- Review Each File: Take the time to open and review each .htaccess file individually. These files often contain directives for URL redirects, security protocols, or performance optimization tailored to different parts of your website.
- Consult Your Hosting Provider: Before making any deletions, it’s wise to get advice from your hosting provider’s support team. They can provide insights specific to your hosting environment and confirm if any of the .htaccess files are essential for certain functionalities or security measures your host has implemented.
- Backup Your Files: Don’t forget to create backups of your .htaccess files before you delete them. This precaution ensures that if you accidentally remove something crucial, you can easily restore the original settings without causing any downtime or functionality issues for your website.
Deleting .htaccess files without understanding their purpose can result in unexpected website behavior or even downtime. It’s always better to be safe than sorry, so take the time to double-check and consult experts before making any modifications.
How Can I Solve The Issue Of Mistakenly Deleting The .htaccess File From Cpanel File Manager?
Accidentally deleting your .htaccess file via CPanel’s File Manager can send a shiver down your spine, but fear not! Here’s a user-friendly guide to tackle this issue head-on:
Step-by-Step Recovery Process:
- Check the Trash: First things first, head over to the Trash folder within your File Manager. If you haven’t emptied it yet, chances are your .htaccess file might still be hanging out there, waiting to be restored.
- Recreating the .htaccess File: If your file isn’t in the Trash or has been permanently deleted, it’s time to roll up your sleeves and recreate it manually. Here’s what you do:
- Navigate to your CPanel’s File Manager.
- Locate the directory where your .htaccess file used to reside.
- Create a fresh file named ‘.htaccess’ in that directory.
- Now, open the file and insert the necessary .htaccess code tailored to your website’s unique requirements.
- Using a Backup: If you’ve been diligent about backups, you’re in luck! Access the “Backup” section in your CPanel, and choose the date prior to the unfortunate deletion. Follow the prompts, and presto! Your settings will be restored.
Additional Tips:
- Consult Technical Support: Feeling a bit lost in the coding wilderness? Reach out to your hosting provider’s technical support team. They’re pros at this stuff and can either offer standard .htaccess code or help craft custom rules for your site.
- Regular Backups: Don’t skip this step! Maintaining regular backups of your website is like having a safety net. It ensures you can bounce back from incidents like this with minimal stress and hassle.
By following these simple steps and tips, you’ll be back on track in no time, ensuring your website stays secure and functions smoothly without any hiccups.
How Can I learn More Ways To Troubleshoot WordPress Errors?
Looking to expand your knowledge on troubleshooting WordPress errors? Dealing with errors, especially with files like .htaccess, is par for the course when working with WordPress. If you find yourself grappling with editing or creating this file due to server restrictions or plugin conflicts, it’s essential to explore your options to effectively manage your website.
Here’s how you can enhance your WordPress troubleshooting skills:
- Understand Server Restrictions: Your web server’s settings may sometimes hinder changes to crucial files like .htaccess. Get familiar with your server’s configuration by referring to your hosting provider’s documentation or reaching out to their support team for assistance.
- Check for Plugin Interference: Plugins can occasionally clash with file management tasks. Try disabling plugins temporarily to see if this resolves the issue with editing the .htaccess file. Remember to back up your site before making any changes to avoid potential data loss.
- Contact Support: If you’re still encountering difficulties after trying the above steps, don’t hesitate to contact your hosting provider’s support team. They can offer tailored guidance based on their server environment, helping you troubleshoot the issue effectively.
- Educate Yourself Further: To minimize downtime and improve your problem-solving skills, delve deeper into WordPress troubleshooting techniques. Explore online guides, tutorials, and forums where seasoned users share valuable insights and solutions.
By increasing your understanding of WordPress functionality and how to address common errors, you’ll be better equipped to tackle challenges efficiently, saving time and frustration along the way. Remember, every problem you solve adds to your expertise in managing your website effectively.
Encountering issues with your .htaccess file can be quite frustrating. If you’ve exhausted all basic troubleshooting steps to no avail, it’s time to enlist the help of your hosting provider’s support team.
Here’s a simple guide to get the support you need:
- Gather Your Details: Before reaching out, make sure you have all the relevant information about the problem at hand. This includes any error messages you’ve encountered and the steps you’ve already taken to resolve the issue.
- Find Contact Options: Head over to your hosting provider’s website and navigate to the ‘Support’ or ‘Help’ section. This is where you’ll typically find contact forms, email addresses, or phone numbers to reach their support team.
- Consult Guides: Take a look to see if your hosting provider offers any specific guides on how to request support. These resources can provide valuable information to help streamline the process.
- Submit a Support Request: Choose the most appropriate contact method and clearly outline the issue you’re facing. Providing all the necessary details upfront can help expedite the resolution process and minimize back-and-forth communication.
If you’re seeking more in-depth guidance on effectively communicating with technical support, consider exploring online resources that offer tips and insights. These resources can empower you to navigate support interactions more effectively, ensuring you receive prompt and efficient assistance.
What Should I Do If The .htaccess File Doesn’t Exist On My WordPress Site?
If you find your WordPress site lacking the .htaccess file, fret not! You can fix this hiccup with just a few simple steps. Here’s your game plan:
Step 1: Automatic Attempt Head over to your WordPress dashboard and swing by Settings, then Permalinks. Hit the ‘Save Changes’ button—no need to alter your current permalink settings. This little action prompts WordPress to give creating a new .htslash file a whirl.
Step 2: Check for WordPress Cues After the automatic attempt, keep an eye out for notifications. Sometimes, WordPress might hit a roadblock due to permissions. If you spot a message saying the .htaccess file isn’t writable, it’s time for a hands-on approach.
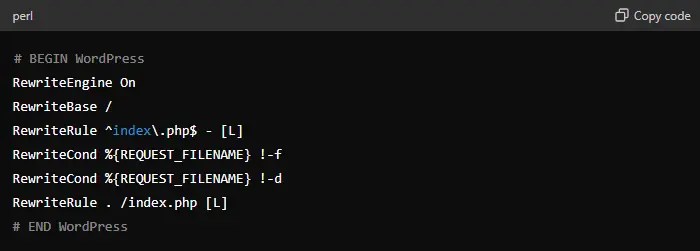
Step 3: DIY .htaccess For a manual touch, crack open a simple text editor like Notepad. Input the essential code that fine-tunes your site’s URL rewriting mojo. You’ll typically need to enable the rewrite engine, set the rewrite base, and define conditions for URL rewriting.
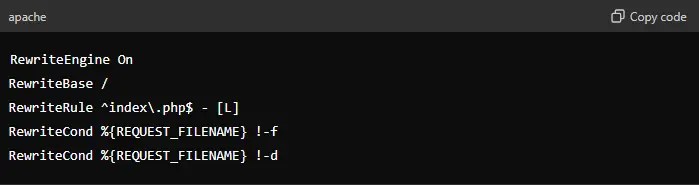
Swap out the RewriteBase value with your WordPress installation’s directory path if it’s chilling in a subdirectory.
Step 4: File Upload Once your .htaccess file is all dressed up, save it to your desktop. Then, summon an FTP client to cozy up with your website’s server. Zip over to the root directory of your WordPress setup, where the usual suspects like wp-config.php hang out, and deposit your freshly baked .htaccess file.
Step 5: Permission Check If gremlins rear their heads during the upload, it might mean tweaking file permissions. Shuffle over to the root directory of your WordPress installation via FTP, locate the public_html folder, and grant it the ‘755’ permissions tagIn WordPress, tags are a taxonomy used to classify and organize posts. They are similar to categories, but unl… More to let the server scribble on the file properly.
Final Check With your upload in the bag, circle back to your WordPress dashboard, swing by Settings > Permalinks, and hit ‘Save Changes’ once more. This should ensure everything’s humming along smoothly.
By sticking to these steps, you’ll have your .htaccess file up and running on your WordPress site in no time. For extra flair and security tweaks, feel free to dive into more .htaccess configurations.
How Can I Show Hidden Files In My FTP or File Manager?
Want to uncover hidden files in your FTP or File Manager? Here’s how you can do it seamlessly across different platforms and software:
For FTP Clients: Using FileZilla:
- Open FileZilla and connect to your server.
- Navigate to the ‘Server’ dropdown menu.
- Click on ‘Force showing hidden files’.
- Voila! Your hidden files, like .htaccess files, should now be visible.
For Other FTP Clients:
- Open your FTP client and connect to your hosting server.
- Look for settings or preferences in the menu.
- Find the ‘Show hidden files’ option and enable it.
- Once enabled, your FTP client will reveal hidden files.
For File Manager in Web Hosting Control Panels: For cPanel Users:
- Log into your cPanel.
- Open the File Manager.
- Click on the ‘Settings’ button in the upper right corner.
- In the pop-up window, ensure the ‘Show Hidden Files (dotfiles)’ option is checked.
- Save the changes, and hidden files will now be visible in your File Manager.
These simple steps empower you to effortlessly uncover hidden files in both FTP clients and hosting File Managers. Remember, the key is to locate the specific setting that enables the display of hidden files, which may vary slightly depending on the interface or software version you’re using.
Conclusion
The .htaccess file can be the key to boosting your site’s performance and security while preserving your hard-won SEO. However, this important file can be tricky to find.
In conclusion, mastering the art of locating and editing your WordPress .htaccess file can greatly empower you in managing your website’s security, performance, and functionality. By following the steps outlined in this guide, you now have the tools and knowledge to access and modify this critical file with confidence. Remember, while editing the .htaccess file can yield significant benefits, it’s essential to proceed with caution and always create a backup before making any changes. With these skills at your disposal, you’re better equipped to navigate the intricacies of WordPress and ensure your website operates at its full potential. Happy editing!
Do you have any questions about editing this important WordPress file? Let us know in the commentsComments are a feature of WordPress that allow users to engage in discussions about the content of a website. … More section below!
If you’re looking for fast wordpress hosting as well as done-for-you updates such as locating and editing your WordPress .htaccess file, check out our hosting packages by clicking the button below:
![How to Remove Tagline in WordPress [A Step-by-Step Guide]](https://codingheros.com/wp-content/webp-express/webp-images/uploads/2024/12/how-to-remove-tagline-in-wordpress-a-step-by-step-guide.png.webp)