If you’re managing a website or domain, understanding how to update NS records is crucial. NS (Name Server) records are essential for directing web traffic to the correct server. This tutorial will walk you through the steps to update your NS records, how to handle DNS settings, and troubleshoot common issues. Whether you’re changing your web hosting provider, moving to a new DNS management service, or ensuring optimal website performance, this guide covers everything you need to know.
What Are NS Records?
Before diving into the process of updating NS records, it’s essential to understand what they are. NS (Name Server) records are part of the Domain Name System (DNS). Their main job is to tell the internet where to find the DNS server that is responsible for your domain. Essentially, NS records direct traffic to the correct location based on your domain name.
For example, when you type in a website’s URL, NS records help resolve that domain name to the correct IP addressAn IP Address (Internet Protocol Address) is a unique numerical identifier assigned to every device connected … More so the browser can load the website.
Why Do You Need to Update NS Records?
There are several scenarios where you might need to update your NS records:
- Switching Hosting Providers: When you change your hosting company, your new hosting provider will likely give you new NS records.
- Changing DNS Management Providers: You may want to update your NS records to use a different DNS service (like Cloudflare or Google DNS) for improved performance and security.
- Migrating to a New Domain Registrar: If you’re transferring your domain to another registrar, you’ll need to update your NS records to point to your new registrar’s DNS servers.
- Improving Website Performance or Security: Some DNS providers offer enhanced DNS security (like DNSSEC) or better website performance with CDNs (Content Delivery Networks). In such cases, updating NS records is essential.

Step-by-Step Tutorial: How to Update NS Records
Now, let’s get into the detailed tutorial on how to update NS records on your domain registrar’s platform. This process may vary slightly depending on your registrar, but the general steps remain the same.
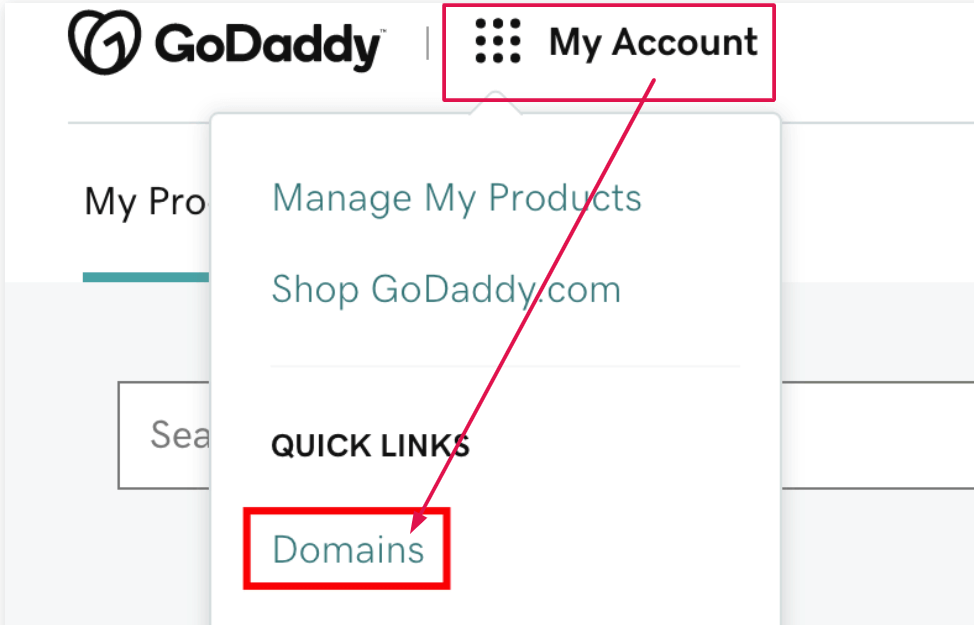
Step 1: Log into Your Domain Registrar Account
To update NS records on your registrar, first, you need to log into your account with your domain provider. Popular registrars include:
- GoDaddy
- Namecheap
- Bluehost
- Google Domains

Once logged in, navigate to the DNS management section or domain settings of the domain you want to update.
Step 2: Find Your Domain’s DNS Settings
After logging in, locate the DNS management pageIn WordPress, a page is a content type that is used to create non-dynamic pages on a website. Pages are typica… More for the domain you want to manage. This is usually under a menuIn WordPress, a menu is a collection of links that are displayed as a navigation menu on a website. Menus are … More like “My Domains,” “Domain Settings,” or “DNS Settings.” You’ll find an option to manage your DNS records.
Step 3: Locate the Current NS Records
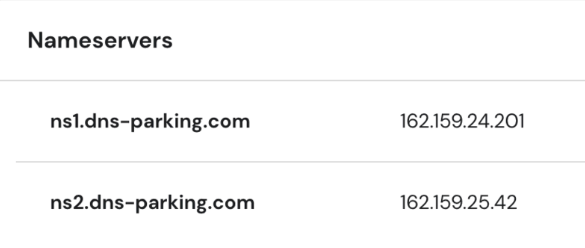
Once in the DNS management section, look for your current NS records. These are typically listed as something like:
ns1.example.comns2.example.com
Make sure to note the existing records if you plan on reverting changes later.
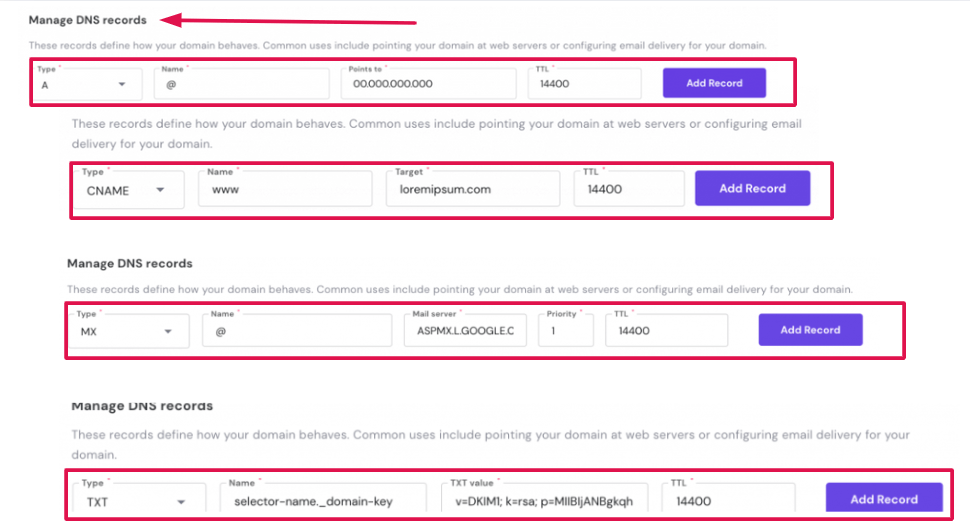
Step 4: Update DNS Records (if necessary)
If you’re also changing DNS settings (such as A records, MX records, or CNAME records), this is where you would update them. However, if you only need to update the NS records, you can skip to the next step.
For example, to update A records (the record that maps a domain to an IP address) or MX records (which control email routing), you can modify or add new records. This step is useful if you’re switching web hosting or email providers and need to update multiple DNS settings.
Step 5: Add or Update the New NS Records
To update the NS records, follow these steps:
- Enter the new nameservers provided by your new hosting provider, DNS management service, or registrar. These might look like:
ns1.newhost.comns2.newhost.com
- Delete old NS records (if necessary), especially if you’re transferring to a different DNS provider or web hosting company. Be cautious to avoid removing important records by mistake.
- Save the changes to update your NS records.
Step 6: Save Changes and Confirm Update
After adding the correct NS records, make sure to save your changes. Most domain registrars will ask you to confirm before applying the update. Once saved, the DNS records will propagate across the internet. Keep in mind that DNS propagation can take anywhere from a few minutes to 48 hours.
Troubleshooting Common NS Record Issues
Sometimes, even after you update your NS records, issues may arise. Here’s how to troubleshoot:
DNS Propagation Delay
After updating NS records, you might not see the changes immediately. This is because DNS propagation takes time as the new nameservers are updated across the internet. This can take anywhere from a few hours to up to 48 hours. During this time, some visitors may see the old site, while others will be directed to the new one.
Incorrect or Missing NS Records
If your website isn’t resolving or showing an error after updating your NS records, double-check for typographical errors or incorrect nameserver entries. Even a small mistake can prevent your site from loading properly. Make sure you enter the full nameserver information as provided by your hosting or DNS service.
Site Not Resolving After NS Update
If your site is not loading after NS changes, it’s likely due to DNS misconfiguration. Here are some steps you can take:
- Clear your browser’s DNS cache: Sometimes, your browser may be using old cached DNS information.
- Flush the DNS cache on your device: This ensures your device is using the latest DNS data.
- Check the DNS settings: Ensure the correct A records and MX records are configured.
DNSSEC and Security Issues
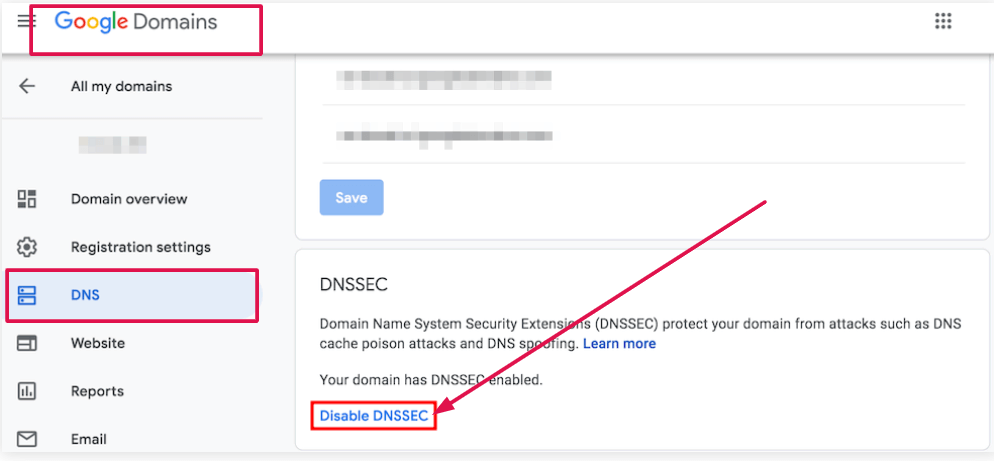
If you’re using DNSSEC (Domain Name System Security Extensions), ensure that you’ve updated the NS records with the correct DNSSEC settings. Incorrect configuration can cause your website to be inaccessible.
Best Practices for Managing NS Records
Once you’ve updated your NS records, it’s essential to follow best practices to ensure smooth operation:
1. Keep NS Records Consistent
Consistency is key when managing nameservers across different domains. Ensure that your NS records are the same across all domains you manage. This prevents confusion and potential issues.
2. Monitor NS Records Regularly
Regularly checking your NS records ensures that no unexpected changes have occurred. It’s also good practice to monitor your DNS settings, especially if you’re using a third-party DNS service.
3. Backup Your DNS Settings
Before making any changes to NS records or other DNS settings, consider backing up your current configuration. This way, you can restore your previous settings if anything goes wrong.
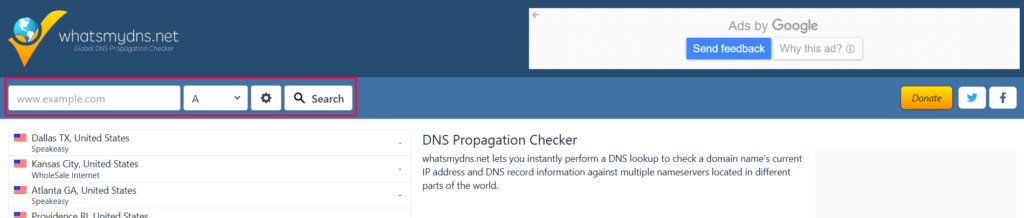
4. Use DNS Monitoring Tools
Several online tools, like DNSstuff or WhatsMyDNS, allow you to monitor your NS records. These tools help you check if your DNS records are updated globally and functioning as expected.
How NS Records Affect SEO
The NS records play a significant role in the performance and availability of your website, which directly impacts SEO. Here’s how:
- Website Load Speed: If your NS records are not updated correctly, your website might experience downtime or slower loading times, which can negatively affect SEO.
- Minimize Downtime During Changes: If there’s any downtime during the NS record change, it can lead to search engine crawlers not being able to access your website, causing a potential drop in rankings.
- Performance and Security Improvements: Using DNS providers with CDNs or DNSSEC can improve website speed and security, which are factors search engines consider when ranking websites.
Managing DNS Settings on Another Platform
If you’re using a third-party DNS service (such as Cloudflare, Google DNS, or others), you’ll need to configure your DNS records separately from your domain registrar. This section walks you through the process of managing your DNS settings when using an external platform:
Log into Your DNS Management Platform
Log into your external DNS management platform.
Update DNS Records
On your DNS platform, add or modify DNS records (like A records, CNAME, MX records, etc.) as needed for your website or email services.
Verify DNS Settings
Double-check all your DNS settings to ensure that they are configured correctly.
Link Your DNS Platform to Your Registrar
Once your DNS settings are ready, make sure your registrar’s NS records point to the DNS platform you’ve set up. For example, if you’re using Cloudflare, ensure the nameservers provided by Cloudflare are correctly entered in the NS record section of your domain registrar.
After these steps, your domain will begin pointing to the external DNS service, and the DNS records will be managed there.
Conclusion
Updating your NS records is a crucial step in managing your website’s DNS settings. Whether you’re switching hosting providers, moving to a new DNS management service, or improving security, ensuring your NS records are updated properly is vital for your website’s functionality and SEO performance. By following the steps in this guide, you can easily update your NS records, troubleshoot common issues, and follow best practices for managing DNS settings.
If you haven’t already, take a moment to check your NS records to ensure they’re accurate and up to date. Your website’s performance and SEO ranking may depend on it!
When you need to update NS records, it’s crucial to make sure the changes are done correctly to ensure your website runs smoothly and your SEO rankings stay intact. By managing your DNS settings properly, you ensure faster load times, better security, and enhanced performance.
If you’re looking for fast WordPress hosting as well as done-for-you updates, check out our hosting packages by clicking the button below. Let us handle the technical details so you can focus on what matters—growing your website!


